The kitchen was quiet except for the hum of the refrigerator and the soft thud of the back door closing behind me. It was late October, the kind of evening where the air turns sharp and the last of the daylight fades before you’re ready to let it go. I had just come in from the garden, hands cold, and the only thing I wanted was something sweet that didn’t require turning on the oven. Not because I was tired of baking—I never get tired of that—but because the house already felt warm enough. I wanted something that felt like fall but didn’t announce itself with heat and fanfare. Something cool, creamy, and quiet.
That’s how these Creamy No-Bake Pumpkin Pie Icebox Bars came to be. I wasn’t trying to reinvent the wheel. I just had a can of pumpkin puree sitting on the counter, a box of graham crackers in the pantry, and a craving for that spiced, velvety flavor that only pumpkin can deliver. I wanted the taste of a holiday pie without the rolling pin, the blind baking, or the wait. (Honestly, who has the patience for a full pie crust on a Tuesday night?)
I pulled out a mixing bowl, and within fifteen minutes, this dessert was chilling in the fridge, doing all the work while I curled up with a mug of tea. The next day, I cut into a pan of the most luscious, creamy pumpkin bars I had ever tasted. The filling was silky, the crust had that buttery snap, and the whole thing tasted like Thanksgiving in a single bite—minus the stress. These bars have since become my go-to for fall gatherings, lazy weekends, and those moments when you just need a little something special without the fuss. Trust me, once you try them, you’ll understand why they stick.
Why You’ll Love This Recipe
I’ve tested this recipe more times than I care to count, and each time, I fall a little more in love with it. These Creamy No-Bake Pumpkin Pie Icebox Bars are the kind of dessert that makes you look like a hero with almost zero effort. Here’s why they work so well:
- No Oven Required: Seriously. No baking, no preheating, no standing over a hot stove. This is a true no-bake dessert that comes together in about 15 minutes of active time.
- Simple Ingredients: You probably have most of these in your kitchen right now. No fancy extracts, no hard-to-find spices, no trips to a specialty store.
- Perfect for Fall Gatherings: Whether it’s a Friendsgiving, a Halloween party, or just a cozy Sunday dinner, these bars fit right in. They’re easy to transport and slice beautifully.
- Crowd-Pleaser: I’ve served these to pumpkin lovers and pumpkin skeptics alike, and they always disappear. The creamy texture and balanced spice blend win everyone over.
- Make-Ahead Magic: These bars need time to set in the fridge, which means you can make them a day or two in advance. One less thing to worry about when you’re hosting.
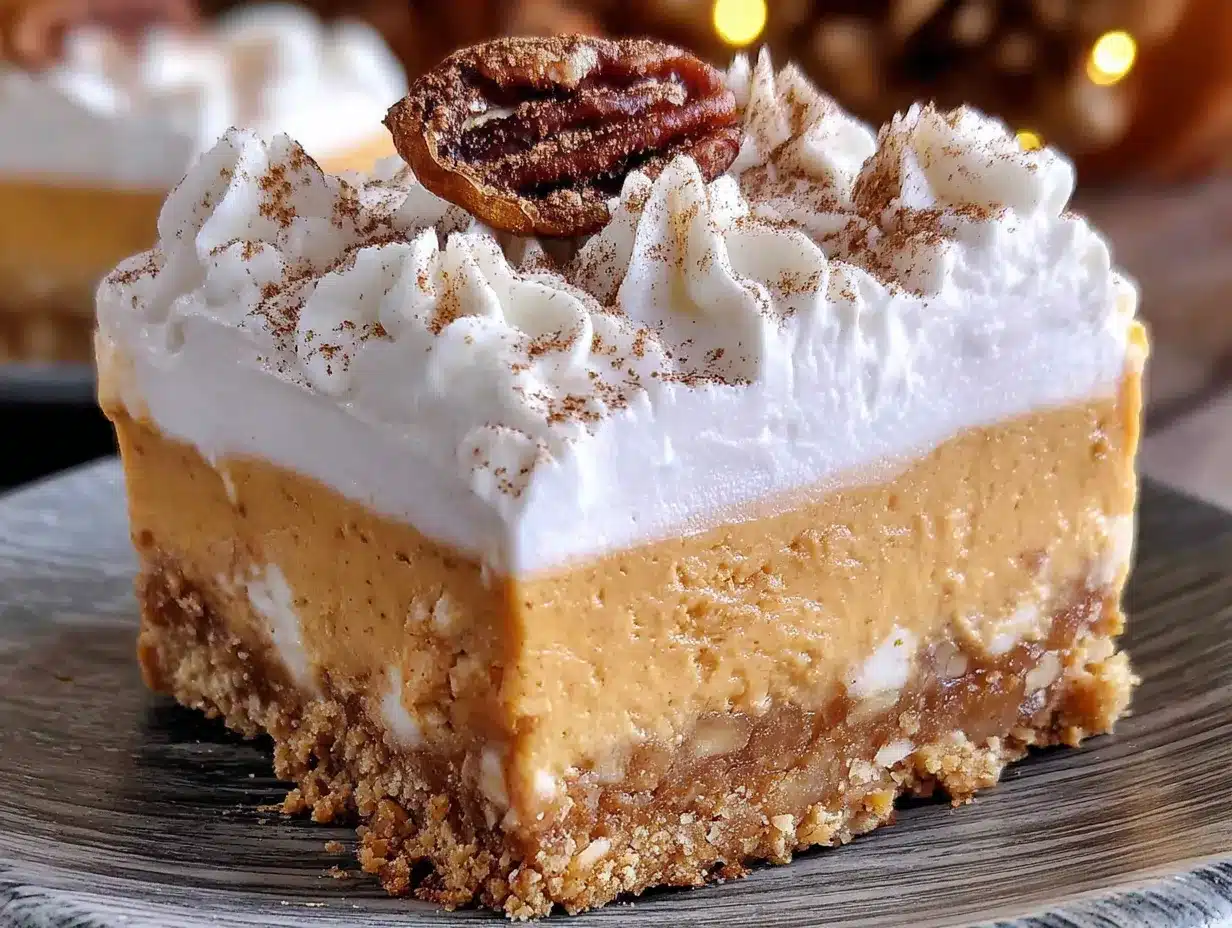
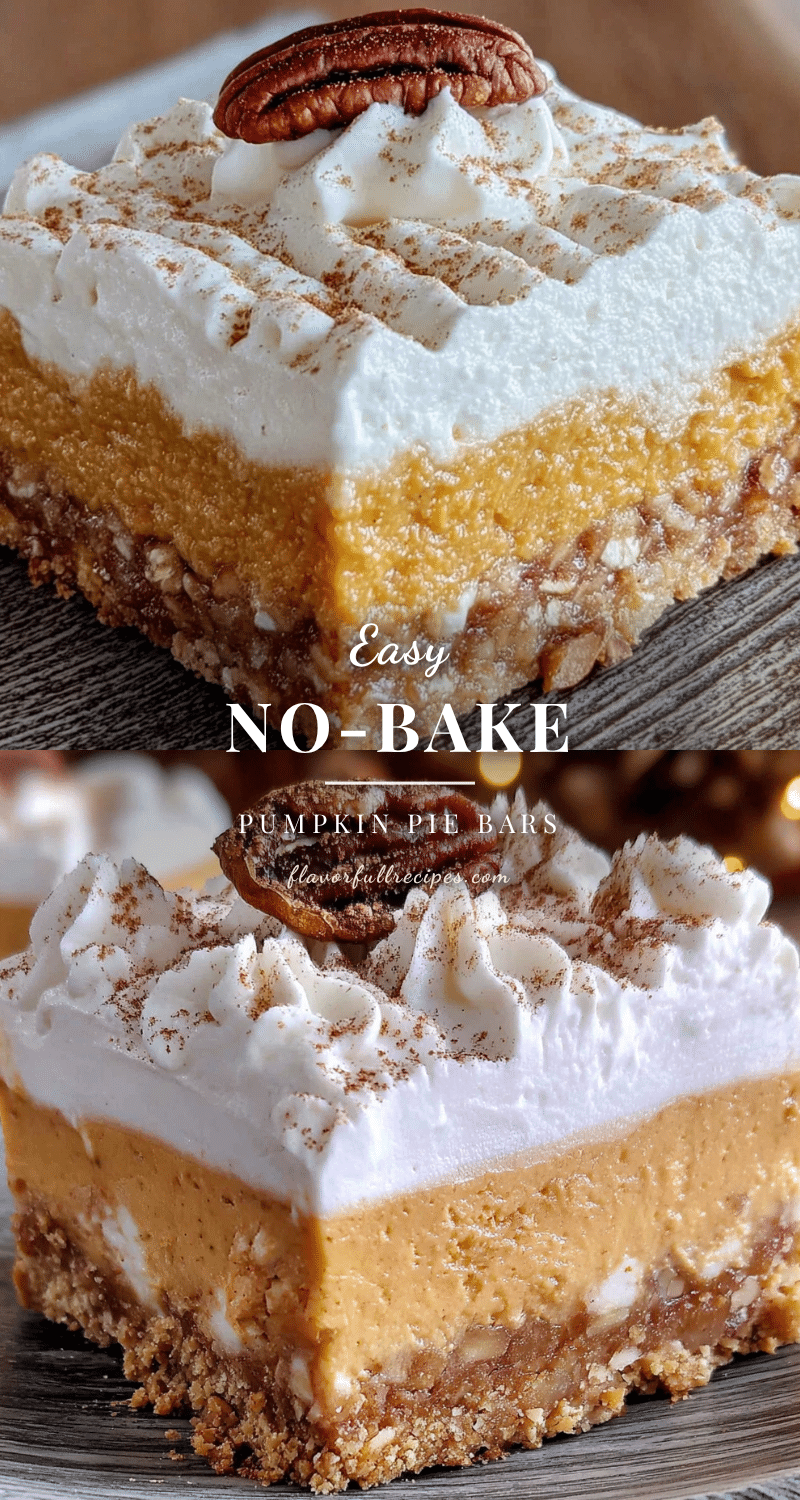
What makes this recipe different from the rest? It’s the texture. I use a combination of cream cheese and heavy cream to create a filling that’s rich without being heavy, and smooth without being dense. The crust is a simple mixture of graham cracker crumbs and melted butter, pressed into the pan and chilled until firm. No complicated layering, no gelatin, no weird shortcuts. It’s just honest, delicious pumpkin pie flavor in bar form.
This is comfort food reimagined—easier, faster, and every bit as satisfying as the original. It’s the kind of dessert that makes you close your eyes after the first bite, not because it’s fancy, but because it tastes like home.
What Ingredients You Will Need
This recipe uses simple, wholesome ingredients to deliver that classic pumpkin pie flavor without the fuss. Most of these are pantry staples, especially if you do any fall baking. I’ve tested several variations, so I’ll also share a few notes on what works best and what you can swap if needed.
For the Crust
- Graham cracker crumbs (2 cups / about 16 full sheets) – You can buy pre-crushed crumbs or crush your own in a food processor or zip-top bag. I prefer the texture of homemade crumbs, but store-bought works just fine.
- Granulated sugar (1/4 cup / 50g) – Just enough to sweeten the crust without making it candy-like.
- Unsalted butter (1/2 cup / 1 stick, melted) – Use real butter here. Margarine or coconut oil will change the texture and flavor. I’ve tested this with salted butter too, and it works, but you might want to reduce the added salt slightly.
- Pinch of salt – Balances the sweetness and enhances the buttery flavor.
For the Pumpkin Filling
- Cream cheese (8 oz / 226g, softened) – Full-fat is best for that luscious, creamy texture. Low-fat cream cheese will work, but the filling won’t be as rich. Let it sit out for about 30 minutes before mixing so it blends smoothly.
- Pumpkin puree (1 1/2 cups / about 1 15-oz can) – Make sure you’re using pure pumpkin puree, not pumpkin pie filling. The pie filling already has sugar and spices, which will throw off the balance. I usually go with Libby’s, but any brand works.
- Powdered sugar (1 cup / 120g) – Dissolves easily into the cream cheese, giving the filling a silky sweetness without any grittiness.
- Heavy cream (1/2 cup / 120ml) – This is what makes the filling light and airy. You can whip it separately and fold it in, or add it directly to the mixer for a slightly denser texture. I prefer whipping it first for maximum fluffiness.
- Vanilla extract (1 teaspoon) – Adds warmth and depth. Pure vanilla extract is worth the splurge here.
- Pumpkin pie spice (2 teaspoons) – You can use store-bought or make your own with cinnamon, nutmeg, ginger, and cloves. I always make my own because I like to control the balance. (More cinnamon, less clove—that’s my rule.)
- Ground cinnamon (1/2 teaspoon) – Because you can never have too much cinnamon in a pumpkin dessert.
For the Topping (Optional but Recommended)
- Whipped cream (1 cup / 240ml) – Homemade is best, but store-bought works in a pinch. I like to sweeten mine with a tablespoon of powdered sugar and a splash of vanilla.
- Caramel sauce (for drizzling) – Store-bought or homemade. I’ve been known to use the jarred stuff when I’m short on time, and it’s still delicious.
- Crushed graham crackers or candied pecans (for garnish) – Adds a nice crunch and makes the bars look extra special.
Equipment Needed
You don’t need much to make these bars, which is part of their charm. Here’s what I use:
- 9×9-inch baking pan – An 8×8-inch pan works too, but the bars will be slightly thicker. If you use a smaller pan, you might have a little extra crust mixture left over.
- Parchment paper – Lining the pan makes lifting the bars out so much easier. Leave a little overhang on two sides to create handles.
- Food processor or zip-top bag and rolling pin – For crushing the graham crackers. I’ve done both, and the food processor is faster, but the bag method is oddly satisfying.
- Electric hand mixer or stand mixer – You’ll need this to beat the cream cheese and cream until smooth and fluffy. A whisk and some elbow grease work too, but it’s a lot of effort.
- Mixing bowls (medium and large) – One for the crust, one for the filling.
- Spatula – For spreading the filling evenly. A rubber spatula is best.
- Measuring cups and spoons – Accuracy matters, especially with the spices.
If you don’t have a 9×9-inch pan, a 9×13-inch pan will work for thinner bars—just reduce the chilling time slightly. And if you’re really in a pinch, you can use a pie dish instead. The bars won’t be as neat, but they’ll taste just as good.
Preparation Method
Alright, let’s get to the good part. This recipe is almost embarrassingly easy, but I’ll walk you through every step so you get perfect results every time.
Step 1: Prepare the pan. Line your 9×9-inch baking pan with parchment paper, leaving about 2 inches of overhang on two opposite sides. This will help you lift the bars out later. If you don’t have parchment, you can lightly grease the pan with butter or non-stick spray, but the parchment method is foolproof.
Step 2: Make the crust. In a medium bowl, combine 2 cups of graham cracker crumbs, 1/4 cup of granulated sugar, and a pinch of salt. Pour in 1/2 cup of melted unsalted butter and stir with a fork until the mixture looks like wet sand and holds together when pressed. Don’t overmix—you just want everything evenly moistened.
Step 3: Press the crust into the pan. Transfer the crumb mixture to your prepared pan and press it down firmly and evenly. I use the bottom of a flat measuring cup for this—it gives you a nice, even surface. Make sure to press into the corners. Pop the pan into the refrigerator to chill while you make the filling. This gives the crust a chance to set.
Step 4: Whip the cream. In a large mixing bowl (or the bowl of your stand mixer), pour in 1/2 cup of cold heavy cream. Beat on medium-high speed until soft peaks form. This takes about 2-3 minutes with an electric mixer. You’ll know it’s ready when the cream holds its shape when you lift the beaters, but it’s still soft and pillowy. Set the whipped cream aside in the refrigerator while you prepare the cream cheese mixture.
Step 5: Beat the cream cheese. In another large bowl, beat the softened 8 oz of cream cheese with an electric mixer on medium speed until it’s smooth and creamy—about 1 minute. Scrape down the sides of the bowl with a spatula.
Step 6: Add the pumpkin and sugar. Add 1 1/2 cups of pumpkin puree, 1 cup of powdered sugar, 1 teaspoon of vanilla extract, 2 teaspoons of pumpkin pie spice, and 1/2 teaspoon of ground cinnamon to the cream cheese. Beat on low speed until combined, then increase to medium and beat for another 30 seconds until the mixture is smooth and uniform. Scrape the bowl again to make sure everything is incorporated.
Step 7: Fold in the whipped cream. Take the whipped cream out of the fridge. Using a rubber spatula, gently fold about one-third of the whipped cream into the pumpkin mixture to lighten it. Then add the remaining whipped cream and fold until no white streaks remain. Be gentle here—you want to keep as much air in the mixture as possible for that light, mousse-like texture.
Step 8: Assemble the bars. Remove the crust from the refrigerator. Spoon the pumpkin filling over the crust and spread it evenly with your spatula. Give the pan a gentle tap on the counter to release any air bubbles.
Step 9: Chill. Cover the pan with plastic wrap or aluminum foil and refrigerate for at least 6 hours, but preferably overnight. I know the wait is hard, but this is where the magic happens. The filling needs time to set so you can cut clean slices.
Step 10: Slice and serve. Once the bars are fully chilled and firm, lift them out of the pan using the parchment overhang. Place them on a cutting board and use a sharp knife to slice into squares. For clean cuts, wipe the knife between slices. Serve with a dollop of whipped cream, a drizzle of caramel sauce, and a sprinkle of crushed graham crackers or candied pecans.
Cooking Tips & Techniques
I’ve made these bars more times than I can count, and I’ve learned a few things along the way. Here are my best tips for getting perfect results every time.
Don’t skip the chilling time. I know it’s tempting to rush this step, but if you slice the bars too early, they’ll be a gooey mess. Six hours is the absolute minimum, but overnight is best. The filling needs time to firm up so it holds its shape.
Use room temperature cream cheese. Cold cream cheese will give you lumpy filling. Let it sit on the counter for about 30 minutes before you start. If you forget, you can microwave it in 10-second bursts, but be careful not to melt it.
Whip the cream separately. I’ve tried adding the heavy cream directly to the pumpkin mixture, and the texture just isn’t the same. Whipping it first and folding it in gives you that light, airy texture that makes these bars so special.
Press the crust firmly. A loose crust will crumble when you try to slice the bars. Use the bottom of a glass or measuring cup to press it down evenly. Don’t be shy—really pack it in.
Adjust the spices to your taste. The spice blend I’ve given here is a good starting point, but feel free to tweak it. If you love ginger, add an extra 1/4 teaspoon. If you’re not a fan of clove, leave it out. This is your dessert, after all.
Make it ahead for best flavor. These bars actually taste better the next day. The flavors meld together as they chill, and the texture becomes even creamier. I often make them two days ahead of a party, and they’re always a hit.
Variations & Adaptations
One of the best things about this recipe is how adaptable it is. Here are some of my favorite variations.
Gluten-Free Version: Use gluten-free graham crackers or gluten-free ginger snaps for the crust. I’ve tested this with both, and they work beautifully. Just make sure to check the labels on your pumpkin puree and spices—most are naturally gluten-free.
Dairy-Free Version: Substitute the cream cheese with a dairy-free cream cheese alternative (I like the one from Miyoko’s Kitchen) and use coconut cream in place of the heavy cream. The texture will be slightly different—a little less firm—but still delicious. Use a dairy-free butter or coconut oil for the crust.
Pumpkin Chocolate Swirl: Melt 1/4 cup of semi-sweet chocolate chips and swirl it into the pumpkin filling before chilling. This adds a beautiful marbled effect and a hint of chocolate that pairs perfectly with the spices.
Ginger Snap Crust: Swap the graham crackers for crushed ginger snaps. The spicy, molasses-y flavor of the ginger snaps complements the pumpkin filling perfectly. I did this for a Friendsgiving once, and people couldn’t stop talking about it.
Individual Servings: Instead of making a full pan, you can layer the crust and filling in small jars or glasses for a pretty, portable dessert. This is great for parties or gifting. Just reduce the chilling time to about 2-3 hours since the portions are smaller.
Serving & Storage Suggestions
These bars are incredibly versatile when it comes to serving. Here’s how I like to do it.
Serving Temperature: Serve these bars cold, straight from the refrigerator. They’re creamy and firm at this temperature, like a cross between a cheesecake and a mousse. If you let them sit out too long, they’ll start to soften.
Presentation: For a pretty presentation, top each bar with a generous swirl of whipped cream, a drizzle of caramel sauce, and a sprinkle of crushed graham crackers or chopped pecans. A dusting of cinnamon or pumpkin pie spice on top adds a nice finishing touch.
Complementary Dishes: These bars pair beautifully with a warm cup of coffee, a spiced chai latte, or a glass of cold milk. If you’re serving them as part of a fall dessert spread, try them alongside my Brown Butter Apple Crisp Bars with Caramel Drizzle or my Perfect Maple Pecan Blondies for a truly unforgettable dessert table.
Storage: Store leftover bars in an airtight container in the refrigerator for up to 5 days. The crust may soften slightly over time, but the flavor will still be great. I’ve never had them last longer than a few days in my house, though!
Freezing: You can freeze these bars for up to 2 months. Wrap the entire pan (or individual bars) tightly in plastic wrap, then in a layer of aluminum foil. Thaw in the refrigerator overnight before serving. The texture will be slightly softer after freezing, but still delicious.
Flavor Development: Like many no-bake desserts, these bars taste even better on the second or third day. The spices mellow and meld together, and the filling becomes even creamier. If you can resist eating them all at once, you’ll be rewarded.
Nutritional Information & Benefits
These Creamy No-Bake Pumpkin Pie Icebox Bars are a treat, but they do have some redeeming qualities. Here’s a rough estimate of the nutritional values per bar (based on 9 servings):
- Calories: 320-350
- Fat: 22g
- Carbohydrates: 30g
- Protein: 4g
- Fiber: 2g
- Sugar: 20g
Pumpkin is a nutritional powerhouse—it’s packed with vitamin A, fiber, and antioxidants. It’s also low in calories, which means most of the richness in this dessert comes from the cream cheese and cream. If you’re looking for a lighter option, you can use low-fat cream cheese and skip the whipped cream topping.
These bars are vegetarian and can easily be made gluten-free or dairy-free with the substitutions I mentioned above. They do contain dairy and gluten in their standard form, so keep that in mind if you’re serving guests with dietary restrictions.
I’m not a nutritionist, but I believe in balance. These bars are a special treat, not an everyday snack. And honestly, a little bit of indulgence now and then is good for the soul.
Conclusion
These Creamy No-Bake Pumpkin Pie Icebox Bars are everything I want in a fall dessert—simple, creamy, and packed with that warm, spiced flavor that makes this season so special. They’re the kind of recipe you’ll turn to again and again, whether you’re hosting a holiday dinner, bringing a dish to a potluck, or just treating yourself on a quiet Tuesday night.
Don’t be afraid to make them your own. Add a chocolate swirl, swap the crust, or pile on the toppings. The beauty of this recipe is that it’s forgiving and flexible. You really can’t mess it up.
I’d love to hear how these turn out for you. Leave a comment below and let me know if you tried any variations, or tag me in your photos on social media. Your feedback and creativity are what make this community so wonderful.
Now go make some magic in your kitchen. Your refrigerator is waiting.
Frequently Asked Questions
Can I use pumpkin pie filling instead of pumpkin puree?
I don’t recommend it. Pumpkin pie filling already has sugar and spices added, which will throw off the balance of this recipe. Stick with pure pumpkin puree for the best results.
How long do these bars need to chill?
At least 6 hours, but overnight is best. The longer they chill, the firmer and cleaner the slices will be. Don’t rush this step—it’s essential for the texture.
Can I make these bars vegan?
Yes! Use a dairy-free cream cheese alternative, coconut cream in place of heavy cream, and a vegan butter or coconut oil for the crust. The texture will be slightly different, but they’ll still be delicious.
Can I freeze these bars?
Absolutely. Wrap them tightly in plastic wrap and then aluminum foil, and freeze for up to 2 months. Thaw in the refrigerator overnight before serving.
What can I use instead of graham crackers for the crust?
Ginger snaps, vanilla wafers, or shortbread cookies all work beautifully. If you’re gluten-free, use gluten-free graham crackers or gluten-free ginger snaps.
Pin This Recipe!
Creamy No-Bake Pumpkin Pie Icebox Bars (Easy Fall Dessert)
- Total Time: 6 hours 15 minutes (includes chilling)
- Yield: 9 servings 1x
Description
These Creamy No-Bake Pumpkin Pie Icebox Bars are a simple, no-oven dessert that delivers the classic pumpkin pie flavor in bar form. With a buttery graham cracker crust and a silky, spiced pumpkin filling, they’re perfect for fall gatherings and make-ahead entertaining.
Ingredients
- 2 cups graham cracker crumbs (about 16 full sheets)
- 1/4 cup granulated sugar (50g)
- 1/2 cup unsalted butter, melted (1 stick)
- Pinch of salt
- 8 oz cream cheese, softened (226g)
- 1 1/2 cups pumpkin puree (about 1 15-oz can)
- 1 cup powdered sugar (120g)
- 1/2 cup heavy cream (120ml)
- 1 teaspoon vanilla extract
- 2 teaspoons pumpkin pie spice
- 1/2 teaspoon ground cinnamon
- 1 cup whipped cream (for topping, optional)
- Caramel sauce (for drizzling, optional)
- Crushed graham crackers or candied pecans (for garnish, optional)
Instructions
- Line a 9×9-inch baking pan with parchment paper, leaving about 2 inches of overhang on two opposite sides.
- In a medium bowl, combine graham cracker crumbs, granulated sugar, and a pinch of salt. Pour in melted butter and stir with a fork until the mixture looks like wet sand and holds together when pressed.
- Transfer the crumb mixture to the prepared pan and press it down firmly and evenly using the bottom of a flat measuring cup. Refrigerate while making the filling.
- In a large mixing bowl, beat cold heavy cream on medium-high speed until soft peaks form, about 2-3 minutes. Set aside in the refrigerator.
- In another large bowl, beat softened cream cheese on medium speed until smooth and creamy, about 1 minute. Scrape down the sides.
- Add pumpkin puree, powdered sugar, vanilla extract, pumpkin pie spice, and ground cinnamon to the cream cheese. Beat on low until combined, then increase to medium and beat for 30 seconds until smooth.
- Gently fold about one-third of the whipped cream into the pumpkin mixture to lighten it, then fold in the remaining whipped cream until no white streaks remain.
- Remove the crust from the refrigerator. Spoon the pumpkin filling over the crust and spread evenly. Tap the pan gently on the counter to release air bubbles.
- Cover the pan with plastic wrap or aluminum foil and refrigerate for at least 6 hours, preferably overnight.
- Once fully chilled and firm, lift the bars out of the pan using the parchment overhang. Slice into squares with a sharp knife, wiping the knife between cuts. Serve with whipped cream, caramel sauce, and crushed graham crackers or candied pecans if desired.
Notes
Chill for at least 6 hours, but overnight is best for clean slices. Use room temperature cream cheese to avoid lumps. Whip the cream separately for a lighter texture. Press the crust firmly to prevent crumbling. Adjust spices to taste. These bars taste even better the next day.
- Prep Time: 15 minutes
- Cook Time: 0 minutes
- Category: Dessert
- Cuisine: American
Nutrition
- Serving Size: 1 bar
- Calories: 335
- Sugar: 20
- Sodium: 200
- Fat: 22
- Saturated Fat: 13
- Carbohydrates: 30
- Fiber: 2
- Protein: 4
Keywords: no-bake pumpkin bars, pumpkin pie bars, icebox bars, fall dessert, easy pumpkin dessert, no-bake dessert