My seven-year-old nephew asked why I couldn’t just mix the pumpkin right into the cheesecake filling instead of layering it. I started to explain why that wouldn’t work — something about density and baking times and the integrity of the cheesecake layer. Then I stopped. Honestly, I had no good reason except that I’d never seen it done that way before. So I shrugged and said, “Let’s find out.”
That Tuesday afternoon turned into one of those messy, flour-dusted kitchen experiments where you’re pretty sure you’re about to waste a block of cream cheese. He stood on a step stool, stirring with way too much enthusiasm, and I kept my mouth shut when he over-mixed the batter. The gingersnap crust came together in the food processor, and I let him press it into the pan with his bare hands because sometimes you just have to let kids touch the food.
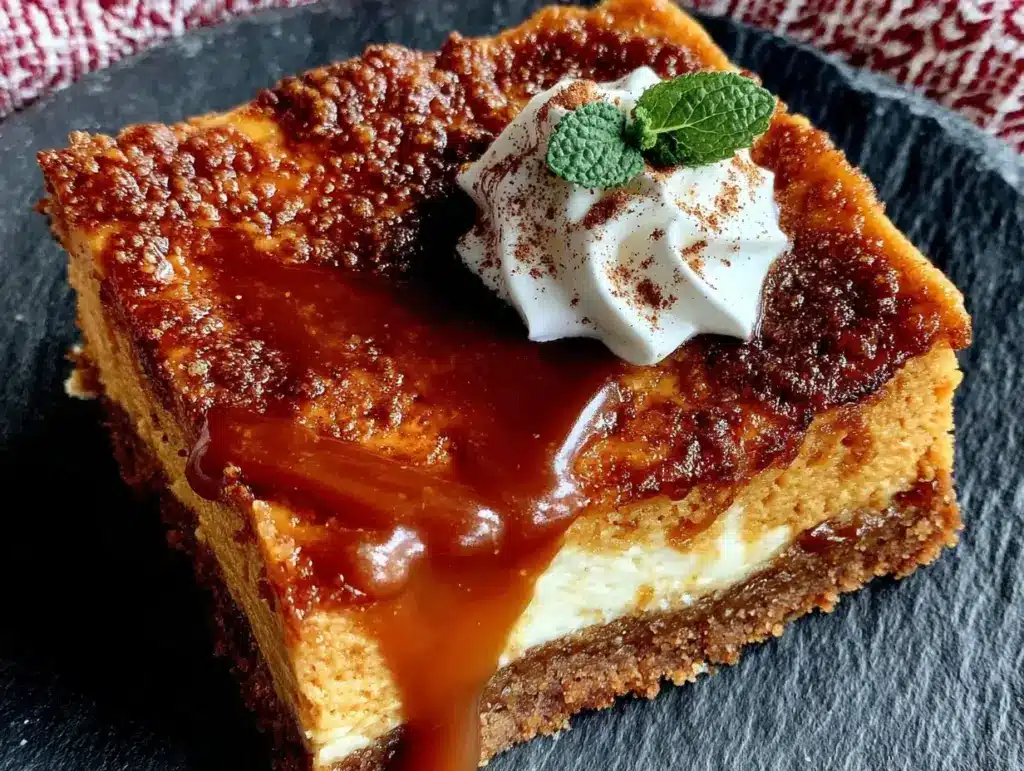
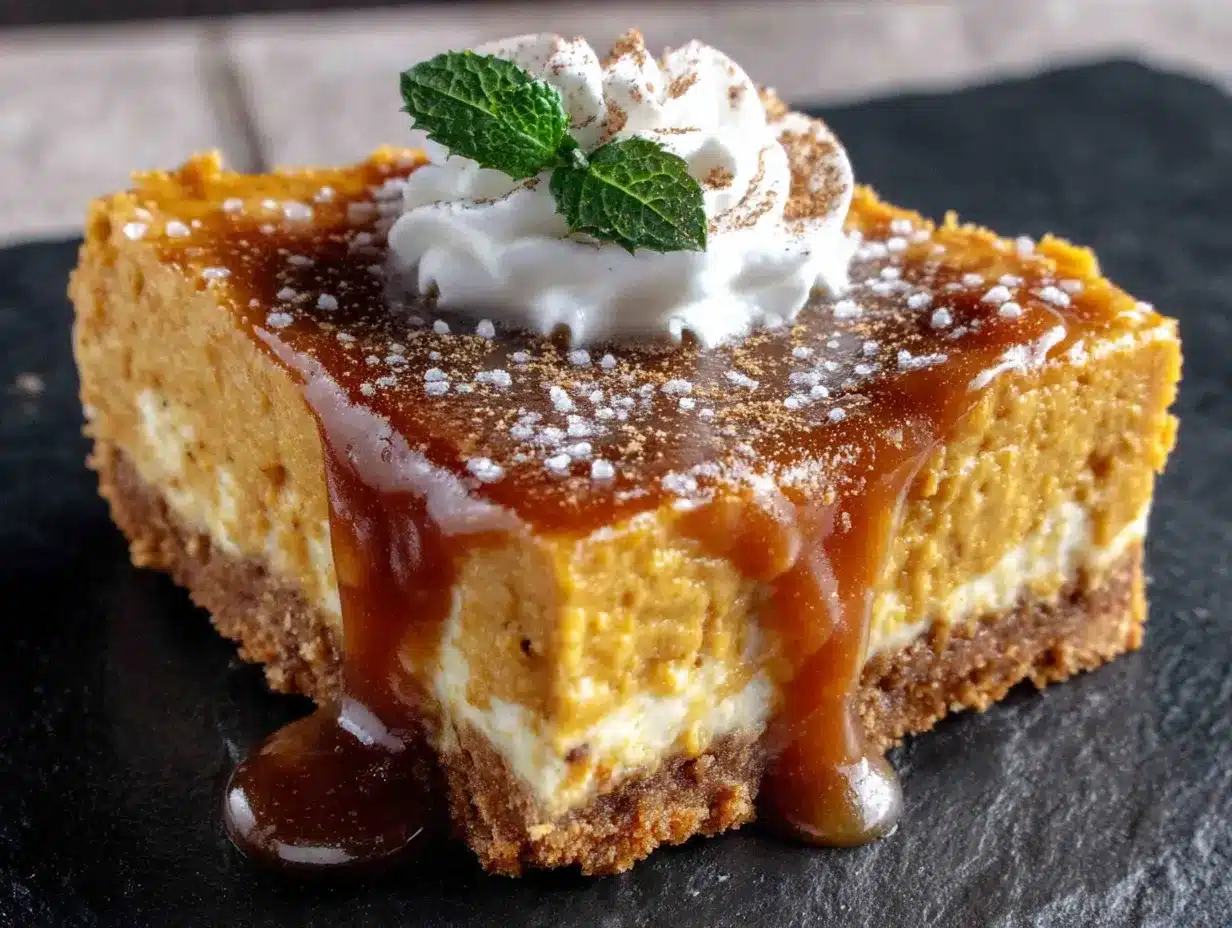
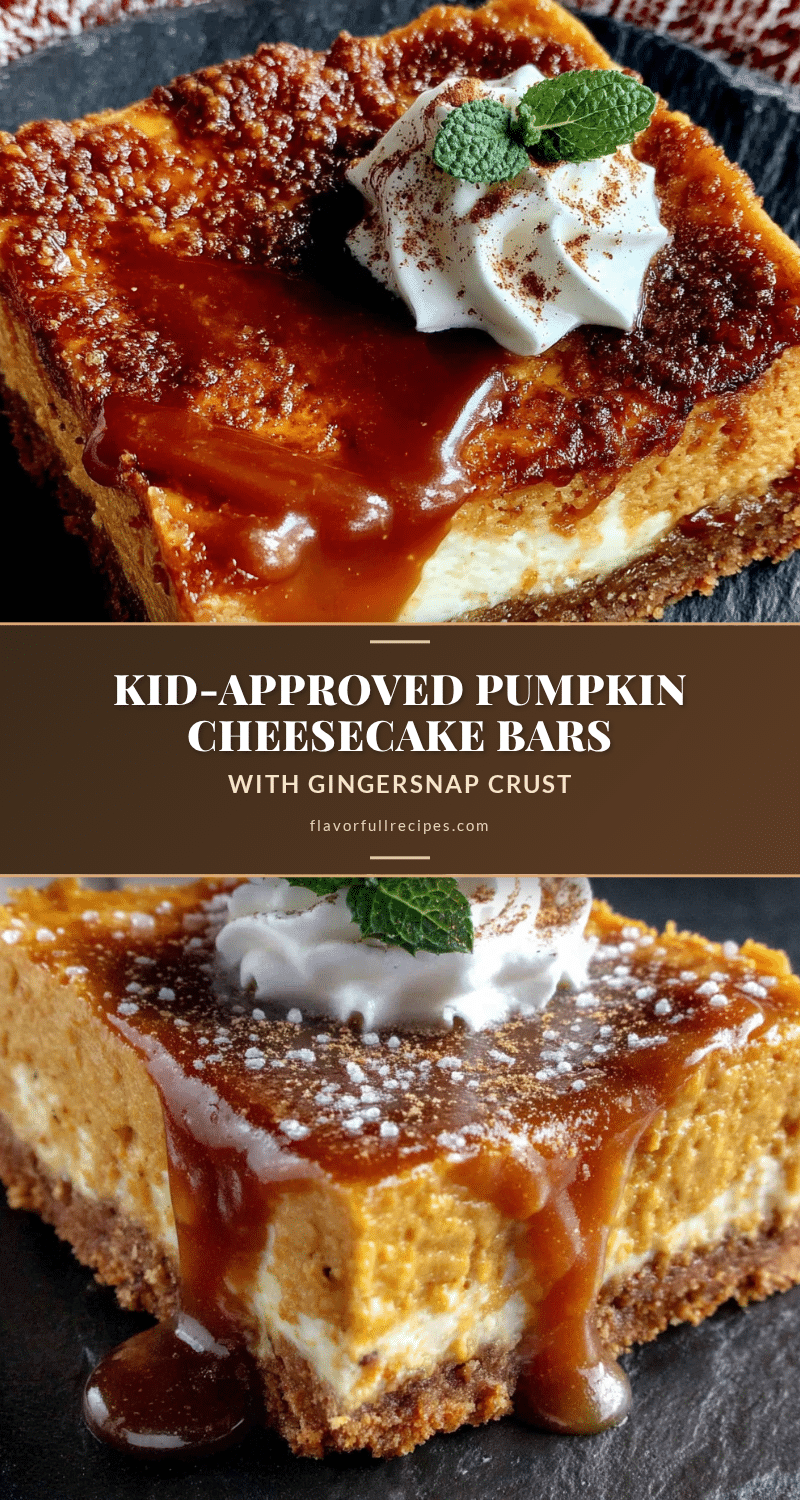
When those bars came out of the oven, the kitchen smelled like fall had exploded. The pumpkin layer had swirled into the cheesecake in these gorgeous marbled ribbons, and the crust smelled like someone baked a gingerbread house. We let them cool on the counter, and I may have snuck a corner piece before dinner. That first bite? The gingersnaps gave this warm, spicy crunch, and the pumpkin cheesecake was so creamy it almost melted on my tongue. My nephew looked at me and said, “See? I told you.” He was right. I was wrong. And now I make these kid-approved pumpkin cheesecake bars with gingersnap crust every single October, sometimes twice.
Why You’ll Love This Recipe
These pumpkin cheesecake bars are the kind of dessert that makes everyone at the table go quiet for a minute. As a home cook feeding a family on a budget, I need recipes that deliver big flavor without expensive ingredients or complicated steps. This one checks every box.
- Quick & Easy: From start to fridge, you’re looking at about 45 minutes of active time. The oven does most of the work, and the fridge handles the rest.
- Simple Ingredients: Canned pumpkin, cream cheese, sour cream, eggs, sugar, and a box of gingersnaps. That’s it. No fancy grocery trips required.
- Perfect for Family Meals: These bars disappear at potlucks, Thanksgiving dessert tables, and random Tuesday dinners when you need something sweet.
- Crowd-Pleaser: Picky eaters love the creamy texture, and adults appreciate the sophisticated ginger-pumpkin combo.
- Unbelievably Delicious: The gingersnap crust adds this deep, molasses-y warmth that plain graham crackers just can’t touch.
What makes these bars different from every other pumpkin cheesecake recipe out there? The crust. Using store-bought gingersnaps instead of graham crackers changes everything. The cookies are already spiced and sweetened, so you don’t need to add sugar or extra cinnamon to the crust. Plus, the texture stays crunchy even after refrigeration, which gives you that satisfying contrast against the silky filling.
This recipe isn’t just good — it’s the kind that makes you close your eyes after the first bite. It’s comfort food reimagined: quicker than a traditional cheesecake, easier on the wallet, but with the same soul-soothing satisfaction. Perfect for impressing guests without stress, or turning a simple family dinner into something memorable.
What Ingredients You Will Need
This recipe uses simple, wholesome ingredients to deliver bold flavor and satisfying texture without the fuss. Most of these items are pantry staples or easy to find at any grocery store.
For the Gingersnap Crust
- 2 cups gingersnap cookie crumbs (about 40 cookies, crushed finely — I recommend Nabisco or a store brand with strong ginger flavor)
- 5 tablespoons unsalted butter, melted
- 2 tablespoons granulated sugar (optional, only if your gingersnaps aren’t very sweet)
- Pinch of salt
For the Pumpkin Cheesecake Filling
- 16 ounces cream cheese, softened to room temperature (full-fat works best for creamy texture)
- 3/4 cup granulated sugar
- 1/4 cup packed light brown sugar
- 1 cup pumpkin puree (not pumpkin pie filling — Libby’s is my go-to brand)
- 1/2 cup sour cream, room temperature (adds richness and tang)
- 2 large eggs, room temperature
- 1 teaspoon vanilla extract
- 1 1/2 teaspoons pumpkin pie spice (or 1 teaspoon cinnamon + 1/2 teaspoon ginger + 1/4 teaspoon nutmeg + 1/4 teaspoon cloves)
- 1/4 teaspoon salt
For the Optional Topping
- 1/2 cup heavy cream, whipped with 1 tablespoon powdered sugar
- Extra crushed gingersnaps for garnish
Let me talk about the cream cheese for a second. Please, please let it come to room temperature. Cold cream cheese creates lumpy filling, and nobody wants lumpy cheesecake bars. Take it out of the fridge about an hour before you start baking. Same goes for the eggs and sour cream — room temperature ingredients blend together smoothly and create that velvety texture we’re after.
For the pumpkin puree, don’t accidentally grab pumpkin pie filling. They look similar on the shelf, but pie filling has sugar and spices already added, which will throw off the sweetness and texture of these bars. Plain pumpkin puree is what you want.
Equipment Needed
You don’t need a fancy kitchen to make these bars. Here’s what you’ll actually use:
- 9×9-inch baking pan — Glass or metal both work fine. If using metal, line it with parchment paper for easy removal.
- Food processor — For crushing the gingersnaps into fine crumbs. You can also use a rolling pin and a zip-top bag, but the food processor is faster and gives you more consistent crumbs.
- Electric hand mixer or stand mixer — For beating the cream cheese until smooth. A whisk and some elbow grease will work, but your arm will thank you for using a mixer.
- Large mixing bowls — One for the crust, one for the filling.
- Rubber spatula — For scraping every last bit of filling into the pan.
- Parchment paper — Makes lifting the bars out of the pan so much easier. Trust me on this one.
- Measuring cups and spoons
I’ve made these bars with a cheap hand mixer I bought at a discount store for twelve dollars. It worked perfectly. Don’t feel like you need expensive equipment to make good food.
Preparation Method
Let’s get baking. These steps are straightforward, but I’ve included little notes from my own kitchen disasters so you can avoid them.
- Preheat your oven to 350°F (175°C). Line your 9×9 pan with parchment paper, leaving some overhang on two sides. This creates handles for lifting the bars out later. Spray the parchment lightly with nonstick spray.
- Make the crust. Pulse the gingersnap cookies in your food processor until they become fine crumbs. You should have about 2 cups. Pour the crumbs into a medium bowl, add the melted butter and salt, and stir until every crumb is moistened. If your gingersnaps are on the milder side, add the 2 tablespoons of sugar. Press this mixture firmly into the bottom of your prepared pan. I use the bottom of a measuring cup to really pack it down. Bake for 10 minutes, then set aside to cool slightly while you make the filling.
- Beat the cream cheese. In a large bowl, beat the softened cream cheese with an electric mixer on medium speed until completely smooth — about 2 minutes. Scrape down the sides and bottom of the bowl with your spatula. Add both sugars and beat for another minute until light and fluffy.
- Add the pumpkin and wet ingredients. Add the pumpkin puree, sour cream, and vanilla extract. Beat on low speed until combined. Don’t go crazy here — you don’t want to incorporate too much air into the batter.
- Add the eggs one at a time. Crack each egg into a small bowl first (just in case you get shell fragments), then add to the batter. Beat on low speed just until the yolk disappears. Over-mixing at this stage can cause cracks in your cheesecake later.
- Add the spices and salt. Sprinkle the pumpkin pie spice and salt over the batter and fold it in gently with your spatula. Give it a few good stirs from the bottom up to make sure everything is evenly distributed.
- Pour and spread. Pour the filling over the pre-baked crust. Use your spatula to spread it evenly to the edges. Give the pan a gentle tap on the counter to release any air bubbles.
- Bake. Place the pan in the preheated oven and bake for 35-40 minutes. The edges should look set and slightly puffed, but the center should still jiggle slightly when you gently shake the pan. That jiggle is important — it means the center will be creamy, not dry.
- Cool completely. Place the pan on a wire rack and let it cool to room temperature. This takes about 1-2 hours. Then cover the pan with plastic wrap and refrigerate for at least 4 hours, preferably overnight. I know the waiting is the hardest part, but cold cheesecake bars slice so much cleaner.
- Slice and serve. Use the parchment paper handles to lift the entire block out of the pan. Place it on a cutting board and use a sharp knife to cut into 16 squares. Wipe the knife clean between cuts for neat edges.
Cooking Tips & Techniques
I’ve made these pumpkin cheesecake bars at least a dozen times, and I’ve learned a few things the hard way. Let me save you some trouble.
Don’t over-bake. This is the number one mistake. Cheesecake continues to set as it cools, so pulling it out when the center is still wobbly is exactly right. If you wait until the center is completely firm, you’ll end up with dry, cracked bars. I learned this lesson when I made a batch for a school bake sale and they came out looking like the surface of the moon. Still tasted good, but not pretty.
Use a water bath if you’re nervous about cracks. Place your 9×9 pan inside a larger roasting pan and pour hot water halfway up the sides of the smaller pan. The steam keeps the cheesecake moist and prevents cracking. I don’t always do this because it’s an extra step, but it works beautifully.
Room temperature ingredients are non-negotiable. I know I said this already, but I’m saying it again because cold cream cheese will ruin your texture. Set everything out an hour before you start. Set a timer on your phone. You’ll thank me later.
Press the crust firmly. A loose crust crumbles when you try to cut the bars. Use the bottom of a glass or a measuring cup to really pack those gingersnap crumbs down. Think of it like making a sandcastle — you want it compact and solid.
Let it chill fully. I once tried to rush the chilling process and cut the bars after only two hours. They were a mess. Soft, sticky, falling apart. The bars need that full 4 hours (or overnight) to set properly. Plan ahead.
Variations & Adaptations
One of the best things about this recipe is how flexible it is. Here are some ways to make it your own:
Gluten-Free Version: Use gluten-free gingersnap cookies for the crust. Many brands make them, and they work exactly the same. The filling is naturally gluten-free, so this swap is easy.
Dairy-Free Adaptation: Substitute the cream cheese with a plant-based version (I like Kite Hill or Miyoko’s), use dairy-free sour cream, and swap the butter with melted coconut oil. The texture will be slightly less firm, but still delicious.
Extra Spicy: Add 1/4 teaspoon of black pepper to the filling. It sounds weird, but black pepper actually enhances the flavor of pumpkin and ginger. I tried this on a whim after reading about it in an old cookbook, and now I do it every time.
Chocolate Drizzle: Melt 1/2 cup of semi-sweet chocolate chips with 1 teaspoon of coconut oil and drizzle it over the chilled bars. The chocolate pairs surprisingly well with the ginger and pumpkin.
Mini Version: Press the crust into a 12-cup muffin tin lined with paper liners. Fill each cup about 3/4 full and bake for 18-20 minutes. These are perfect for lunchboxes or portion control.
No Food Processor? Place the gingersnaps in a zip-top bag and crush them with a rolling pin. It takes a few extra minutes and you might have some bigger chunks, but it works perfectly fine.
Serving & Storage Suggestions
These bars are best served cold, straight from the refrigerator. The texture is firm and creamy, and the flavors are more pronounced when they’re chilled. If you want to get fancy, let them sit at room temperature for about 10 minutes before serving — they soften slightly and become almost mousse-like.
For presentation, I like to cut the bars into neat squares and arrange them on a white platter. A dollop of whipped cream on each square and a sprinkle of crushed gingersnaps makes them look bakery-level gorgeous. Around the holidays, I add a few sugared cranberries as garnish.
These bars pair beautifully with a hot cup of coffee or a glass of cold milk. If you’re serving them after a big meal, keep the portions small — they’re rich and satisfying.
Storage: Keep the bars in an airtight container in the refrigerator for up to 5 days. Layer them with parchment paper between each layer to prevent sticking. The flavors actually improve after a day or two as the pumpkin and spices meld together.
Freezing: These freeze beautifully. Wrap individual bars tightly in plastic wrap, then place them in a freezer-safe bag or container. They’ll keep for up to 3 months. To thaw, move them to the refrigerator overnight. Don’t thaw at room temperature — they’ll get soggy.
Reheating: I don’t recommend reheating these bars. They’re meant to be served cold. But if you accidentally leave them out too long and they get soft, pop them back in the fridge for an hour to firm up.
Nutritional Information & Benefits
Here’s the estimated nutritional breakdown for one bar (based on 16 servings):
- Calories: 285
- Fat: 18g
- Carbohydrates: 28g
- Protein: 5g
- Fiber: 1g
- Sugar: 20g
While these are definitely a treat, there are some redeeming qualities. Pumpkin is packed with vitamin A and fiber, and it adds moisture to the cheesecake without requiring extra fat. Ginger has anti-inflammatory properties and aids digestion — perfect after a heavy meal. The cream cheese provides calcium and protein, though it’s also where most of the fat comes from.
For a lighter version, you can use reduced-fat cream cheese and Greek yogurt instead of sour cream. The texture will be slightly less rich but still very good.
These bars contain dairy, gluten, and eggs. If you have allergies, check the variations section above for substitutions.
Conclusion
These kid-approved pumpkin cheesecake bars with gingersnap crust have become a fall tradition in my house, and I hope they become one in yours too. They’re everything I want in a dessert: easy to make, affordable, and so good that everyone asks for the recipe.
What I love most about this recipe is how forgiving it is. You can over-mix a little, forget to set out the cream cheese on time, or cut the bars before they’re fully chilled, and they’ll still taste amazing. It’s the kind of recipe that builds confidence in the kitchen, especially if you’re cooking with little helpers who have strong opinions about how things should be done.
Go ahead and make these your own. Add extra ginger, skip the whipped cream, or double the batch for a crowd. However you make them, I promise they’ll disappear fast.
Have you tried these bars? Did your kids have any suggestions that turned out surprisingly well? Drop a comment below and tell me about it. I’d love to hear your kitchen stories.
Frequently Asked Questions
Can I use fresh pumpkin instead of canned?
Yes, but you’ll need to cook and puree it first, then drain off any excess liquid. Fresh pumpkin has more water than canned, so your filling might be slightly softer. Roast the pumpkin at 400°F until tender, then blend until smooth and strain through a cheesecloth if it seems watery.
Why did my cheesecake crack on top?
Cracks usually happen from over-baking or sudden temperature changes. Make sure you pull the bars out when the center is still slightly jiggly. Let them cool gradually on the counter before refrigerating. If they do crack, don’t worry — a layer of whipped cream hides everything.
Can I make these bars ahead of time?
Absolutely. In fact, they’re better made a day ahead. The flavors deepen and the texture sets perfectly overnight. Make them up to 2 days in advance and keep them covered in the fridge.
What if I can’t find gingersnap cookies?
You can substitute graham crackers or vanilla wafers, but you’ll lose that warm ginger flavor. To compensate, add 1 teaspoon of ground ginger and 1/2 teaspoon of cinnamon to the crust mixture. It won’t be exactly the same, but it’ll still be delicious.
How do I get clean slices?
Use a sharp knife and wipe it clean with a damp paper towel between each cut. For the cleanest slices, chill the bars for at least 6 hours or overnight. You can also run the knife under hot water and dry it before cutting — the warmth helps the knife glide through the cheesecake.
Pin This Recipe!
Best Easy Pumpkin Cheesecake Bars with Gingersnap Crust
- Total Time: 4 hours 55 minutes (including chilling)
- Yield: 16 bars 1x
Description
These kid-approved pumpkin cheesecake bars feature a crunchy gingersnap crust and a creamy, marbled pumpkin cheesecake filling. Quick to make with simple ingredients, they’re the perfect fall dessert for family meals, potlucks, or Thanksgiving.
Ingredients
- 2 cups gingersnap cookie crumbs (about 40 cookies, crushed finely)
- 5 tablespoons unsalted butter, melted
- 2 tablespoons granulated sugar (optional, only if gingersnaps aren’t very sweet)
- Pinch of salt
- 16 ounces cream cheese, softened to room temperature
- 3/4 cup granulated sugar
- 1/4 cup packed light brown sugar
- 1 cup pumpkin puree (not pumpkin pie filling)
- 1/2 cup sour cream, room temperature
- 2 large eggs, room temperature
- 1 teaspoon vanilla extract
- 1 1/2 teaspoons pumpkin pie spice (or 1 tsp cinnamon + 1/2 tsp ginger + 1/4 tsp nutmeg + 1/4 tsp cloves)
- 1/4 teaspoon salt
- 1/2 cup heavy cream (for optional topping)
- 1 tablespoon powdered sugar (for optional topping)
- Extra crushed gingersnaps for garnish (optional)
Instructions
- Preheat your oven to 350°F (175°C). Line a 9×9-inch baking pan with parchment paper, leaving overhang on two sides. Spray lightly with nonstick spray.
- Make the crust: Pulse gingersnap cookies in a food processor until fine crumbs form. In a medium bowl, combine crumbs, melted butter, and salt. If gingersnaps are mild, add 2 tablespoons sugar. Stir until moistened. Press firmly into the bottom of the prepared pan using the bottom of a measuring cup. Bake for 10 minutes, then set aside to cool slightly.
- Beat the cream cheese: In a large bowl, beat softened cream cheese with an electric mixer on medium speed until completely smooth, about 2 minutes. Scrape down sides. Add both sugars and beat for another minute until light and fluffy.
- Add pumpkin and wet ingredients: Add pumpkin puree, sour cream, and vanilla extract. Beat on low speed until combined. Do not overmix.
- Add eggs one at a time: Crack each egg into a small bowl, then add to batter. Beat on low speed just until yolk disappears. Over-mixing can cause cracks.
- Add spices and salt: Sprinkle pumpkin pie spice and salt over batter. Fold gently with a spatula until evenly distributed.
- Pour and spread: Pour filling over pre-baked crust. Spread evenly to edges. Gently tap pan on counter to release air bubbles.
- Bake: Bake for 35-40 minutes. Edges should be set and slightly puffed, but center should still jiggle slightly when shaken.
- Cool completely: Place pan on a wire rack and cool to room temperature, about 1-2 hours. Cover with plastic wrap and refrigerate for at least 4 hours, preferably overnight.
- Slice and serve: Use parchment handles to lift the block out of the pan. Place on a cutting board and cut into 16 squares with a sharp knife, wiping knife clean between cuts.
Notes
Room temperature ingredients are crucial for a smooth texture. Don’t over-bake; the center should still jiggle. For cleaner slices, chill at least 6 hours or overnight. A water bath can prevent cracking. Store in an airtight container in the refrigerator for up to 5 days. Freeze individual bars wrapped in plastic wrap for up to 3 months.
- Prep Time: 20 minutes
- Cook Time: 35-40 minutes
- Category: Dessert
- Cuisine: American
Nutrition
- Serving Size: 1 bar
- Calories: 285
- Sugar: 20
- Sodium: 220
- Fat: 18
- Saturated Fat: 10
- Carbohydrates: 28
- Fiber: 1
- Protein: 5
Keywords: pumpkin cheesecake bars, gingersnap crust, fall dessert, easy cheesecake bars, pumpkin dessert, kid-friendly, Thanksgiving dessert