There’s something undeniably magical about chocolate mousse. That silky, smooth texture combined with a rich chocolate flavor is pure dessert heaven. But what if we took that indulgence and made it even better—by serving it in bite-sized portions? These mini chocolate mousse cups are the perfect little treats for parties, date nights, or just when you’re craving something sweet. They’re elegant, easy to make, and guaranteed to impress!
My love affair with chocolate mousse began years ago when I first tasted it at a fancy restaurant. But recreating that luxurious dessert at home seemed daunting—until I discovered this simple recipe. With just a few ingredients and minimal effort, you can whip up these adorable mini cups that look as fancy as they taste. Trust me, you’ll want to make extras!
The Story Behind Mini Chocolate Mousse Cups
Chocolate mousse has its roots in French cuisine, and its name translates to “chocolate foam.” It’s traditionally made by folding whipped cream or egg whites into melted chocolate to create an airy, luscious dessert. Over the years, this recipe has evolved into countless variations, but the essence of mousse—a light yet decadent texture—remains timeless.
For me, mini desserts have always been a favorite. There’s something special about having your own little portion of something delicious. These mini chocolate mousse cups are a modern twist on the classic mousse, perfect for entertaining or individual servings at a dinner party. Plus, they’re great for portion control (unless you end up eating three, like I often do!).
Seasonally, these are perfect year-round. Imagine them as a romantic Valentine’s Day treat, a no-bake summer dessert, or an elegant addition to your holiday dessert table. No matter the occasion, these mousse cups always feel like a celebration.
Ingredient Breakdown
Let’s dive into the ingredients that make these mini chocolate mousse cups so irresistible:
- Dark Chocolate: The star of the show! Choose high-quality chocolate with at least 60-70% cocoa for the best flavor. If you prefer a sweeter mousse, semi-sweet chocolate works too.
- Heavy Cream: This is what gives the mousse its creamy texture. Make sure it’s cold before whipping for the best results. You can substitute with coconut cream for a dairy-free option.
- Granulated Sugar: Just a touch of sugar helps balance the bitterness of the chocolate. Adjust the amount to suit your sweetness preference.
- Vanilla Extract: A splash of vanilla enhances the flavor and adds warmth to the mousse.
- Pinch of Salt: Don’t skip this! A little salt amplifies the chocolate’s natural richness.
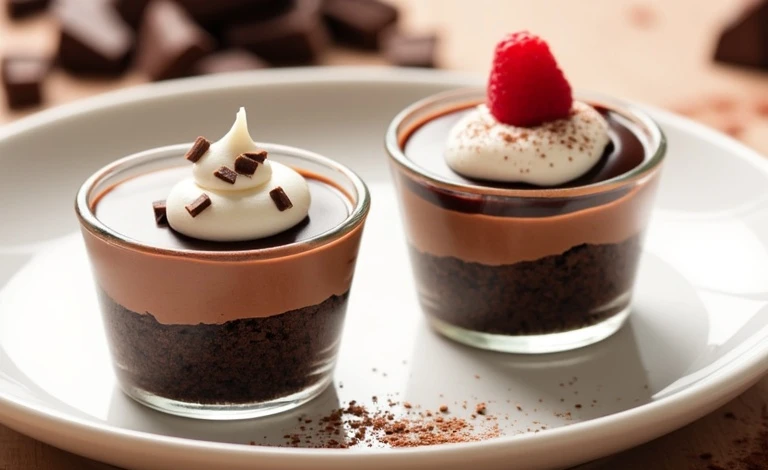
Optional toppings like whipped cream, chocolate shavings, or fresh berries add visual appeal and extra flavor. Feel free to get creative here!
Equipment Needed
You don’t need any fancy gadgets for these mini chocolate mousse cups. Here’s a quick list of what you’ll need:
- Mixing Bowls: A couple of medium-sized bowls for melting chocolate and whipping cream.
- Hand Mixer or Stand Mixer: Whipping cream by hand is possible, but a mixer makes it much easier.
- Heatproof Bowl: For melting chocolate over a double boiler.
- Mini Cups or Glasses: Look for small dessert glasses, shot glasses, or even little mason jars.
- Spoon or Piping Bag: To neatly fill the cups with mousse. A piping bag gives a polished look, but a spoon works too.
If you’re missing a double boiler, don’t worry—you can melt the chocolate in the microwave in short intervals, stirring frequently.
Preparation Method
- Melt the Chocolate: Place the chopped chocolate in a heatproof bowl. Set it over a pot of simmering water (make sure the bowl doesn’t touch the water) or microwave it in 20-second bursts, stirring until smooth. Let it cool slightly.
- Whip the Cream: In a mixing bowl, combine 3/4 cup (180ml) of heavy cream, granulated sugar, and vanilla extract. Use a hand mixer or stand mixer to whip until soft peaks form. Be careful not to overwhip.
- Fold in the Chocolate: Gently fold the melted chocolate into the whipped cream. Use a spatula and fold until the mixture is smooth and fully combined. Take your time here to maintain the mousse’s airy texture.
- Assemble the Cups: Spoon or pipe the mousse into mini cups or dessert glasses. Tap the cups gently on the counter to remove air pockets and level the surface.
- Chill: Refrigerate the cups for at least 2 hours to allow the mousse to set. This step is crucial for the perfect texture.
- Decorate: Before serving, add your chosen toppings like whipped cream, a sprinkle of chocolate shavings, or a fresh berry for a pop of color.
And that’s it! You’ve got yourself a batch of decadent, bite-sized chocolate mousse cups.
Cooking Tips & Techniques
Here are some tips to ensure your mini chocolate mousse cups turn out flawless:
- Use Quality Chocolate: Since chocolate is the main ingredient, its quality makes a huge difference. Avoid chocolate chips, as they often contain stabilizers that affect melting.
- Don’t Overwhip: Soft peaks are key! Overwhipping the cream can lead to a grainy texture when folding in the chocolate.
- Cool Chocolate Slightly: If the chocolate is too hot, it can deflate the whipped cream. Let it cool to room temperature before folding.
- Tidy Layers: If you’re piping the mousse, use a large star tip for a beautiful presentation. Wipe the edges of the cups for a clean finish.
- Plan Ahead: The mousse needs time to set, so make these a few hours before serving (or even the night before).
Variations & Adaptations
These mini chocolate mousse cups are wonderfully versatile! Here are a few ideas to make them your own:
- Dairy-Free: Replace heavy cream with chilled coconut cream, and use dairy-free chocolate.
- Flavored Mousse: Add a teaspoon of instant espresso powder to the melted chocolate for a mocha twist, or a splash of orange liqueur for a citrusy kick.
- Seasonal Toppings: Top with crushed candy canes for a festive holiday dessert or fresh mint leaves for a refreshing summer vibe.
- Layered Desserts: Alternate layers of mousse with crumbled cookies or brownie pieces for a parfait-style dessert.
Serving & Storage Suggestions
These mousse cups are best served chilled. Arrange them on a platter for a party or serve individually for an intimate dessert option. Pair with a cup of coffee, a glass of red wine, or even a scoop of vanilla ice cream for an extra treat.
To store, cover the cups with plastic wrap and refrigerate for up to 3 days. The texture will remain creamy and airy. If you want to prepare ahead, you can make the mousse and store it in a piping bag, filling the cups just before serving.
Nutritional Information & Benefits
Each mini chocolate mousse cup has approximately 150 calories, making it a guilt-free indulgence. With about 12g of fat and 10g of carbohydrates, these are perfect for a low-carb treat if you limit the sugar or use a sugar substitute.
Dark chocolate is rich in antioxidants and may even boost your mood—so feel good about savoring these little bites of joy!
Conclusion
If you’re looking for a dessert that’s easy, elegant, and downright delicious, these mini chocolate mousse cups are it. Whether you’re hosting a dinner party, celebrating a special occasion, or just treating yourself, they’re guaranteed to impress.
Give this recipe a try and let your creativity shine with toppings and variations. I’d love to hear how yours turn out! Leave a comment below or share your creations on social media. Happy cooking!
FAQs
Can I make these mini chocolate mousse cups ahead of time?
Yes! You can prepare the mousse up to two days in advance and store it in the fridge. Add toppings just before serving.
What’s the best chocolate to use?
High-quality dark or semi-sweet chocolate with 60-70% cocoa content works best. Avoid chocolate chips, as they don’t melt as smoothly.
Can I make this recipe dairy-free?
Absolutely! Use coconut cream instead of heavy cream and dairy-free chocolate for a plant-based version.
How do I prevent the whipped cream from deflating?
Be gentle when folding in the chocolate. Use a spatula and fold slowly to keep the mixture light and airy.
What toppings work well with this dessert?
Whipped cream, chocolate shavings, fresh berries, or even a drizzle of caramel sauce are all fantastic options.