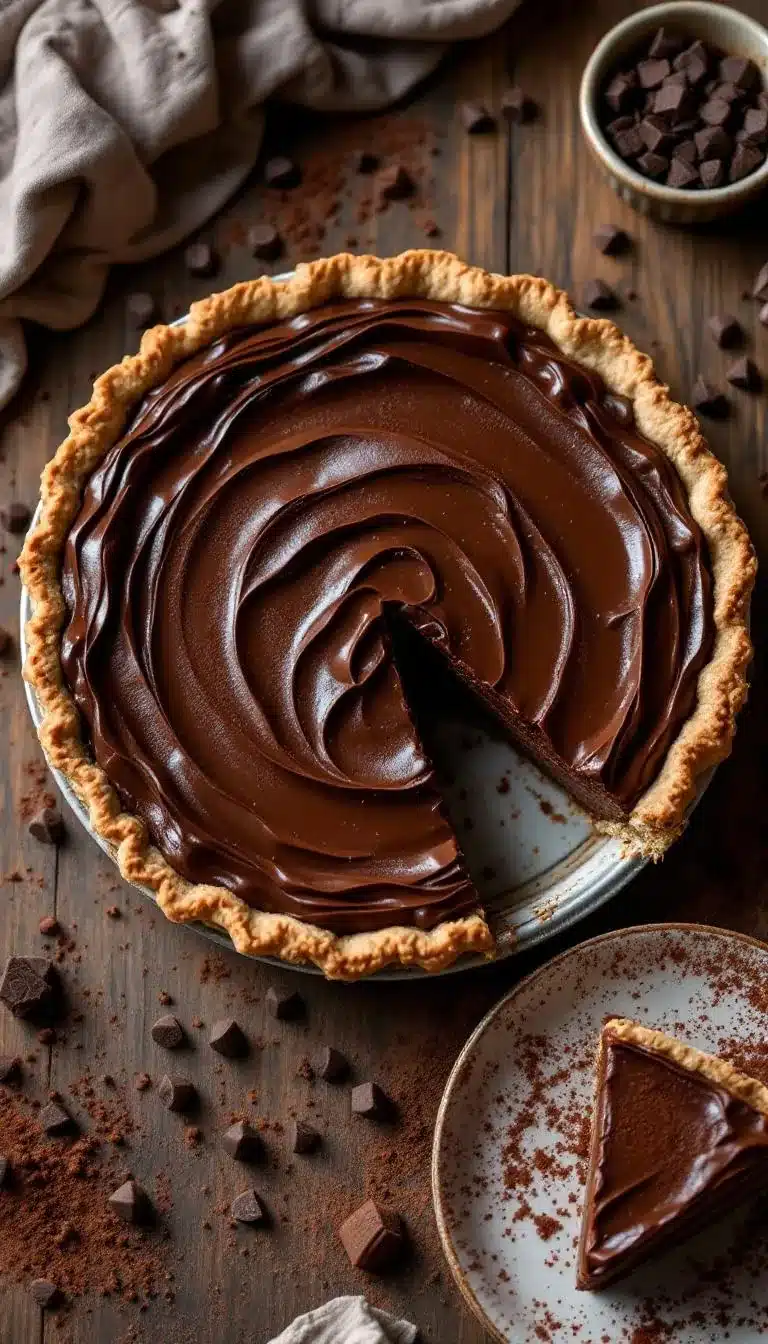
The first bite of creamy, velvety chocolate pie feels like a warm hug for your taste buds. This classic homemade chocolate pie recipe is everything you want in a dessert—rich, silky, and indulgent, with a perfectly crisp crust that crumbles in all the right ways. It’s my go-to dessert for family gatherings, holiday dinners, or whenever I’m craving a little chocolate therapy. Honestly, there’s something magical about the simple yet sophisticated combination of buttery pastry and luscious chocolate filling.
I first fell in love with chocolate pie during a childhood visit to my grandma’s kitchen. She’d make it from scratch, whisking the filling with a patience that only someone who truly loves cooking could have. Over the years, I’ve refined her recipe to make it quicker and easier, without losing any of that nostalgic charm. Whether you’re a seasoned baker or a newbie in the kitchen, this recipe is as approachable as it is delicious.
So, grab your apron and get ready to create a dessert that’s guaranteed to be the star of any meal. This classic chocolate pie is not only a crowd-pleaser but also surprisingly simple to make. I promise you, once you try it, you’ll find yourself making it on repeat!
Why You’ll Love This Recipe
- Quick & Easy: This recipe comes together effortlessly in under an hour, making it perfect for busy weeknights or impromptu celebrations.
- Simple Ingredients: You don’t need a fancy pantry to make this pie—most of the ingredients are everyday staples.
- Perfect for All Occasions: Whether it’s a casual family dinner or a festive holiday party, this pie fits the bill.
- Crowd-Pleaser: Trust me, no one can resist the silky, chocolatey indulgence of this dessert.
- Unbelievably Delicious: The rich chocolate filling paired with the buttery crust creates a flavor and texture combo that’s pure bliss.
What makes this recipe stand out is its balance of flavors and textures. The chocolate filling has just the right amount of sweetness, complemented by a hint of vanilla and a touch of salt. The crust is golden and flaky, providing the perfect contrast to the creamy filling. Plus, with a few simple tips, you can make a chocolate pie that looks as good as it tastes. It’s not just a dessert—it’s a little slice of happiness.
What Ingredients You Will Need
This recipe uses simple, wholesome ingredients to create a truly decadent dessert. Here’s what you’ll need:
For the Crust
- All-purpose flour: About 1 ¼ cups (150g), sifted for a light and flaky crust.
- Unsalted butter: ½ cup (115g), cold and cubed for that perfect buttery texture.
- Granulated sugar: 1 tablespoon, to add a touch of sweetness.
- Salt: ¼ teaspoon, to balance flavors.
- Ice water: 3-4 tablespoons, just enough to bring the dough together.
For the Chocolate Filling
- Granulated sugar: ¾ cup (150g), for sweetness.
- Cocoa powder: ⅓ cup (40g), unsweetened for deep chocolate flavor.
- Cornstarch: 3 tablespoons (24g), for thickening the filling.
- Salt: ¼ teaspoon, to enhance the chocolatey goodness.
- Whole milk: 2 ¾ cups (660ml), for creaminess.
- Egg yolks: 4 large, whisked to add richness.
- Unsalted butter: 2 tablespoons (30g), for a silky finish.
- Vanilla extract: 1 teaspoon, for a fragrant depth.
Equipment Needed
- Mixing bowls: For combining dry and wet ingredients.
- Whisk: Essential for ensuring a smooth filling.
- Rolling pin: To roll out the pie crust evenly.
- 9-inch pie dish: The perfect size for this recipe.
- Plastic wrap: Helps chill the dough without drying it out.
- Heavy-bottom saucepan: Ideal for making the custard-like filling.
- Spatula: For stirring and scraping every delicious bit.
- Wire rack: To cool your pie evenly after baking.
If you don’t have a pie dish, a tart pan can work as a substitute. And if you’re missing a rolling pin, a clean wine bottle will get the job done in a pinch!
Preparation Method
- Prepare the crust: In a mixing bowl, combine the flour, sugar, and salt. Add the cold, cubed butter and use a pastry cutter or your fingers to work it into the flour until the mixture resembles coarse crumbs. Gradually add ice water, one tablespoon at a time, until the dough comes together. Form into a disk, wrap in plastic wrap, and refrigerate for at least 30 minutes.
- Roll out and bake the crust: Preheat your oven to 375°F (190°C). On a lightly floured surface, roll out the chilled dough into a circle about 12 inches (30cm) in diameter. Transfer it to your pie dish, press it gently into the edges, and trim any excess. Prick the bottom with a fork and bake for 15 minutes or until lightly golden. Set aside to cool.
- Make the filling: In a heavy-bottom saucepan, whisk together sugar, cocoa powder, cornstarch, and salt. Gradually add milk, whisking until smooth. Cook over medium heat, stirring constantly, until the mixture thickens and starts to bubble—about 8-10 minutes.
- Temper the eggs: Slowly pour about 1 cup of the hot chocolate mixture into the whisked egg yolks, stirring constantly to prevent scrambling. Then, pour the tempered egg mixture back into the saucepan and cook for an additional 2 minutes.
- Add butter and vanilla: Remove the saucepan from heat and stir in the butter and vanilla extract until fully incorporated.
- Assemble the pie: Pour the warm filling into the baked crust, smoothing the top with a spatula.
- Chill and serve: Refrigerate the pie for at least 4 hours, or overnight, until fully set. Slice and enjoy!
Cooking Tips & Techniques
Here are some tips to ensure your chocolate pie turns out perfect:
- Keep the butter cold: Cold butter helps create a flaky crust, so don’t let it sit out for too long.
- Whisk constantly: To avoid lumps in your filling, keep whisking while cooking on the stove.
- Temper egg yolks carefully: Pour the hot mixture slowly into the yolks to prevent scrambling—this step is key for a smooth texture.
- Cool completely: Let the pie chill thoroughly before serving to ensure the filling sets properly.
I’ve learned that patience is key with this recipe. Rushing the cooling process might result in a runny filling, so plan ahead and give it plenty of time to chill.
Variations & Adaptations
- Gluten-free option: Use a gluten-free flour blend to make the crust, or opt for a store-bought gluten-free crust.
- Dairy-free adaptation: Swap the butter and milk with plant-based alternatives like coconut milk and vegan butter.
- Extra chocolatey: Fold in ½ cup (90g) of chopped dark chocolate or chocolate chips into the filling for added richness.
- Top it off: Add whipped cream, chocolate shavings, or fresh fruit for a decorative and delicious finish.
Personally, I love adding a sprinkle of flaky sea salt on top—it really enhances the flavor and adds a nice contrast to the sweetness.
Serving & Storage Suggestions
This classic chocolate pie is best served chilled. Slice it into generous wedges and pair it with freshly whipped cream or a scoop of vanilla ice cream for an extra indulgent treat. It also pairs beautifully with a hot cup of coffee or a glass of red wine.
Store any leftovers in the refrigerator for up to 4 days, covered tightly with plastic wrap or aluminum foil. For longer storage, freeze the pie for up to a month—just make sure to wrap it well to prevent freezer burn. When you’re ready to enjoy, thaw the frozen pie in the fridge overnight and serve chilled.
Nutritional Information & Benefits
Here’s a quick breakdown of the nutritional value per serving of this classic chocolate pie:
- Calories: Approximately 350 per slice
- Protein: 5 grams
- Carbohydrates: 40 grams
- Fat: 20 grams
- Fiber: 2 grams
The cocoa powder in the filling is packed with antioxidants, which are known to support heart health. Egg yolks add a dose of healthy fats and vitamins, while milk contributes calcium and protein. For those watching their sugar intake, you can experiment with using a natural sugar alternative like coconut sugar or stevia.
Conclusion
If you’re looking for a dessert that’s rich, comforting, and sure to impress, this classic homemade chocolate pie is the answer. It’s easy to customize, simple to prepare, and guaranteed to be a favorite for years to come. I love this recipe because it’s a nostalgic treat that brings back memories of family gatherings and cozy kitchen moments.
Remember—every slice is a reason to celebrate. Happy baking!
FAQs
Can I use a store-bought pie crust?
Absolutely! While homemade crust adds a special touch, a pre-made crust works just as well for a quicker option.
How do I know when the filling is thick enough?
The filling is ready when it coats the back of a spoon and you can draw a line through it with your finger without it running.
Can I make this pie ahead of time?
Yes! This pie is perfect for making ahead. Simply prepare and chill it the day before serving.
How can I make this pie less sweet?
Try reducing the sugar in the filling by ¼ cup, or use dark chocolate for a more bittersweet flavor.
What’s the best way to store leftovers?
Cover the pie tightly and store it in the refrigerator for up to 4 days, or freeze it for up to a month.