There’s something utterly magical about tiramisu. Its layers of creamy mascarpone, delicate coffee-soaked ladyfingers, and that irresistible dusting of cocoa powder make it one of the most loved desserts worldwide. But what if we took this classic Italian treat and gave it a modern, shareable spin? Enter Elegant Tiramisu Dessert Jars – the perfect way to enjoy tiramisu in adorable individual servings. Whether you’re hosting a dinner party or craving a luxurious treat, this recipe is going to be your new favorite!
This recipe is worth making because it combines the timeless appeal of tiramisu with a fun presentation that’s easy to customize. Plus, dessert jars are great for portion control (not that you’ll want to stop at just one). I first made these for a family gathering, and honestly, they were the star of the evening! Everyone loved having their own little jar to savor at their own pace.
The Story Behind Tiramisu Dessert Jars
Tiramisu, which translates to “pick me up,” originated in the Veneto region of Italy in the 1960s. Traditionally made in a single dish, it was the go-to dessert for celebrations and special occasions. But as food trends evolved, tiramisu adapted to suit modern tastes.
I first fell in love with tiramisu during a trip to Rome. There was a tiny café tucked away on a cobblestone street, and their tiramisu was served in glass jars. It felt so chic and personal! That memory inspired this recipe. By layering the classic tiramisu ingredients in jars, you get all the flavors of the original dessert but with a delightful twist.
These dessert jars are ideal for all seasons. In summer, they’re cool and refreshing, while in winter, their coffee-infused richness is comforting. Plus, they travel well, making them perfect for picnics, potlucks, or gifting during the holidays.
Ingredient Breakdown
Every ingredient in tiramisu plays a vital role in creating its unique taste and texture. Here’s a closer look at what you’ll need:
- Ladyfingers: These soft, sponge-like biscuits soak up coffee beautifully without turning mushy. Look for Italian savoiardi for the best results. If you’re gluten-free, swap them for gluten-free ladyfingers or pound cake slices.
- Espresso: Brew a strong, dark espresso for that authentic coffee flavor. Instant espresso powder works in a pinch, but fresh coffee makes all the difference.
- Mascarpone Cheese: This creamy Italian cheese is the heart of tiramisu. Always use the freshest mascarpone you can find, and avoid substitutions like cream cheese for the best texture.
- Heavy Cream: Whipped heavy cream adds lightness to the mascarpone layer. For a dairy-free version, try coconut cream.
- Egg Yolks: Traditional tiramisu uses egg yolks for richness, but in this recipe, we skip them for simplicity (and to avoid raw egg concerns).
- Sugar: Regular granulated sugar blends well with the mascarpone and coffee. If you prefer less sweetness, reduce the sugar slightly.
- Cocoa Powder: The final dusting of cocoa powder ties everything together. Use unsweetened cocoa for a rich, bittersweet flavor.
- Kahlúa or Coffee Liqueur: Adding a splash of coffee liqueur to the espresso enhances its depth. Skip it for a kid-friendly version.
Optional additions like shaved chocolate or a sprinkle of cinnamon can add a personal touch. And if you’re feeling adventurous, try layering in fresh berries for a fruity twist!
Equipment Needed
Making tiramisu dessert jars is simple and doesn’t require fancy equipment. Here’s what you’ll need:
- Glass jars: Mason jars, parfait glasses, or small bowls work perfectly. Choose clear containers to showcase the beautiful layers.
- Mixing bowls: You’ll need a few bowls for whipping cream and mixing the mascarpone filling.
- Electric mixer: Whipping cream by hand is possible, but an electric mixer saves time and effort.
- Espresso maker: A stovetop espresso maker or coffee machine will do the trick. If you don’t have one, instant espresso powder works.
- Sieve: For dusting cocoa powder evenly over the top.
If you don’t have jars, you can layer the tiramisu in a single dish and serve it in scoops. It’s less fancy but still delicious!
Preparation Method
Ready to create your own Elegant Tiramisu Dessert Jars? Follow these simple steps:
- Brew 1 cup (240 ml) of strong espresso and let it cool to room temperature. Stir in 2 tablespoons (30 ml) of Kahlúa if using.
- In a mixing bowl, beat 1 cup (240 ml) of heavy cream until stiff peaks form. Set aside.
- In another bowl, combine 8 ounces (227 g) of mascarpone cheese and 1/3 cup (67 g) of sugar. Mix until smooth and creamy.
- Gently fold the whipped cream into the mascarpone mixture until fully combined. Be careful not to deflate the cream.
- Dip each ladyfinger briefly into the cooled coffee mixture. Avoid soaking them too long, or they’ll become soggy.
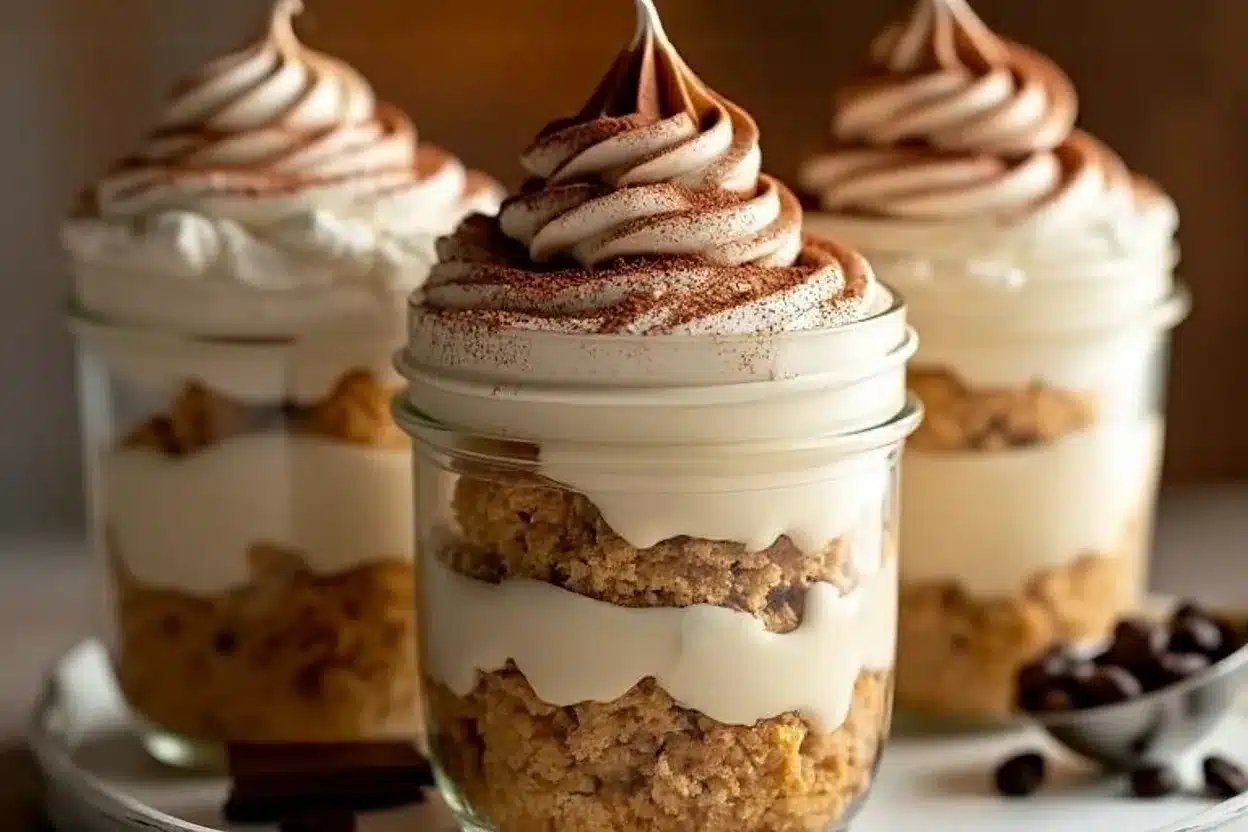
- Start assembling the jars: Add a layer of coffee-soaked ladyfingers, followed by a layer of mascarpone mixture. Repeat until the jar is full, ending with mascarpone.
- Dust the top with unsweetened cocoa powder using a fine sieve.
- Cover the jars and refrigerate for at least 4 hours (or overnight) to let the flavors meld.
Your tiramisu jars are ready! They’ll look stunning with a sprinkle of shaved chocolate or fresh mint leaves on top.
Cooking Tips & Techniques
Here are some tips to ensure your tiramisu dessert jars turn out perfectly:
- Don’t over-soak the ladyfingers. A quick dip in the coffee mixture is all you need.
- For extra creaminess, chill the mascarpone mixture before assembling the jars.
- Make sure your espresso is fully cooled before dipping the ladyfingers.
- Layer carefully to keep the jars looking neat. Use a piping bag for the mascarpone mixture if you want clean edges.
- Make the jars a day ahead for deeper flavors. Just keep them covered in the fridge.
If you accidentally make the mascarpone mixture too runny, refrigerate it for 15 minutes before using. It’ll firm up nicely!
Variations & Adaptations
Want to mix things up? Try these variations:
- Berry Tiramisu: Add layers of fresh strawberries or raspberries for a fruity twist.
- Chocolate Lovers: Swap the coffee for hot chocolate and add chocolate chips between layers.
- Alcohol-Free: Skip the Kahlúa and add a splash of vanilla extract to the coffee instead.
- Vegan Option: Use coconut cream instead of heavy cream and dairy-free mascarpone substitutes.
- Nutty Delight: Sprinkle crushed hazelnuts or almonds between layers for added texture.
I once tried adding a drizzle of salted caramel on top, and it was a hit! Feel free to experiment and make this recipe your own.
Serving & Storage Suggestions
These tiramisu jars are best served chilled. Here’s how to get the most out of them:
- Serving: Serve straight from the fridge for a cool, creamy treat. Pair with espresso or a glass of dessert wine for a complete experience.
- Presentation: Add a sprig of fresh mint or a small edible flower on top for a touch of elegance.
- Storage: Cover jars tightly and refrigerate for up to 3 days. For longer storage, freeze for up to 2 weeks and thaw in the fridge before serving.
- Reheating: Not required for this recipe, but let the jars sit at room temperature for 10 minutes if they’ve been frozen.
The flavors deepen over time, so they’re even better the next day!
Nutritional Information & Benefits
Here’s an estimate of the nutritional values per serving (one jar):
- Calories: 320
- Protein: 5g
- Fat: 18g
- Carbohydrates: 30g
- Sugar: 18g
Mascarpone is rich in calcium, while coffee provides a gentle energy boost. If you’re mindful of sugar, reduce the amount or use a sugar substitute. Of course, tiramisu is a treat, so enjoy it guilt-free!
Conclusion
Elegant Tiramisu Dessert Jars are truly a showstopper. They’re easy to make, customizable, and perfect for any occasion. Whether you’re sharing them with loved ones or indulging solo, you’ll love every creamy, coffee-infused bite.
I adore this recipe because it combines elegance with convenience. Plus, who doesn’t love a dessert that feels personal? I hope you try these jars, and if you do, let me know how they turned out in the comments below. Share your adaptations, too – I’d love to hear your creative twists!
Now go ahead, grab those jars, and create your own little masterpieces. Happy layering!
FAQs
Can I make tiramisu dessert jars without alcohol?
Absolutely! Skip the Kahlúa and add a splash of vanilla extract to the coffee for extra flavor.
What type of jars should I use?
Any clear, small jars work well. Mason jars or parfait glasses are popular options.
How long should I refrigerate the jars?
Refrigerate for at least 4 hours to let the flavors meld. Overnight is even better!
Can I freeze tiramisu jars?
Yes, you can freeze them for up to 2 weeks. Thaw in the fridge before serving.
Are there dairy-free options for this recipe?
Yes! Use coconut cream and dairy-free mascarpone substitutes for a vegan-friendly version.
Print
Elegant Tiramisu Dessert Jars
- Total Time: 4 hours 20 minutes
- Yield: 6 servings 1x
Description
A modern twist on the classic Italian dessert, these tiramisu jars combine creamy mascarpone, coffee-soaked ladyfingers, and cocoa powder in adorable individual servings. Perfect for any occasion!
Ingredients
- Ladyfingers (Italian savoiardi or gluten-free alternative)
- 1 cup (240 ml) strong espresso, cooled
- 2 tablespoons (30 ml) Kahlúa or coffee liqueur (optional)
- 1 cup (240 ml) heavy cream
- 8 ounces (227 g) mascarpone cheese
- 1/3 cup (67 g) granulated sugar
- Unsweetened cocoa powder for dusting
Instructions
- Brew 1 cup (240 ml) of strong espresso and let it cool to room temperature. Stir in 2 tablespoons (30 ml) of Kahlúa if using.
- In a mixing bowl, beat 1 cup (240 ml) of heavy cream until stiff peaks form. Set aside.
- In another bowl, combine 8 ounces (227 g) of mascarpone cheese and 1/3 cup (67 g) of sugar. Mix until smooth and creamy.
- Gently fold the whipped cream into the mascarpone mixture until fully combined. Be careful not to deflate the cream.
- Dip each ladyfinger briefly into the cooled coffee mixture. Avoid soaking them too long, or they’ll become soggy.
- Start assembling the jars: Add a layer of coffee-soaked ladyfingers, followed by a layer of mascarpone mixture. Repeat until the jar is full, ending with mascarpone.
- Dust the top with unsweetened cocoa powder using a fine sieve.
- Cover the jars and refrigerate for at least 4 hours (or overnight) to let the flavors meld.
Notes
For best results, refrigerate the jars overnight to allow the flavors to meld. Use a piping bag for neat layers, and avoid over-soaking the ladyfingers to prevent sogginess.
- Prep Time: 20 minutes
- Cook Time: 0 minutes
- Category: Dessert
- Cuisine: Italian
Nutrition
- Serving Size: 1 jar
- Calories: 320
- Sugar: 18
- Sodium: 50
- Fat: 18
- Saturated Fat: 11
- Carbohydrates: 30
- Fiber: 1
- Protein: 5
Keywords: Tiramisu, Dessert Jars, Italian Dessert, Coffee Dessert, No-Bake Dessert