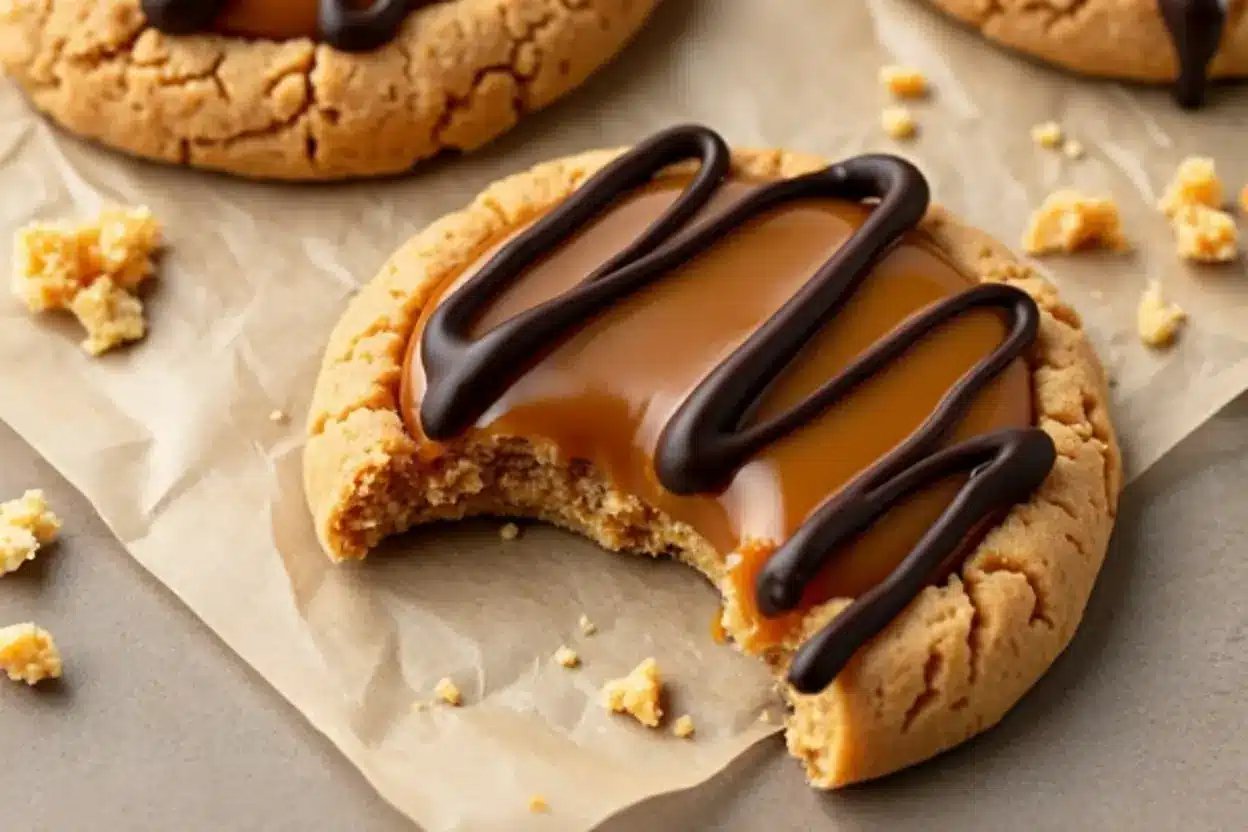
There’s something magical about a dessert that doesn’t require an oven, isn’t there? These easy no-bake caramel cookies are the perfect solution for anyone looking to whip up something delicious without the fuss of baking. Imagine soft, chewy cookies infused with rich caramel flavor and topped with a luscious chocolate drizzle—it’s a treat that feels indulgent but comes together in no time.
This recipe is ideal for warm days when you don’t want to heat up your kitchen or when you need a quick dessert for last-minute guests. Trust me, once you try these, you’ll be making them all year round!
The Story Behind No-Bake Caramel Cookies
No-bake desserts have been a lifesaver for generations. Whether it’s a busy mom looking for quick treats or someone without access to an oven, recipes like these have stood the test of time. The combination of caramel and chocolate is a classic pairing, but adding the no-bake element makes it even more accessible.
This particular recipe reminds me of the summers spent at my grandmother’s house. She had a knack for creating simple yet delicious treats without breaking a sweat. Her caramel cookies were always a hit, and she’d top them off with melted chocolate for that extra special touch. Over time, I’ve adapted her recipe to make it even easier, using pantry staples and a few shortcuts. It’s perfect for those days when you want something sweet without a lot of effort.
What makes this recipe even better is its versatility. Whether you’re making it for a holiday platter, a birthday party, or just a regular Tuesday, these cookies fit the bill. Plus, they’re great for sharing—or keeping all to yourself!
Ingredients You’ll Need
Let’s talk ingredients! Each one plays a key role in creating the perfect flavor and texture for these cookies. Here’s what you’ll need:
- Caramel sauce: Choose a high-quality caramel sauce for the most authentic flavor. You can use store-bought or make your own if you’re feeling adventurous.
- Butter: Unsalted butter is best, as it allows you to control the saltiness of the recipe. Make sure it’s softened for easy mixing.
- Brown sugar: Adds depth and richness to the caramel flavor. Light or dark brown sugar works well.
- Quick oats: These are the base of the cookies. They give the cookies structure while keeping them soft and chewy. Rolled oats can work in a pinch, but quick oats are ideal.
- Vanilla extract: A splash of vanilla enhances the caramel and chocolate flavors beautifully.
- Chocolate chips: Use semi-sweet or dark chocolate chips for the drizzle. You could also melt a chocolate bar if that’s what you have on hand.
- Sea salt: Optional, but a sprinkle of flaky sea salt on top takes these cookies to the next level.
For substitutions, you can swap out the butter with coconut oil for a dairy-free version. Gluten-free oats will make these cookies suitable for those avoiding gluten. And if you don’t have caramel sauce, dulce de leche is a great alternative.
Equipment Needed
Good news—this recipe doesn’t require any fancy tools! Here’s what you’ll need:
- Mixing bowl: A large mixing bowl to combine all your ingredients.
- Spatula: A sturdy spatula for mixing everything together.
- Small saucepan: For melting the chocolate drizzle. Alternatively, you can use a microwave-safe bowl.
- Baking sheet: You’ll need a baking sheet lined with parchment paper to shape and chill your cookies.
- Measuring cups and spoons: Precision is key when it comes to no-bake recipes.
If you don’t have a baking sheet, any flat surface covered with parchment paper will work for chilling the cookies. And as for melting the chocolate, a double boiler works wonders for ensuring smooth, even melting.
How to Make No-Bake Caramel Cookies
- Prepare your workspace: Line a baking sheet with parchment paper so the cookies don’t stick.
- Mix the wet ingredients: In a large mixing bowl, combine 1 cup (240 ml) of caramel sauce, 1/2 cup (115 g) of softened butter, and 1/2 cup (100 g) of brown sugar. Stir until smooth and creamy.
- Add the oats: Gradually fold in 2 cups (180 g) of quick oats until well combined. The mixture should be sticky but not overly wet.
- Shape the cookies: Using a spoon or your hands, scoop out portions of the mixture and form them into cookies. Place them on the prepared baking sheet.
- Chill the cookies: Transfer the baking sheet to the refrigerator for about 30 minutes to allow the cookies to set.
- Melt the chocolate: In a small saucepan or microwave-safe bowl, melt 1/2 cup (90 g) of chocolate chips until smooth. Be careful not to overheat them.
- Add the drizzle: Using a spoon or piping bag, drizzle the melted chocolate over the chilled cookies. Add a sprinkle of flaky sea salt if desired.
- Chill again: Place the cookies back in the fridge for 15 minutes to set the chocolate drizzle.
And that’s it! Your cookies are ready to enjoy.
Tips for Perfect No-Bake Cookies
Here are some handy tricks to make sure your cookies turn out perfectly each time:
- Don’t rush the chilling: The cookies need time to set properly, so resist the temptation to skip this step.
- Watch the chocolate melting: Chocolate can burn quickly, so melt it over low heat or in short bursts in the microwave.
- Customize the size: If you prefer bite-sized cookies, use a teaspoon to scoop the dough instead of a tablespoon.
- Keep your hands clean: If shaping the cookies gets messy, lightly grease your hands with a bit of butter or oil.
And if the mixture feels too dry, add a little more caramel sauce until it comes together nicely.
Variations and Adaptations
If you love experimenting in the kitchen, here are a few ways to tweak this recipe:
- Peanut butter twist: Add 1/4 cup (60 g) of peanut butter to the caramel mixture for a nutty flavor.
- Holiday version: Sprinkle crushed candy canes over the chocolate drizzle for a festive touch.
- Nut-free alternative: Replace the caramel sauce with honey or agave syrup for a different flavor profile.
I once added a pinch of cinnamon to the oats, and the warm spice paired beautifully with the caramel and chocolate. Feel free to get creative!
Serving and Storing Your Cookies
These cookies are best served chilled or at room temperature. Arrange them on a dessert platter with fresh berries or a scoop of ice cream for an elegant presentation.
For storage, keep them in an airtight container in the refrigerator for up to a week. If you want to freeze them, layer them between parchment paper in a freezer-safe container. They’ll last up to two months and can be thawed in the fridge overnight.
To reheat, simply let them sit at room temperature for 10-15 minutes, or enjoy them cold straight from the fridge!
Nutritional Information
Here’s an estimate for one cookie (based on 12 cookies):
- Calories: 150
- Fat: 8 g
- Carbohydrates: 18 g
- Protein: 2 g
- Sugar: 12 g
Oats add fiber, and dark chocolate provides antioxidants, making these cookies a slightly healthier treat compared to traditional baked goods. Be mindful of the sugar content if you’re watching your intake.
Conclusion
If you’re looking for a quick, crowd-pleasing dessert, these easy no-bake caramel cookies are a must-try. They’re simple, versatile, and packed with flavor. I love how they take me back to childhood summers, and I hope they’ll bring joy to your kitchen too.
Give this recipe a try and let me know how it turns out! Share your favorite variations in the comments below, or snap a photo and tag me on social media. Happy no-baking!
FAQs
Can I use rolled oats instead of quick oats?
Yes, but the texture will be slightly different. Quick oats are better for a softer cookie, while rolled oats give a chewier bite.
How do I make these cookies dairy-free?
Swap the butter for coconut oil and use a dairy-free caramel sauce. The flavor will still be delicious!
What’s the best way to melt chocolate for the drizzle?
A double boiler is ideal for even melting, but you can also use the microwave in 15-second intervals, stirring each time.
Can I freeze these cookies?
Absolutely! Store them in a freezer-safe container with parchment paper between layers. They’ll last up to two months.
Why aren’t my cookies setting properly?
If your cookies are too soft, it’s likely due to under-chilling. Make sure they’re refrigerated long enough to firm up.