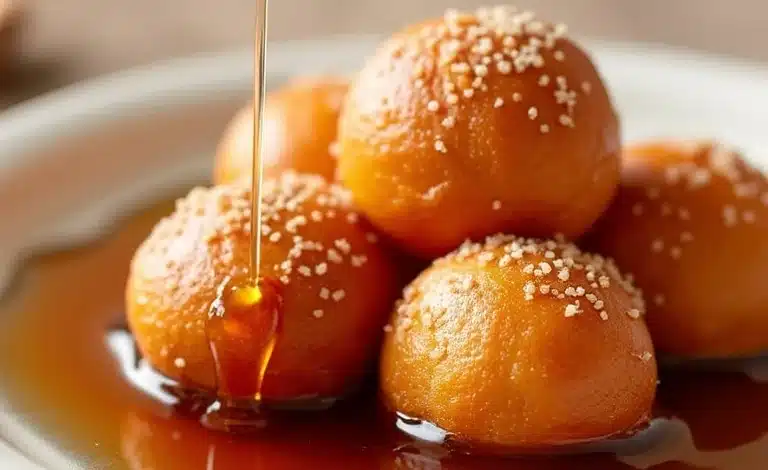
If you’ve ever wished you could take the fluffiness of a pancake and turn it into a bite-sized breakfast treat, then these Easy Maple Pancake Poppers are about to become your new favorite recipe! Imagine golden, airy pancake bites infused with just the right hint of maple sweetness—perfect for a quick breakfast, a leisurely brunch, or even as a fun snack. Trust me, these little guys are going to win over kids and adults alike!
I’ve always been a fan of pancake mornings, but let’s be real—sometimes flipping pancakes one by one feels like a chore. That’s where these pancake poppers swoop in to save the day. They’re baked, not fried, meaning less mess and more time to enjoy your coffee. Plus, they’re just so darn cute! Let’s dive into why you’ll want to whip these up, stat.
The Story Behind Maple Pancake Poppers
Every recipe has a story, right? Well, my love affair with pancake poppers started during a lazy Sunday morning. The kids were asking for pancakes, but I just couldn’t face standing over the stove flipping them. I had a mini muffin tin handy and thought, “Why not bake the batter?” The result? A batch of fluffy, golden pancake bites that were gone before I could even sit down. That’s when I knew I was onto something.
Maple syrup has always been a staple in my kitchen (hello, weekend waffle breakfasts), so naturally, I wanted to incorporate it directly into the batter. By doing this, I found the pancake poppers had a subtle sweetness that didn’t even need extra syrup—though dipping is always an option!
This recipe also reminds me of a trip to Vermont a few years back, where maple syrup is practically a way of life. These poppers capture that cozy, maple-syrup-drizzled feeling that makes breakfast such a comforting meal. Whether you’re making them for a holiday brunch or just a casual morning at home, they bring a little magic to the table.
Ingredients for Maple Pancake Poppers
Let’s run through the key ingredients and why they’re important. Don’t worry—you probably already have most of these in your pantry!
- All-purpose flour: The base of any good pancake batter. Make sure to measure it properly (spoon and level it) for the perfect texture.
- Baking powder: This is what gives the poppers their fluffiness. Make sure it’s fresh for the best rise.
- Salt: Just a pinch to balance the sweetness.
- Milk: I prefer whole milk for richness, but you can use almond milk or oat milk as a substitute.
- Egg: Helps bind everything together and adds structure.
- Maple syrup: The star of the show! Use pure maple syrup for the best flavor—none of that imitation stuff.
- Vanilla extract: Adds a warm, aromatic note to the batter.
- Butter: Melted butter adds richness and moisture to the poppers.
If you’re looking to switch things up, you can add a handful of mini chocolate chips, blueberries, or even a sprinkle of cinnamon to the batter. The possibilities are endless!
Equipment Needed
Here’s what you’ll need to make these pancake poppers:
- Mini muffin tin: This is essential for getting that perfect round shape. If you don’t have one, you can use a regular muffin tin, but the poppers will be larger.
- Mixing bowls: One for the dry ingredients and one for the wet ingredients.
- Whisk: For combining the batter without overmixing.
- Measuring cups and spoons: Accuracy is key for baking!
- Non-stick spray or butter: To grease the muffin tin and ensure your poppers slide right out.
If you’re new to using a mini muffin tin, don’t worry—it’s incredibly forgiving. Just make sure to grease it well to avoid sticking, and you’re good to go!
How to Make Easy Maple Pancake Poppers
- Preheat your oven: Set it to 375°F (190°C). Grease your mini muffin tin generously with butter or non-stick spray.
- Mix the dry ingredients: In a large bowl, whisk together 1 cup (125g) of all-purpose flour, 1 teaspoon of baking powder, and a pinch of salt.
- Combine the wet ingredients: In another bowl, whisk 1/2 cup (120ml) of milk, 1 large egg, 2 tablespoons (30ml) of maple syrup, 1 teaspoon of vanilla extract, and 2 tablespoons (28g) of melted butter.
- Make the batter: Gradually pour the wet ingredients into the dry ingredients, stirring gently until just combined. Be careful not to overmix—the batter should be slightly lumpy.
- Fill the muffin tin: Spoon the batter into the prepared muffin tin, filling each cup about 3/4 full.
- Bake: Place the tin in the oven and bake for 12-15 minutes, or until the poppers are golden and a toothpick inserted into the center comes out clean.
- Cool slightly: Let the poppers cool in the tin for 5 minutes before transferring them to a wire rack.
And that’s it! You’ll have a batch of warm, fluffy pancake poppers ready to enjoy.
Cooking Tips & Techniques
Here are some tips to make sure your pancake poppers turn out perfectly every time:
- Don’t overmix: Overmixing can make the batter tough. Stir just until the ingredients are combined.
- Use room-temperature ingredients: This helps the batter mix more evenly and results in fluffier poppers.
- Test for doneness: If you’re unsure if the poppers are done, insert a toothpick into the center—if it comes out clean, they’re ready.
- Work quickly: Once the wet and dry ingredients are combined, bake the poppers immediately to preserve the leavening action of the baking powder.
Variations & Adaptations
Here are some fun ways to adapt this recipe to suit your preferences:
- Gluten-free: Swap the all-purpose flour for a 1:1 gluten-free flour blend.
- Dairy-free: Use a non-dairy milk like almond or oat milk and replace the butter with coconut oil.
- Flavor boost: Add a pinch of cinnamon or nutmeg to the batter for a warm, spiced flavor.
- Fruity twist: Fold in fresh blueberries or diced strawberries for a burst of fruitiness.
Feel free to get creative—this recipe is super versatile!
Serving & Storage Suggestions
These maple pancake poppers are best enjoyed warm, straight out of the oven. Serve them with a small bowl of maple syrup for dipping or pair them with fresh fruit and whipped cream for a more indulgent treat.
Got leftovers? Store the poppers in an airtight container in the fridge for up to 3 days. To reheat, pop them in the microwave for 10-15 seconds or in a 350°F (175°C) oven for 5 minutes. They also freeze well—just let them cool completely, then store them in a freezer-safe bag for up to 2 months.
Nutritional Information & Benefits
Here’s a quick breakdown of the nutritional value (per popper, depending on the size):
- Calories: ~50
- Protein: ~1g
- Fat: ~2g
- Carbs: ~6g
These poppers are low in sugar and provide a small dose of protein and carbs to kickstart your morning. If you’re watching your sugar intake, you can reduce the maple syrup slightly without sacrificing flavor.
Conclusion
There you have it—Easy Maple Pancake Poppers that are as fun to eat as they are to make! These little bites are a game-changer for busy mornings or lazy weekends, offering all the pancake goodness you love with none of the hassle. I can’t wait for you to try them!
Have you made these pancake poppers yet? Let me know your thoughts or any fun variations you tried in the comments below. And if you loved this recipe, don’t forget to share it with your friends or pin it for later. Happy cooking!
FAQs
Can I make pancake poppers ahead of time?
Yes! You can bake them the night before and reheat them in the morning. They’re also freezer-friendly.
What’s the best way to reheat pancake poppers?
Pop them in the microwave for 10-15 seconds or reheat in a 350°F oven for about 5 minutes.
Can I use pancake mix instead of making batter from scratch?
Absolutely! Just follow the mix instructions and add a touch of maple syrup for flavor.
Are these poppers kid-friendly?
Yes! Kids love the bite-sized format and the subtle maple sweetness.
Can I make these without a mini muffin tin?
You can use a regular muffin tin, but the poppers will be larger. Adjust the baking time as needed.