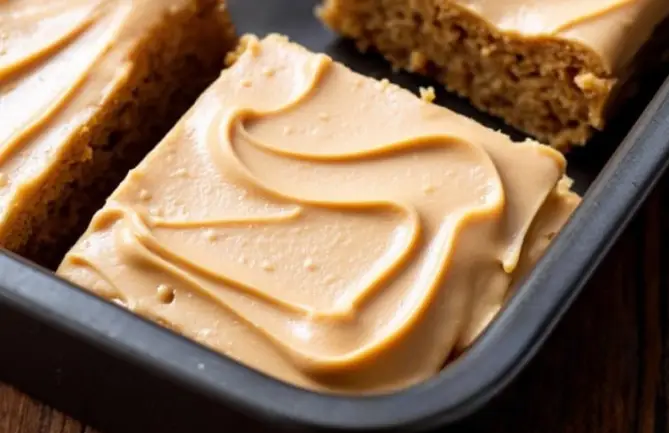
Do you remember those magical peanut butter cookie bars served by lunch ladies back in school? The ones so buttery, chewy, and deeply satisfying that you’d dream about them long after lunchtime was over? These Lunch Lady Peanut Butter Cookie Bars are a nostalgic treat that brings all those warm childhood memories right back to the forefront. Honestly, they’re the kind of dessert that feels like a hug in cookie form!
This recipe is worth making because it’s simple, uses pantry staples, and delivers big on flavor. Whether you’re baking them for a potluck, a cozy family night, or just because you’re craving something sweet, these bars will become your go-to. Plus, they’re perfect for sharing—or keeping all to yourself. No judgment here!
Fun fact: Peanut butter cookie bars first gained popularity in cafeterias for their ease of preparation and universal appeal. They’ve stuck around for decades because, let’s face it, peanut butter makes everything better.
Recipe Story/Background
The history of these cookie bars is rooted in nostalgia. Back in the day, school cafeterias were all about simple recipes that could feed a crowd. Peanut butter bars fit the bill perfectly—they were inexpensive, easy to make in bulk, and loved by kids and adults alike. Most lunch ladies had their own spin on the recipe, but the core ingredients were always the same: peanut butter, sugar, and a soft, chewy cookie base.
For me, these cookie bars are more than just a dessert—they’re a piece of my childhood. I remember lining up with my tray, hoping there’d be enough for seconds. That first bite was pure joy. Fast forward to today, and I’m still obsessed. That’s why I’ve spent years perfecting this recipe to capture all the magic of the original, with just a touch of my personal flair.
These bars are especially great during the cooler months when you’re craving something comforting. They also make fantastic holiday treats—just add a drizzle of chocolate or some festive sprinkles to dress them up. Trust me, no one will complain.
Ingredient Discussion
Let’s break down the ingredients for these Lunch Lady Peanut Butter Cookie Bars. Each one plays a key role in creating that perfect, nostalgic flavor.
- Peanut Butter: The star of the show! Creamy peanut butter works best for that smooth texture, but you can use chunky if you want a bit of crunch. Go for a natural brand without added sugar for a more authentic taste.
- Butter: Unsalted butter gives the bars their rich, buttery flavor. Make sure it’s softened to blend easily with the sugar.
- Brown Sugar: Adds a deep, molasses-like sweetness that complements the peanut butter beautifully.
- Granulated Sugar: Balances the richness and brings a hint of crunch to the edges.
- Eggs: These provide structure and moisture, making the bars soft and chewy. Room temperature eggs work best.
- All-Purpose Flour: The base of the dough. If you’re gluten-free, you can substitute with a 1:1 gluten-free flour blend.
- Baking Powder and Baking Soda: Ensure the bars rise evenly and stay soft instead of dense.
- Vanilla Extract: A subtle but essential flavor enhancer. Use pure vanilla if possible—it makes a difference!
- Salt: Balances the sweetness and brings out the peanut butter’s natural flavor. Don’t skip this!
Pro tip: If you’re feeling extra indulgent, sprinkle some mini chocolate chips or crushed peanuts on top before baking. It’s a game-changer!
Equipment Needed
You don’t need fancy tools to make these cookie bars—just a few basics you probably already have in your kitchen:
- Mixing Bowls: A large one for the dough and a smaller one for any pre-mixing.
- Hand or Stand Mixer: Makes creaming the butter and sugar a breeze. A sturdy whisk works in a pinch.
- 9×13 Baking Pan: The size is perfect for spreading out the dough evenly.
- Parchment Paper: Helps prevent sticking and makes cleanup easier.
- Rubber Spatula: Great for scraping down the bowl and spreading the dough.
If you don’t have a mixer, you can mix everything by hand—it just takes a bit more elbow grease. And if you’re short on parchment paper, greasing your pan with butter or non-stick spray works just fine.
Preparation Method
- Preheat the oven: Set it to 350°F (175°C) and line your baking pan with parchment paper.
- Cream the butter and sugars: In a large mixing bowl, beat 1 cup (226g) of softened butter with 1 cup (200g) of brown sugar and 1 cup (200g) of granulated sugar until light and fluffy—about 3 minutes.
- Add the peanut butter: Mix in 1 cup (240g) of creamy peanut butter until fully combined.
- Incorporate the eggs and vanilla: Beat in 2 large eggs (room temperature) one at a time, then add 2 teaspoons of vanilla extract.
- Combine dry ingredients: In a separate bowl, whisk together 2½ cups (310g) of all-purpose flour, 1 teaspoon of baking powder, ½ teaspoon of baking soda, and ½ teaspoon of salt.
- Mix the dough: Gradually add the dry ingredients to the wet mixture, stirring just until combined. Don’t overmix!
- Spread the dough: Transfer the dough to your prepared pan and press it evenly using a spatula or your hands.
- Bake: Place the pan in the oven and bake for 25–30 minutes, or until the edges are golden and a toothpick inserted in the center comes out clean.
- Cool and slice: Let the bars cool completely in the pan before cutting into squares. Trust me, waiting is worth it!
The aroma of peanut butter filling your kitchen is your cue that something amazing is about to happen!
Cooking Tips & Techniques
Here are some helpful tips to make your Lunch Lady Peanut Butter Cookie Bars turn out perfectly:
- Don’t rush the creaming process: Creaming the butter and sugar thoroughly creates a light, fluffy base.
- Room temperature ingredients: Eggs and butter mix better when they’re not cold.
- Watch the oven: Overbaking can dry out the bars. Check them at 25 minutes and go from there.
- Let them cool: Cutting too soon can cause crumbly edges. Give them time to set.
- Custom toppings: Drizzle melted chocolate or sprinkle flaky sea salt for a gourmet touch.
Variations & Adaptations
This recipe is incredibly flexible! Here are some fun variations to try:
- Gluten-Free: Swap the all-purpose flour for a 1:1 gluten-free blend.
- Chocolate Lover’s Twist: Mix in ½ cup of chocolate chips or swirl melted chocolate on top.
- Nut-Free Version: Use sunflower seed butter or Wowbutter instead of peanut butter.
- Seasonal Flair: Add cinnamon in fall or crushed candy canes for a holiday vibe.
- Personal Touch: I once added a swirl of raspberry jam for a PB&J-inspired treat—it was a hit!
Serving & Storage Suggestions
These cookie bars are best served at room temperature, but slightly warmed in the microwave (about 10 seconds) takes them to the next level. Pair them with a cold glass of milk or a steaming cup of coffee for the ultimate indulgence.
For storage, keep them in an airtight container at room temperature for up to 5 days. They also freeze beautifully—wrap individual bars in plastic wrap and store them in a freezer-safe bag for up to 3 months. To reheat, microwave for 15–20 seconds or let them thaw overnight at room temperature.
Nutritional Information & Benefits
Here’s a rough estimate of the nutritional values per serving (based on 16 bars):
- Calories: 250
- Fat: 15g
- Carbohydrates: 25g
- Protein: 5g
- Sugar: 18g
Peanut butter provides healthy fats and protein, making these bars more filling than your average dessert. However, they’re still a treat, so enjoy them in moderation!
Conclusion
If you’re looking for a dessert that’s easy, nostalgic, and downright delicious, these Lunch Lady Peanut Butter Cookie Bars are a must-try. With simple ingredients and straightforward steps, they’re perfect for bakers of all skill levels.
I love this recipe because it’s a little slice of childhood, reimagined for today. Plus, it’s endlessly customizable—you can truly make it your own.
Give these bars a try, and let me know what you think in the comments below! If you make any fun variations, I’d love to hear about them. Happy baking!
FAQs
Can I use crunchy peanut butter instead of creamy?
Absolutely! Crunchy peanut butter adds a bit of texture, which can be a nice twist.
What’s the best way to tell if the bars are done baking?
Look for golden edges and a toothpick inserted in the center coming out clean.
Can I double the recipe?
Yes, just use a larger pan or bake in two batches. Adjust baking time slightly if needed.
How do I make these dairy-free?
Replace the butter with a plant-based alternative like coconut oil or vegan butter.
Can I freeze the dough instead of baking it right away?
Yes! Wrap the dough tightly in plastic wrap and freeze for up to 3 months. Thaw before baking.