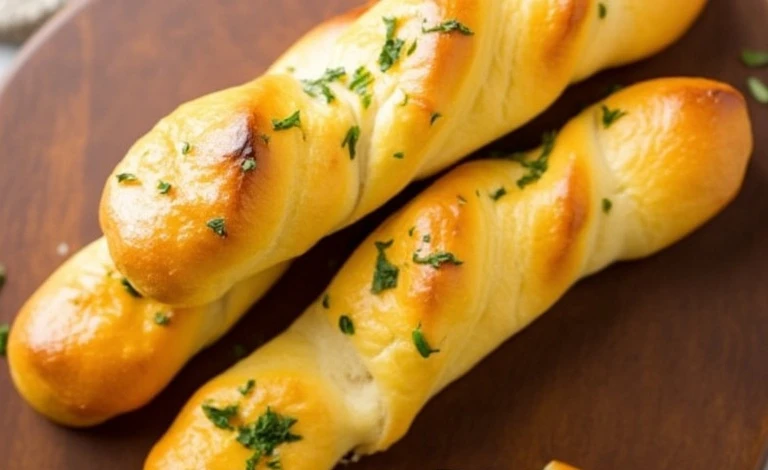
Have you ever walked into a kitchen and been greeted by the warm, inviting aroma of freshly baked bread? It’s pure magic! These garlic herb breadsticks deliver all the cozy vibes with their golden crust, fluffy texture, and irresistible buttery coating. Trust me, once you try making them, you’ll wonder why you ever bought the store-bought ones.
The Story Behind Garlic Herb Breadsticks
Breadsticks have an intriguing history that dates back to 17th-century Italy. Known as “grissini,” they were originally thin, crunchy sticks served as an appetizer. Over time, they’ve evolved into the soft, buttery version we know and love today.
For me, these breadsticks are the ultimate comfort food. They remind me of family dinners around the table, dipping warm breadsticks into marinara sauce while sharing laughs. They’re also perfect for any season—pair them with hearty soups in the winter or light salads in the summer. And let’s not forget how dreamy they are alongside a creamy Alfredo pasta!
This recipe takes that traditional Italian concept and adds a modern twist with flavorful herbs and garlic. It’s a crowd-pleaser every single time!
Ingredients: What Makes These Breadsticks Special
- Active Dry Yeast: The key to fluffy breadsticks! Make sure it’s fresh and activate it properly for the best rise.
- Warm Water: The right temperature (110°F/43°C) ensures your yeast thrives without getting killed off.
- Granulated Sugar: Helps feed the yeast and adds a subtle sweetness.
- All-Purpose Flour: The perfect balance for soft yet structured breadsticks. You can substitute with bread flour for extra chewiness.
- Salt: Enhances flavor and balances the sweetness.
- Olive Oil: Adds richness to the dough and keeps it tender.
- Butter: Melted butter is the secret to that irresistible golden shine and buttery flavor.
- Garlic Powder: Packs a punch of garlic flavor without overpowering the breadsticks.
- Dried Herbs: Oregano, parsley, and thyme add a fragrant, earthy touch. Feel free to use fresh herbs if you have them!
Pro Tip: If you’re missing an herb, swap it out for what you have on hand—rosemary or basil works beautifully too!
Equipment Needed
- Mixing Bowl: A large bowl for combining and kneading the dough.
- Measuring Cups and Spoons: Precision is key for baking success.
- Kitchen Scale: If you prefer weighing ingredients for accuracy.
- Baking Sheet: Perfect for baking breadsticks evenly.
- Parchment Paper: Prevents sticking and makes cleanup a breeze.
- Pastry Brush: Helps coat the breadsticks with buttery herb goodness.
Don’t have a pastry brush? No worries! Use the back of a spoon—it works in a pinch.
Preparation Method
- Start by activating the yeast. In a small bowl, mix 2 1/4 teaspoons of active dry yeast with 1 cup (240ml) warm water and 2 tablespoons (25g) granulated sugar. Let it sit for 5-10 minutes until it’s foamy.
- In a large mixing bowl, combine 2 1/2 cups (315g) all-purpose flour and 1 teaspoon (6g) salt. Add the yeast mixture and 3 tablespoons (45ml) olive oil. Stir until the dough comes together.
- Transfer the dough to a lightly floured surface and knead for 8-10 minutes until smooth and elastic. If the dough feels sticky, sprinkle in a little extra flour a tablespoon at a time.
- Place the dough in a greased bowl, cover with a damp towel, and let it rise for 1 hour in a warm spot.
- After the dough has doubled in size, punch it down and divide it into 12 equal pieces. Roll each piece into a breadstick shape, about 6 inches long.
- Line a baking sheet with parchment paper and arrange the breadsticks on it. Cover and let them rise for another 20 minutes.
- Preheat your oven to 375°F (190°C). Bake the breadsticks for 12-15 minutes, or until they’re golden brown.
- While the breadsticks are baking, prepare the butter mixture. Combine 3 tablespoons (42g) melted butter, 1 teaspoon (3g) garlic powder, and the dried herbs (oregano, parsley, thyme).
- Brush the hot breadsticks with the butter mixture as soon as they come out of the oven. Serve warm and enjoy!
Cooking Tips & Techniques
Here are a few helpful tips to make sure your breadsticks turn out perfect:
- Don’t rush the yeast: Give it time to activate properly. If it doesn’t foam, your yeast might be expired.
- Use warm water: Too hot will kill the yeast; too cold won’t activate it.
- Keep the dough moist: Cover it with a damp towel during rising to prevent it from drying out.
- Don’t overbake: Watch closely during the last few minutes—golden brown is the goal.
- Brush immediately: The butter mixture absorbs best when the breadsticks are piping hot.
Variations & Adaptations
Want to switch things up? Here are a few ideas:
- Cheesy Breadsticks: Sprinkle shredded mozzarella or Parmesan on top before baking.
- Gluten-Free Option: Use a 1:1 gluten-free flour blend instead of all-purpose flour.
- Spicy Kick: Add a pinch of red pepper flakes to the butter mixture for a hint of heat.
- Fresh Herbs: Swap dried herbs for fresh ones for a brighter flavor.
Once, I added rosemary and a dash of sea salt to the butter mixture—let me tell you, it was heavenly!
Serving & Storage Suggestions
These breadsticks are best served warm, straight from the oven. Pair them with a marinara dipping sauce, creamy Alfredo, or a hearty bowl of soup. They also shine as a side for a crisp Caesar salad.
To store leftovers, wrap them tightly in foil or place them in an airtight container. Refrigerate for up to 3 days or freeze for up to 1 month. When reheating, pop them in a 350°F (175°C) oven for 5-7 minutes to restore their buttery goodness.
Nutritional Information & Benefits
Each breadstick contains approximately:
- Calories: 150
- Carbohydrates: 20g
- Protein: 3g
- Fat: 5g
The olive oil contributes heart-healthy fats, while the herbs provide antioxidants and flavor without added sodium. If you’re watching your calorie intake, you can reduce the butter slightly without sacrificing too much flavor.
Conclusion
There’s something so satisfying about pulling a tray of homemade garlic herb breadsticks out of the oven. They’re cozy, flavorful, and perfect for sharing—or keeping all to yourself (no judgment here!).
I hope this recipe adds a little extra warmth to your dinner table. Don’t be afraid to get creative with the herbs or pair them with your favorite dips. Let me know how yours turn out in the comments—I’d love to hear your variations!
Happy baking, and may your breadsticks always be golden and buttery!
FAQs
- Can I use instant yeast instead of active dry yeast?
- Yes! If using instant yeast, skip the activation step and mix it directly with the dry ingredients.
- What’s the best way to reheat breadsticks?
- Reheat them in a 350°F (175°C) oven for 5-7 minutes for the best texture.
- Can I freeze the dough?
- Absolutely! After shaping the breadsticks, freeze them on a baking sheet, then transfer to a freezer bag. Let them thaw and rise before baking.
- What if my breadsticks don’t rise?
- Check your yeast—it may be expired. Also, ensure your water temperature isn’t too hot or too cold.
- Can I make these vegan?
- Yes! Substitute the butter with vegan butter and ensure your sugar is vegan-friendly.