Imagine sinking your spoon into a rich, creamy chocolate mousse cup, the velvety sweetness melting in your mouth. If you’re a chocolate lover like me, this recipe for decadent chocolate mousse cups is going to be your next favorite dessert. Whether you’re hosting a fancy dinner or treating yourself on a quiet evening, this indulgent treat fits the bill for any occasion. Plus, it’s surprisingly easy to make, no culinary degree required!
Chocolate mousse has been a classic dessert for decades, and for good reason—it’s the perfect balance of airy lightness and deep chocolate flavor. I first fell in love with mousse at a little café, and I’ve been obsessed ever since. Let’s dive into this recipe and create a dessert you’ll want to make over and over again.
Recipe Story & Background
The origins of chocolate mousse trace back to the 18th century in France, where “mousse” literally means foam. It was a dessert reserved for the elite due to the expensive ingredients and labor-intensive preparation. Lucky for us, modern techniques have made it much simpler!
Growing up, my family didn’t make mousse often—it seemed too fancy for weeknight desserts. But on special occasions, like birthdays or holidays, it would grace the table in all its decadent glory. I remember my mom experimenting with different toppings and serving it in elegant cups. That tradition stuck with me, and now I whip up chocolate mousse cups whenever I want to add a little elegance to the day.
These mousse cups are also perfect for seasonal events. Think Valentine’s Day, Christmas gatherings, or summer parties. They’re easy to dress up with fresh fruits, whipped cream, or even edible gold flakes. Trust me, this recipe will become your go-to for impressing friends and family.
Ingredient Discussion
Let’s talk ingredients. The beauty of chocolate mousse cups lies in their simplicity, but each component plays a vital role in creating that perfect texture and flavor.
- Chocolate: Stick with high-quality semi-sweet or dark chocolate (at least 60% cocoa content). It’s the star of the show, so avoid cheap baking chocolate. Brands like Ghirardelli or Valrhona are excellent options. If you’re not a fan of dark chocolate, use milk chocolate instead for a sweeter profile.
- Heavy Cream: You’ll need this for both the mousse and whipped topping. Make sure it’s cold and fresh for optimal whipping. If you’re dairy-free, coconut cream can be a great substitute.
- Eggs: Using eggs gives the mousse its airy texture. You’ll need to separate the yolks and whites, and the whites will be whipped into a fluffy foam. If you’re concerned about raw eggs, opt for pasteurized ones.
- Sugar: Just a touch to sweeten the mousse. Granulated sugar works best, but you can substitute with powdered sugar for a finer texture.
- Vanilla Extract: Adds warmth and depth to the mousse. Pure vanilla extract is ideal, but you can also use almond extract for a twist.
For toppings, the possibilities are endless. Fresh berries, crushed nuts, shaved chocolate, or even caramel drizzle can take these mousse cups to the next level. Feel free to get creative!
Equipment Needed
To make these decadent chocolate mousse cups, you don’t need fancy equipment. Here’s what you’ll want to have on hand:
- Mixing Bowls: Several sizes for separating eggs and whipping cream.
- Hand Mixer or Stand Mixer: Essential for whipping the cream and egg whites. If you don’t have one, a whisk and some elbow grease will work, but get ready for a workout!
- Double Boiler: For melting the chocolate gently without scorching. A heatproof bowl over a pot of simmering water works just as well.
- Spatula: Useful for folding ingredients together without deflating them.
- Serving Cups: Glass cups or ramekins work wonderfully for presentation. If you’re hosting a party, consider disposable clear cups for convenience.
If you don’t have a double boiler, you can melt the chocolate in the microwave in 30-second intervals, stirring in between to prevent burning.
Preparation Method
Let’s get down to the fun part—making these irresistible chocolate mousse cups. Follow these steps to achieve smooth, fluffy perfection.
- Melt the Chocolate: Chop 8 oz (225 g) of semi-sweet chocolate into small pieces. Place in a double boiler or heatproof bowl over simmering water. Stir until melted and smooth, then remove from heat and let cool slightly.
- Whip the Cream: In a chilled mixing bowl, beat 1 ½ cups (360 ml) of heavy cream until stiff peaks form. Set aside ½ cup (120 ml) for topping later.
- Separate the Eggs: Separate 4 eggs, placing the whites in one bowl and the yolks in another. Whisk the yolks with 2 tbsp (25 g) sugar and 1 tsp (5 ml) vanilla extract until pale and creamy.
- Combine Chocolate and Yolks: Gradually add the cooled melted chocolate to the yolk mixture, stirring until fully incorporated.
- Whip the Egg Whites: Using a clean bowl and beaters, whip the egg whites until they form stiff peaks. Be careful not to overwhip or they’ll become grainy.
- Fold Everything Together: Gently fold the whipped egg whites into the chocolate mixture in three additions, being careful not to deflate the mixture. Then fold in the whipped cream until fully combined.
- Assemble the Cups: Spoon the mousse into serving cups, smoothing the tops. Chill in the refrigerator for at least 2 hours to set.
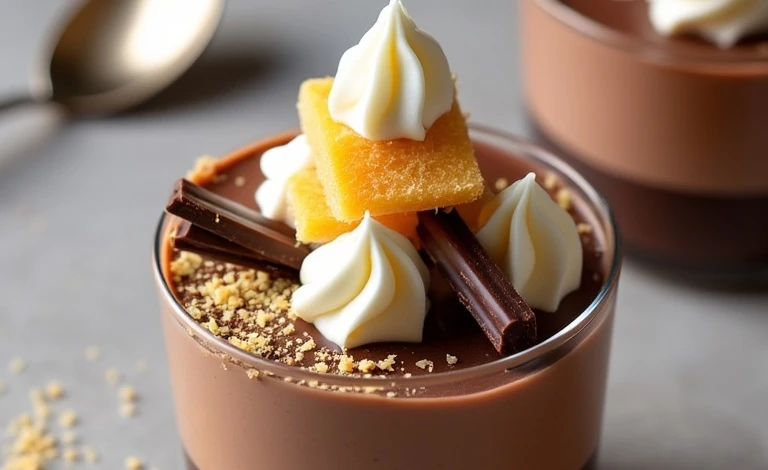
- Add Toppings: Before serving, dollop whipped cream on top and garnish with your favorite toppings like fresh berries or chocolate shavings.
Pro tip: Use a piping bag to fill the cups neatly if you want a polished look. And don’t skip the chilling step—it’s what gives the mousse its signature texture!
Cooking Tips & Techniques
Making chocolate mousse might seem intimidating at first, but these tips will help you nail it every time:
- Use Room Temperature Ingredients: Let your eggs come to room temperature before whipping to maximize their volume.
- Cool the Chocolate: Don’t add hot melted chocolate to the egg yolks—it’ll cook them! Let it cool slightly but not to the point of hardening.
- Fold, Don’t Stir: Folding aerates the mousse, keeping it light and fluffy. Stirring too vigorously will deflate the mixture.
- Chill Long Enough: Give the mousse at least 2-3 hours in the fridge to set properly. Overnight chilling is even better.
- Troubleshooting: If your mousse seems grainy, it may be overmixed. Work gently and patiently during each step.
Cooking is all about learning through trial and error. Even if your first batch isn’t perfect, you’ll improve every time!
Variations & Adaptations
One of the best things about chocolate mousse cups is how versatile they are. Here are a few ways to make this recipe your own:
- Dairy-Free: Substitute heavy cream with coconut cream and use dairy-free chocolate. The result is just as rich and creamy!
- Seasonal Twist: Add a splash of peppermint extract for the holidays or garnish with fresh peaches and mint for summer vibes.
- Healthier Option: Use dark chocolate with 70% cocoa and swap sugar for a natural sweetener like honey or maple syrup.
- Alcohol Infusion: For an adult version, add 1 tbsp (15 ml) of Grand Marnier, Kahlúa, or Baileys to the chocolate mixture.
- Custom Toppings: Try crushed Oreos, toasted coconut, or even edible flowers for a unique presentation.
My personal favorite variation? Swirling in a dollop of peanut butter before chilling. Chocolate and peanut butter are always a winning combo!
Serving & Storage Suggestions
Chocolate mousse cups are best served chilled, straight out of the fridge. They’re perfect for individual servings—just grab a spoon and dig in!
For presentation, I love topping them with whipped cream, a sprinkle of cocoa powder, or fresh raspberries for a pop of color. Pair them with a cup of coffee or a glass of red wine for an indulgent pairing.
If you have leftovers (unlikely, but possible!), cover the cups tightly with plastic wrap and store in the fridge for up to 3 days. Mousse doesn’t freeze well, as the texture can change upon thawing, so enjoy it fresh!
When reheating, skip the microwave—just let the cups sit at room temperature for 10-15 minutes to slightly soften before eating.
Nutritional Information & Benefits
Here’s a quick breakdown of the nutritional value per serving of chocolate mousse (based on standard ingredients):
- Calories: ~350
- Fat: ~25 g
- Carbohydrates: ~22 g
- Protein: ~6 g
Dark chocolate is rich in antioxidants and may support heart health and brain function. Eggs provide protein, and heavy cream adds calcium, though this is definitely a treat rather than a health food!
If you’re watching your sugar intake, you can reduce the sugar or use a natural alternative like stevia.
Conclusion
Chocolate mousse cups are one of those desserts that never fail to impress. They’re elegant, rich, and versatile enough for any occasion—whether it’s a dinner party or a cozy night in.
I love this recipe not just for its flavor but for the memories it brings back every time I make it. From experimenting with toppings to watching my guests’ faces light up, it’s a joy to share these decadent treats.
Give this recipe a try and let me know how it turned out! Leave a comment below with your favorite variation or share a photo on social media. Happy mousse-making!
FAQs
Can I make chocolate mousse cups ahead of time?
Yes! You can prepare them a day in advance and store them in the fridge. Just add toppings right before serving.
What’s the best chocolate to use for mousse?
High-quality semi-sweet or dark chocolate with at least 60% cocoa content works best. The better the chocolate, the better the mousse!
Can I skip the eggs in this recipe?
Yes, you can make an egg-free version by using whipped cream and melted chocolate. However, the texture will be denser.
How long does chocolate mousse take to set?
Chill for at least 2 hours, but overnight chilling gives the best results.
Can I freeze chocolate mousse cups?
Freezing isn’t recommended as it can alter the creamy texture. They’re best enjoyed fresh and chilled!