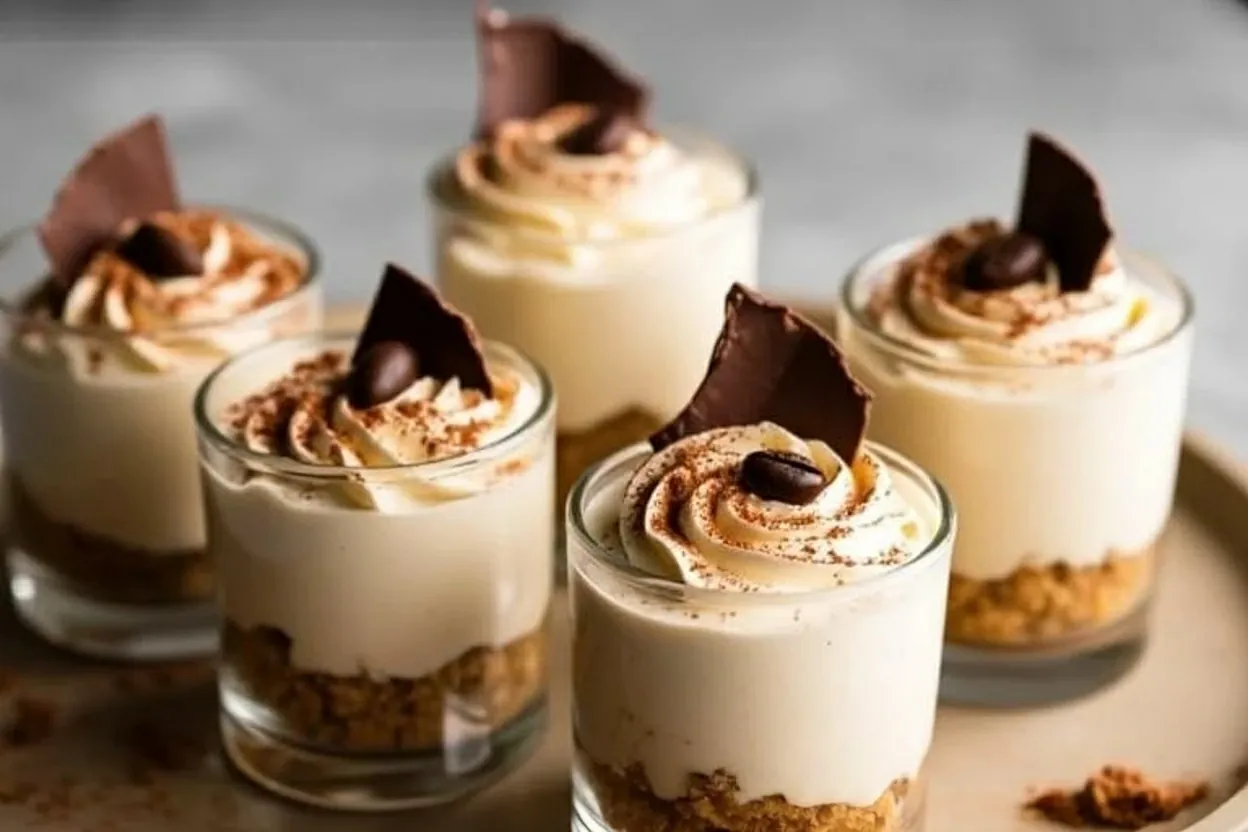
If you’re looking for a dessert that’s both elegant and easy to make, these Creamy Mini Tiramisu Cheesecake Cups are the answer! Picture this: layers of creamy mascarpone cheesecake, coffee-soaked ladyfingers, and a dusting of cocoa powder, all served in adorable single-serve portions. It’s the perfect dessert for parties, holidays, or even a romantic dinner at home. Plus, they’re surprisingly simple to prepare, and the no-bake aspect makes them a stress-free option for any occasion.
Tiramisu already holds a special place in the hearts of dessert lovers everywhere, but this mini cheesecake version takes it to another level. You get all the classic tiramisu flavors, but with the added richness of cheesecake. Trust me, these little cups will be the star of the dessert table!
Recipe Story: Why I Love Mini Tiramisu Cheesecake Cups
Growing up, tiramisu was one of those desserts that felt almost magical. My mom would make it on special occasions, and the combination of coffee, cocoa, and creaminess was pure heaven. Fast forward to today, and I wanted to create a version of tiramisu that’s easy to serve at parties—without sacrificing any of that nostalgic charm.
The idea for these mini tiramisu cheesecake cups came to me while planning a holiday dinner party. I wanted something that would feel fancy but wouldn’t require me to spend hours in the kitchen. These cups were the perfect solution! They’re individually portioned, so there’s no slicing or serving drama, and they look absolutely stunning when arranged on a dessert tray.
What I love most about this recipe is its versatility. You can make them ahead of time (which is a lifesaver for party prep), and they’re easy to customize depending on the occasion. Whether it’s a baby shower, a birthday party, or just a cozy night in, these mini cheesecake cups always steal the show.
Ingredients for Mini Tiramisu Cheesecake Cups
Let’s break down the key ingredients that make this dessert so irresistible:
- Mascarpone Cheese: This is the heart of the cheesecake layer. It’s rich, creamy, and slightly tangy. If you can’t find mascarpone, cream cheese is a good substitute, but mascarpone gives it that authentic tiramisu flavor.
- Heavy Whipping Cream: Whipped cream adds lightness to the cheesecake layer, creating a silky texture that melts in your mouth.
- Ladyfingers: These little sponge cookies soak up the coffee mixture beautifully. For a gluten-free option, you can use gluten-free ladyfingers, which are often available at specialty grocery stores.
- Espresso or Strong Coffee: The coffee flavor is essential for that classic tiramisu taste. Brew a strong cup, and let it cool before soaking the ladyfingers.
- Powdered Sugar: This sweetens the cheesecake mixture without making it heavy.
- Cocoa Powder: A light dusting of unsweetened cocoa powder on top ties everything together and gives that signature tiramisu look.
- Vanilla Extract: Just a splash adds warmth and depth to the cheesecake mixture.
Optional Ingredients:
- Kahlúa or Coffee Liqueur: If you’re making these for adults, a splash of liqueur in the coffee mixture adds a delightful boozy touch.
- Dark Chocolate Shavings: For an extra layer of indulgence, sprinkle some on top before serving.
Equipment You’ll Need
Here’s what you’ll need to bring these mini tiramisu cheesecake cups to life:
- Electric Mixer: A hand mixer or stand mixer works well for whipping the cream and blending the mascarpone mixture.
- Clear Serving Cups: You can use small glass cups, dessert jars, or even plastic cups for easy cleanup.
- Piping Bag or Zip-Top Bag: For neatly layering the cheesecake mixture. If you don’t have one, a spoon works too!
- Fine Mesh Sieve: This is perfect for dusting cocoa powder evenly over the top.
How to Make Mini Tiramisu Cheesecake Cups
- Whip the Cream: In a mixing bowl, whip 1 cup (240 ml) of heavy whipping cream until stiff peaks form. Set aside.
- Prepare the Cheesecake Mixture: In another bowl, beat 8 oz (225 g) of mascarpone cheese, 1/3 cup (40 g) of powdered sugar, and 1 tsp of vanilla extract until smooth and creamy. Gently fold in the whipped cream until fully combined.
- Make the Coffee Mixture: Brew 1 cup (240 ml) of espresso or strong coffee and let it cool. If using, stir in 2 tbsp of Kahlúa or coffee liqueur.
- Soak the Ladyfingers: Quickly dip each ladyfinger into the coffee mixture. Be careful not to oversoak, as they can become mushy.
- Assemble the Cups: Start by placing a layer of coffee-soaked ladyfingers at the bottom of each cup. Pipe or spoon a layer of the mascarpone mixture on top. Repeat the layers until the cup is full, finishing with the cheesecake layer.
- Chill: Refrigerate the cups for at least 2 hours, or overnight if possible, to let the flavors meld together.
- Dust with Cocoa Powder: Just before serving, use a fine mesh sieve to dust the tops with unsweetened cocoa powder. Add chocolate shavings if desired.
Cooking Tips & Techniques
- Don’t Oversoak the Ladyfingers: A quick dip in the coffee is all they need. Too much soaking can make them fall apart.
- Use Cold Ingredients: Keep your mascarpone and cream cold for the best texture. Warm ingredients can make the mixture too runny.
- Make Ahead: These cups taste even better after a night in the fridge, so feel free to prepare them a day in advance.
- Layer Neatly: Using a piping bag makes it easier to create clean layers, but don’t stress too much—it’ll taste amazing no matter what!
Variations & Adaptations
- Gluten-Free: Swap regular ladyfingers for gluten-free ones.
- Alcohol-Free: Skip the liqueur and use plain coffee instead.
- Chocolate Lovers: Add a layer of chocolate ganache between the ladyfingers and mascarpone mixture.
- Seasonal Twist: Add a touch of cinnamon or nutmeg for a holiday vibe.
- Fruit-Infused: Layer in some fresh berries for a fruity contrast.
Serving & Storage Suggestions
Serve these mini tiramisu cheesecake cups chilled for the best flavor and texture. They’re perfect on their own, but you can pair them with a cup of espresso or a glass of Prosecco for an extra treat.
To store, cover the cups with plastic wrap or lids and keep them in the refrigerator for up to 3 days. If you want to freeze them, skip the cocoa powder topping and wrap them tightly. They’ll keep in the freezer for up to 2 weeks. Thaw in the fridge overnight, then dust with cocoa powder before serving.
Nutritional Information & Benefits
Each cup provides approximately:
- Calories: 280
- Protein: 4 g
- Carbohydrates: 20 g
- Fat: 20 g
The mascarpone cheese is rich in calcium and healthy fats, while the cocoa powder adds a dose of antioxidants. Just remember, this is a dessert, so enjoy it as an occasional indulgence!
Conclusion
These Creamy Mini Tiramisu Cheesecake Cups are the perfect combination of elegance and ease. Whether you’re hosting a party or simply treating yourself, they’re guaranteed to impress. I love how customizable they are—you can make them fancy or keep them simple, and they always turn out delicious.
Give this recipe a try and let me know how it goes! Share your own variations in the comments, and don’t forget to tag me on social media if you make them. I can’t wait to see your creations!
FAQs
Can I make these mini tiramisu cheesecake cups in advance?
Yes! They taste even better when made a day ahead, as the flavors have time to meld together.
What can I use instead of mascarpone cheese?
Cream cheese is a suitable substitute, though it will slightly alter the flavor.
Can I make these without coffee?
Absolutely! Use hot chocolate or a flavored syrup for a kid-friendly version.
How do I prevent the layers from mixing together?
Using a piping bag helps create clean layers, but even if they mix a bit, they’ll still taste amazing.
Are these cups suitable for freezing?
Yes, but skip the cocoa powder topping before freezing. Add it after thawing for the best presentation.