It was 10:47 PM on a frantic Tuesday in mid-December, and I had a very specific craving for something festive that didn’t require turning on the oven. The Christmas playlist was on its third loop, the living room was a sea of half-wrapped presents, and I was running on peppermint mocha fumes. I didn’t have the patience for a traditional layered cake or the time to roll out sugar cookies, but I had a box of vanilla cake mix, a tub of cream cheese frosting, and a wild idea that arrived like a bolt of holiday lightning. I wanted the joy of a Christmas treat without the three-hour production. That night, standing in my messy kitchen with sprinkles stuck to my fingers, I discovered that these little cake pops weren’t just a shortcut—they were a revelation. They came together in under an hour, and by the time I was drizzling the white chocolate, I felt like I’d cracked the code to holiday baking. Honestly, maybe you’ve been there—that moment when you need something beautiful and delicious but your energy tank is on empty. This recipe stayed with me because it proved that you don’t need a culinary degree or a free afternoon to make something that looks like it came from a fancy bakery. It’s Christmas magic for the tired, the busy, and the beautifully overwhelmed.
Why You’ll Love This Recipe
Let me tell you why these Christmas cake pops have become my go-to holiday treat. After testing this recipe about six times in one week (my neighbors were very happy), I can confidently say this version is the one that works every single time.
- Quick & Easy: From start to finish, you’re looking at about 45 minutes. No baking required if you use a pre-made cake, and the hands-on time is maybe 20 minutes. Perfect for those nights when you remember at 9 PM that you need a treat for tomorrow’s cookie exchange.
- Simple Ingredients: Cake mix, frosting, candy melts, and sprinkles. That’s it. No fancy grocery trips to three different stores for obscure ingredients. You probably have most of this in your pantry right now.
- Perfect for Holiday Gatherings: These little guys are ideal for Christmas parties, potlucks, teacher gifts, or just keeping your sanity intact during the holiday chaos. They travel well and look impressive on any dessert table.
- Crowd-Pleaser: I’ve watched kids and adults alike grab three or four of these before anyone noticed. The combination of soft cake and crunchy white chocolate coating is irresistible.
- Unbelievably Delicious: The texture is what gets me every time—creamy and moist on the inside with that satisfying snap when you bite through the white chocolate shell. It’s comfort food in bite-sized form.
What makes this recipe different from the rest? It’s the ratio of frosting to cake. Most recipes use way too much frosting, making the cake pops greasy and heavy. I’ve tested the perfect balance—just enough to hold everything together without turning your cake balls into a soggy mess. Plus, the white chocolate drizzle isn’t just decorative; it adds a subtle sweetness that complements the cake without overwhelming it. This isn’t just another version of cake pops—it’s your best version, the one you’ll come back to year after year.
What Ingredients You Will Need
This recipe uses simple, everyday ingredients to deliver festive flavor without the fuss. Most of these are pantry staples during the holiday season, and substitutions are easy if you need them.
- 1 box vanilla cake mix (plus eggs, oil, and water as directed on the box) — I prefer Betty Crocker or Duncan Hines for consistent results. The vanilla base gives you a blank canvas for holiday flavors.
- 1/3 cup cream cheese frosting (store-bought or homemade) — This is the secret to moist cake pops. Don’t use more than this, or they’ll fall apart. Pillsbury works great in a pinch.
- 12 ounces white candy melts or white chocolate chips — I recommend Wilton candy melts for the smoothest coating. If using white chocolate chips, add 1 teaspoon of coconut oil to thin them out.
- 1 tablespoon coconut oil or vegetable shortening — This helps the white chocolate flow smoothly for that perfect drizzle.
- Christmas sprinkles — Red and green jimmies, snowflake shapes, or nonpareils work beautifully. Get creative with what you find at the store.
- Lollipop sticks — About 20-24 sticks, depending on how many cake pops you make. You can find these at craft stores or online.
- Optional: 1/2 teaspoon peppermint extract — Adds a holiday twist to the cake mixture. Just don’t use more than this, or it’ll taste like toothpaste.
- Optional: Red food coloring — A few drops in the cake batter make these extra festive. Gel food coloring works best for vibrant color without thinning the batter.
For ingredient selection, look for candy melts that are fresh—old ones can seize up and become grainy. If you’re using white chocolate chips, check the expiration date because white chocolate doesn’t age well. And here’s a tip I learned the hard way: avoid generic brand cake mixes for this recipe. The texture is different, and the cake pops won’t hold their shape as well. Stick with the name brands you trust.
Substitution guidance: For a gluten-free version, use a gluten-free vanilla cake mix and check that your candy melts are certified gluten-free. For dairy-free, use a dairy-free cake mix, vegan frosting, and dairy-free white chocolate. The texture will be slightly different, but still delicious.
Equipment Needed
You don’t need a fancy kitchen setup for these cake pops, but having the right tools makes the process smoother. Here’s what you’ll need:
- Large baking sheet — Line it with parchment paper or wax paper for easy cleanup. I use my half-sheet pan for this.
- Mixing bowls — One large bowl for the cake mixture and one small microwave-safe bowl for melting the white chocolate.
- 9×13 inch baking pan — For baking the cake. A round pan works too, but the rectangle gives you more even baking.
- Cookie scoop or melon baller — This ensures all your cake balls are the same size. A 1-tablespoon scoop is perfect.
- Lollipop sticks — About 20-24 sticks. I get mine at Michaels or Amazon.
- Styrofoam block or floral foam — To hold the cake pops upright while the coating sets. A cardboard box with holes poked in it works in a pinch.
- Microwave-safe bowl — For melting the white chocolate. Glass or ceramic works best.
- Fork or dipping tool — For drizzling the white chocolate. A spoon works too, but a fork gives you better control.
If you don’t have lollipop sticks, you can skip them entirely and make cake truffles instead—just roll them into balls and drizzle the white chocolate right on top. No sticks, no fuss. And if you don’t have a Styrofoam block, a muffin tin turned upside down with the cake pops resting between the cups works surprisingly well.
Preparation Method
Follow these steps carefully, and you’ll have beautiful cake pops that look like they took hours. I’ve included all my little tricks and warnings so you don’t make the same mistakes I did.
- Bake the cake: Preheat your oven to 350°F (175°C). Prepare the vanilla cake mix according to the package directions, adding eggs, oil, and water. If you’re using red food coloring, add a few drops now and stir until the batter is evenly pink or red. Pour the batter into a greased 9×13 inch pan and bake for 25-30 minutes, or until a toothpick inserted in the center comes out clean. Let the cake cool completely—this is crucial. Warm cake will make the frosting melt and create a sticky mess. I usually bake the cake the night before and let it cool overnight.
- Crumble the cake: Once the cake is completely cool, use your hands to crumble it into a large bowl. You want fine crumbs, not big chunks. Think breadcrumb consistency. This takes about 3-4 minutes of rubbing the cake between your fingers. It’s messy but oddly satisfying—like a stress ball for holiday anxiety.
- Add the frosting: Add 1/3 cup of cream cheese frosting to the crumbled cake. Use a spatula or your hands to mix it together until the mixture holds together when pressed. You should be able to form a ball that doesn’t crack or fall apart. If it’s too dry, add another tablespoon of frosting. If it’s too wet, add a few more cake crumbs. This is the most important step—get this right, and everything else is easy.
- Form the cake balls: Using a cookie scoop or your hands, roll the mixture into 1-inch balls. You should get about 20-24 balls. Place them on a parchment-lined baking sheet. Pop the sheet in the freezer for 15-20 minutes. This firms them up so they don’t fall apart when you dip them. Don’t skip this step—I once did, and my cake pops disintegrated into the white chocolate.
- Melt the white chocolate: In a microwave-safe bowl, combine the white candy melts and 1 tablespoon of coconut oil. Microwave in 30-second intervals, stirring after each, until completely smooth. Don’t overheat, or the chocolate will seize. It should be thin enough to drizzle easily. If it’s too thick, add another teaspoon of coconut oil.
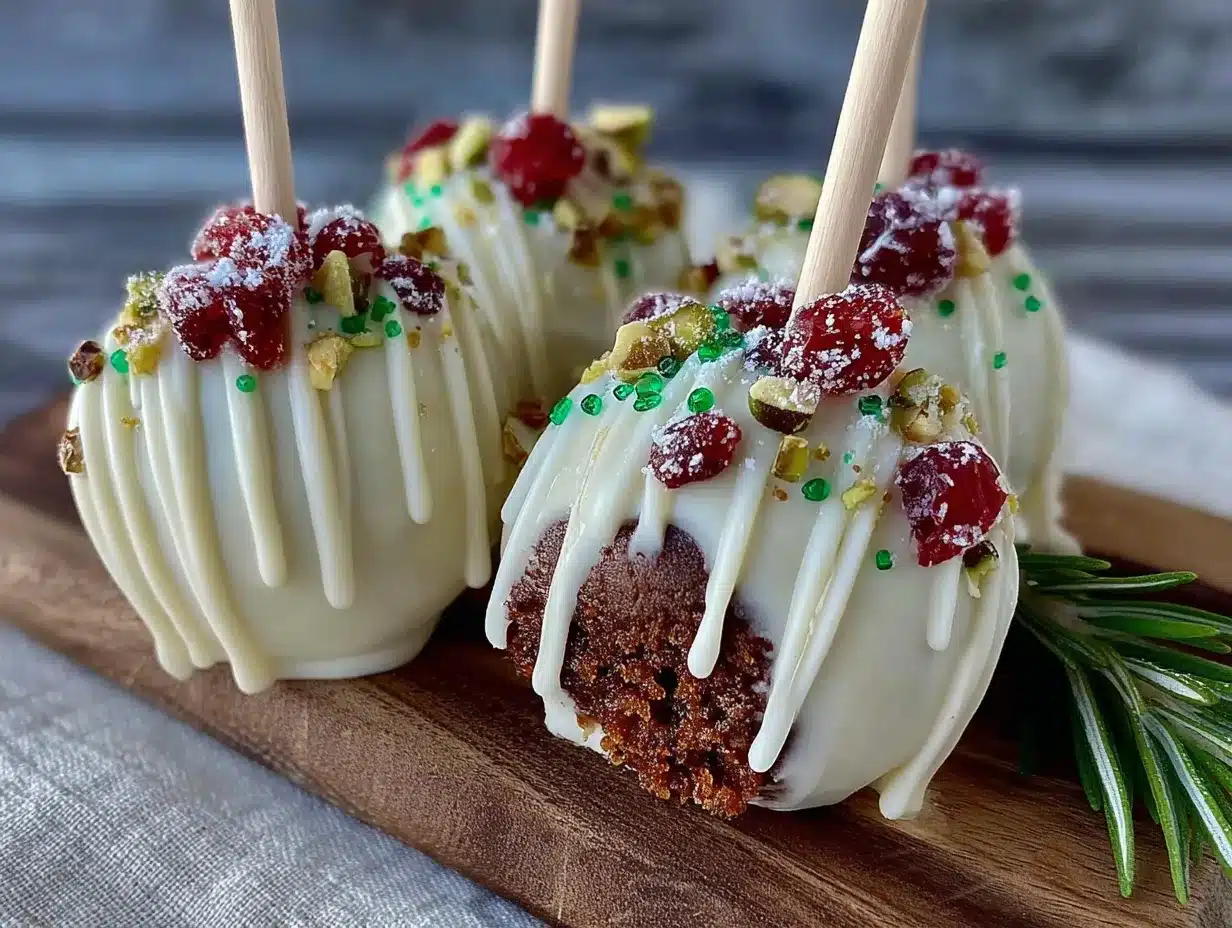
- Dip and decorate: Remove the cake balls from the freezer. Dip the tip of each lollipop stick into the melted white chocolate, then insert it about halfway into a cake ball. This acts like glue and keeps the pop on the stick. Dip the entire cake ball into the white chocolate, gently tap off the excess, and place it in your Styrofoam block. Work quickly—the cake balls warm up fast. Sprinkle with Christmas sprinkles while the coating is still wet.
- Add the drizzle: Once all the cake pops are coated and the white chocolate has set (about 10 minutes), melt a small amount of additional white chocolate. Use a fork to drizzle it back and forth over the cake pops. This gives them that professional bakery look. Let the drizzle set completely before serving, about 15-20 minutes.
Sensory cues: The cake mixture should feel like damp sand when you squeeze it. The white chocolate should flow like thick honey off your spoon. When you tap the excess chocolate, you should see a smooth, even coating without any cake showing through.
Cooking Tips & Techniques
After making these cake pops more times than I care to admit, I’ve collected a few hard-earned lessons. Let me save you some trouble.
The biggest mistake people make is using too much frosting. I know it’s tempting to add the whole tub, but trust me—less is more. Too much frosting makes the cake balls greasy and they’ll slide right off the sticks. Start with 1/3 cup and add more only if needed. I learned this the hard way when my first batch ended up as a puddle of cake-flavored goo at the bottom of the chocolate bowl.
Temperature is everything. The cake balls need to be cold when you dip them—cold enough that they feel firm to the touch. But the white chocolate should be warm and fluid. If your cake balls are too warm, they’ll crack. If your chocolate is too hot, it’ll melt the cake. Find that sweet spot where the cold cake meets the warm chocolate, and you’ll get a perfect seal every time.
Work in small batches. Don’t take all the cake balls out of the freezer at once. Take out 4-5 at a time, dip them, and put them back in the Styrofoam block. This keeps the remaining cake balls cold and makes the dipping process much smoother. I usually do this in assembly-line fashion: dip five, sprinkle five, move on.
Multitasking strategy: While the cake is cooling, set up your dipping station. Have your Styrofoam block ready, your sprinkles open, and your white chocolate measured. The actual dipping goes fast—maybe 10 minutes for all 24 pops—so having everything within arm’s reach makes a huge difference.
For consistency, use a cookie scoop for the cake balls. Eyeballing it leads to uneven sizes, which means some pops will be too heavy for the sticks and fall off. A 1-tablespoon scoop gives you perfectly uniform balls every time.
Variations & Adaptations
One of the best things about this recipe is how easily it adapts to different tastes and dietary needs. Here are some variations I’ve tried and loved.
Chocolate Peppermint: Use a chocolate cake mix instead of vanilla. Add 1/2 teaspoon of peppermint extract to the cake mixture. Dip in dark chocolate instead of white, then drizzle with white chocolate and crushed candy canes. This is my personal favorite for Christmas morning.
Gingerbread Spice: Use a spice cake mix or add 1 teaspoon of ginger, 1 teaspoon of cinnamon, and 1/2 teaspoon of nutmeg to the vanilla cake batter. Frost with cream cheese frosting as usual, then coat in white chocolate and top with a tiny gingerbread cookie. The warm spices pair beautifully with the sweet coating.
Vegan Version: Use a vegan vanilla cake mix (check the label), vegan cream cheese frosting, and dairy-free white chocolate. The texture will be slightly denser, but still delicious. I tested this for a friend with dairy allergies, and she couldn’t tell the difference.
Gluten-Free: Use a gluten-free vanilla cake mix. I’ve had good results with King Arthur Flour’s gluten-free mix. Everything else stays the same—just double-check that your candy melts are gluten-free. Some brands use wheat-based ingredients in their white chocolate.
Low-Sugar Option: Use a sugar-free cake mix and sugar-free frosting. For the coating, use sugar-free white chocolate chips (Lily’s makes a good one). The cake pops won’t be as sweet, but they’ll still satisfy that holiday craving without the sugar crash.
For a fun seasonal twist, try adding a few drops of orange extract to the cake mixture. The citrus flavor cuts through the sweetness and adds a bright note that’s perfect for winter. I stumbled on this combination by accident when I ran out of vanilla extract, and now it’s my secret weapon.
Serving & Storage Suggestions
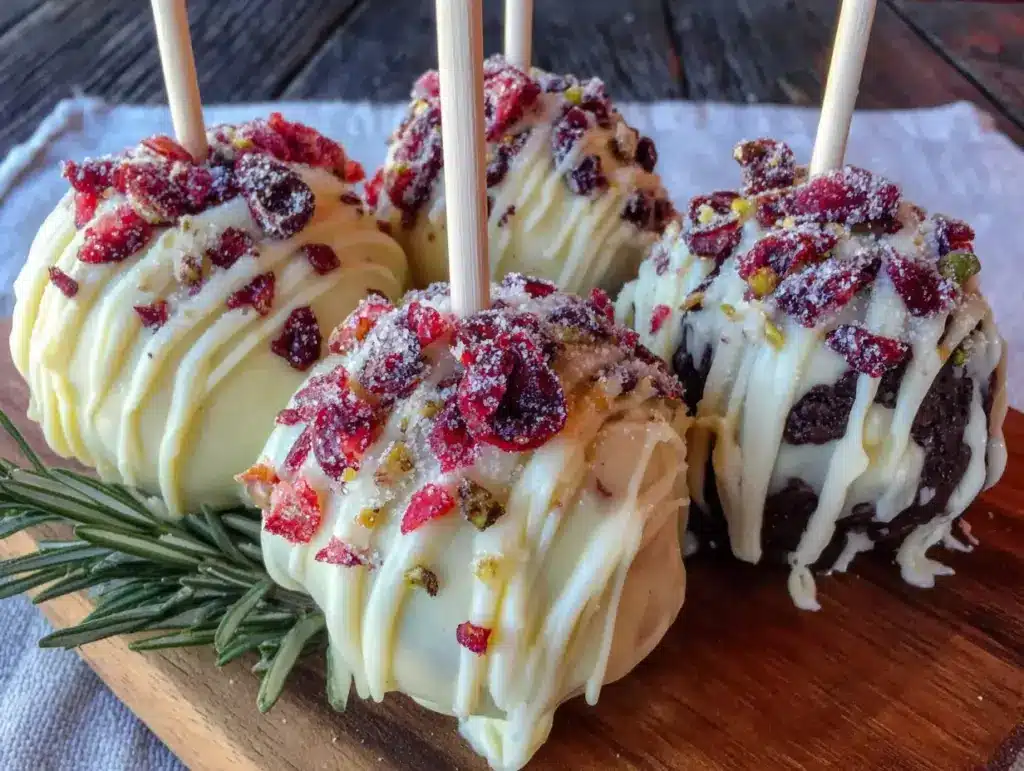
These cake pops are best served at room temperature, about 15 minutes after you take them out of the fridge. The white chocolate should be firm but not hard, and the cake inside should be soft and creamy. Arrange them on a festive platter with the sticks pointing up, like a bouquet of edible flowers. They look gorgeous on a cake stand surrounded by fresh cranberries and rosemary sprigs.
For complementary dishes, these cake pops pair beautifully with a hot cup of coffee, a glass of cold milk, or a mug of peppermint hot chocolate. If you’re serving them at a party, put out a bowl of fresh fruit or a cheese board to balance the sweetness. They also make excellent gifts—wrap a few in a clear cellophane bag tied with a red ribbon, and you’ve got a thoughtful homemade present.
Storage instructions: Store the cake pops in an airtight container in the refrigerator for up to 5 days. Layer them between sheets of parchment paper so the white chocolate doesn’t stick together. If you’re stacking them, make sure the drizzle is completely set first—otherwise, you’ll end up with a sticky mess.
Freezer instructions: These freeze beautifully for up to 2 months. Place the cake pops in a single layer on a baking sheet and freeze for 1 hour, then transfer them to a freezer-safe bag or container. To thaw, leave them in the refrigerator overnight or at room temperature for about 30 minutes. The white chocolate might develop a slight bloom (white streaks) after freezing, but that’s cosmetic—they’ll still taste amazing.
Reheating tip: Don’t microwave these—the white chocolate will melt and slide off. If you want them slightly warm, let them sit at room temperature for an extra 15 minutes. The cake inside will soften naturally.
One thing I love about these cake pops is that the flavors actually get better after a day in the fridge. The cake absorbs the frosting more fully, and the white chocolate sets to that perfect snap. So don’t stress about making them the same day you need them—they’re actually better made a day ahead.
Nutritional Information & Benefits
These Christmas cake pops are a treat, so let’s be honest about the numbers. One cake pop (using standard ingredients) contains approximately:
- Calories: 180-200
- Fat: 9-10g
- Carbohydrates: 24-26g
- Sugar: 16-18g
- Protein: 2-3g
These values will vary depending on the specific brands you use and any substitutions you make. The vegan version will have slightly less saturated fat, while the gluten-free version might have more carbohydrates.
On the positive side, the white chocolate contains calcium from the milk solids, and if you use a cream cheese frosting, you’re getting a small amount of protein and probiotics. The peppermint variation offers digestive benefits—peppermint is known to soothe upset stomachs, which is handy after a heavy holiday meal.
Dietary considerations: This recipe is not naturally gluten-free or dairy-free, but the substitutions I mentioned earlier work well. Always check labels if you’re cooking for someone with allergies—some candy melts contain milk solids, and some cake mixes contain wheat flour. The recipe is vegetarian-friendly as written.
My personal take: These cake pops are about joy, not nutrition. The holidays are a time for indulgence, and a 200-calorie treat that brings a smile to someone’s face is worth every bite. Just don’t eat the whole batch in one sitting—trust me on this one.
Conclusion
These quick Christmas cake pops with white chocolate drizzle are proof that you don’t need hours in the kitchen to create something special. They’re the recipe I turn to when I want to feel festive without the stress, when I need a last-minute gift, or when I just want to sit down with a cup of coffee and something sweet after a long day of holiday chaos.
I love that this recipe is forgiving—it doesn’t demand perfection. Your first cake pop might be lopsided, and that’s okay. Your drizzle might look more like a Jackson Pollock painting than a bakery display, and honestly, that’s part of the charm. What matters is that you made something with your hands, something that brings a little bit of Christmas magic to your table.
Now I want to hear from you. Have you tried making cake pops before? What’s your favorite holiday treat to make when you’re short on time? Drop a comment below and share your experience—I read every single one and I’d love to know how these turned out for you. And if you’ve got a variation that blew your mind, please share it. That’s how recipes evolve, through people like you making them their own.
Happy holidays, and happy baking. You’ve got this.
Frequently Asked Questions
Can I use store-bought cake instead of baking one from a mix?
Absolutely. A pre-made vanilla or pound cake from the bakery section works perfectly. Just crumble it up and follow the same steps. This saves even more time and works great for last-minute baking sessions.
Why did my cake pops fall off the sticks?
This usually happens for two reasons: the cake balls were too warm when you dipped them, or you used too much frosting. Make sure the cake balls are thoroughly chilled (15-20 minutes in the freezer), and stick to 1/3 cup of frosting. Also, dip the stick in melted chocolate before inserting it—that acts like glue.
Can I make these without lollipop sticks?
Yes! Skip the sticks entirely and make cake truffles instead. Roll the cake mixture into balls, freeze them, then dip them in the white chocolate using a fork. Place them on parchment paper to set, then drizzle the white chocolate on top. They’re just as delicious and way less fuss.
How do I get the white chocolate drizzle to look professional?
Use a fork, not a spoon. Dip the fork into the melted white chocolate, then wave it back and forth over the cake pops. The tines create thin, even lines that look like they came from a bakery. Practice on a piece of parchment paper first if you’re nervous.
Can I use dark chocolate instead of white chocolate?
Definitely. Dark chocolate pairs beautifully with the sweet cake and frosting. Use dark chocolate chips or candy melts, and add 1 teaspoon of coconut oil to thin them out. The contrast between the dark coating and colorful sprinkles is stunning.
Pin This Recipe!
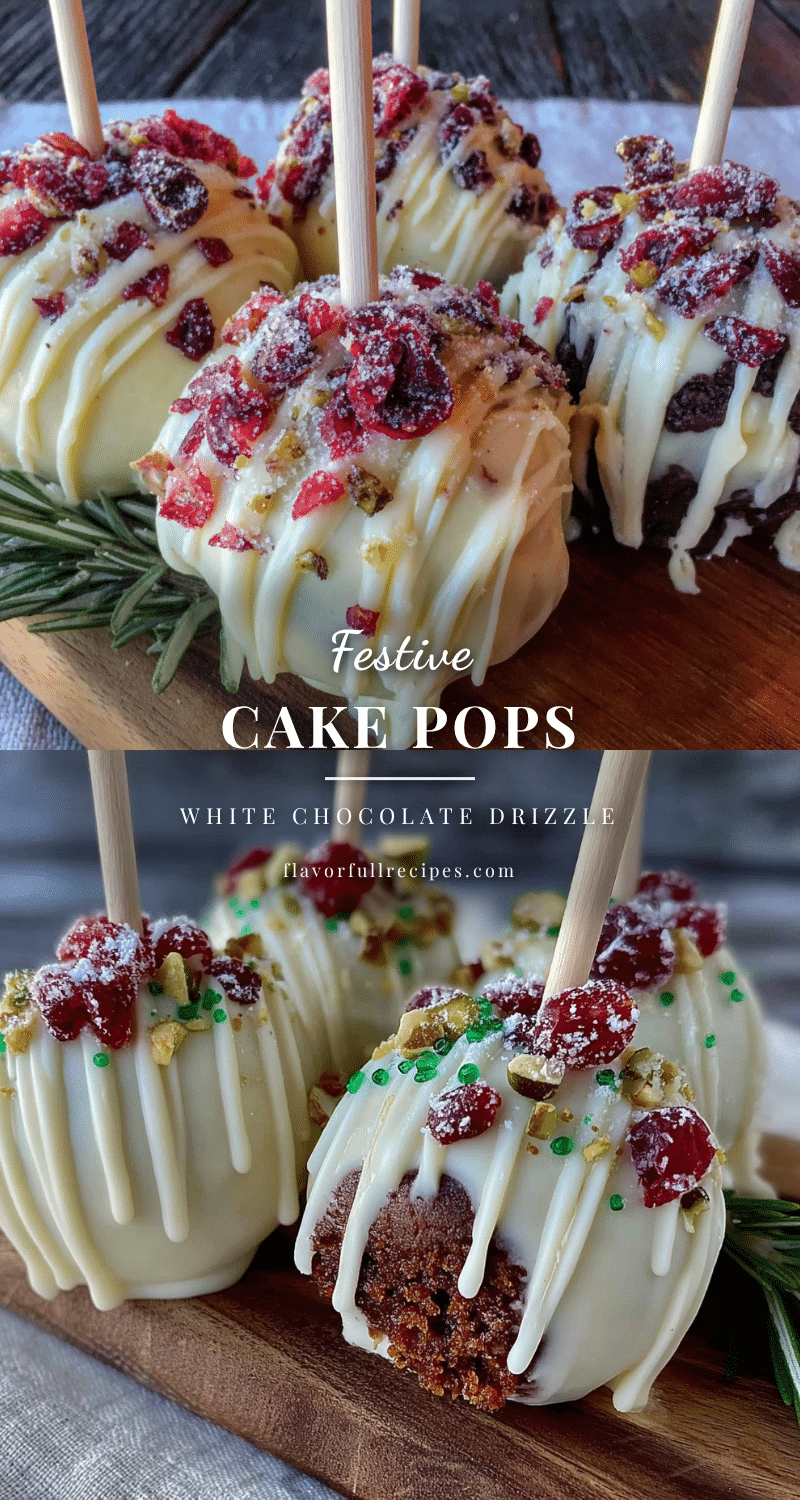

Best Easy Christmas Cake Pops with White Chocolate Drizzle
- Total Time: 45 minutes
- Yield: 20-24 cake pops 1x
Description
These quick and easy Christmas cake pops come together in under an hour using simple ingredients like cake mix, cream cheese frosting, and white chocolate. Perfect for holiday gatherings, last-minute gifts, or when you need a festive treat without the fuss.
Ingredients
- 1 box vanilla cake mix (plus eggs, oil, and water as directed on the box)
- 1/3 cup cream cheese frosting (store-bought or homemade)
- 12 ounces white candy melts or white chocolate chips
- 1 tablespoon coconut oil or vegetable shortening
- Christmas sprinkles (red and green jimmies, snowflake shapes, or nonpareils)
- 20–24 lollipop sticks
- Optional: 1/2 teaspoon peppermint extract
- Optional: Red food coloring (gel food coloring works best)
Instructions
- Preheat your oven to 350°F (175°C). Prepare the vanilla cake mix according to the package directions, adding eggs, oil, and water. If using red food coloring, add a few drops now and stir until the batter is evenly pink or red. Pour the batter into a greased 9×13 inch pan and bake for 25-30 minutes, or until a toothpick inserted in the center comes out clean. Let the cake cool completely.
- Once the cake is completely cool, use your hands to crumble it into a large bowl. You want fine crumbs, not big chunks—think breadcrumb consistency. This takes about 3-4 minutes.
- Add 1/3 cup of cream cheese frosting to the crumbled cake. Use a spatula or your hands to mix it together until the mixture holds together when pressed. You should be able to form a ball that doesn’t crack or fall apart. If it’s too dry, add another tablespoon of frosting. If it’s too wet, add a few more cake crumbs.
- Using a cookie scoop or your hands, roll the mixture into 1-inch balls. You should get about 20-24 balls. Place them on a parchment-lined baking sheet. Pop the sheet in the freezer for 15-20 minutes to firm them up.
- In a microwave-safe bowl, combine the white candy melts and 1 tablespoon of coconut oil. Microwave in 30-second intervals, stirring after each, until completely smooth. Don’t overheat, or the chocolate will seize. It should be thin enough to drizzle easily. If it’s too thick, add another teaspoon of coconut oil.
- Remove the cake balls from the freezer. Dip the tip of each lollipop stick into the melted white chocolate, then insert it about halfway into a cake ball. This acts like glue and keeps the pop on the stick. Dip the entire cake ball into the white chocolate, gently tap off the excess, and place it in your Styrofoam block. Work quickly—the cake balls warm up fast. Sprinkle with Christmas sprinkles while the coating is still wet.
- Once all the cake pops are coated and the white chocolate has set (about 10 minutes), melt a small amount of additional white chocolate. Use a fork to drizzle it back and forth over the cake pops. Let the drizzle set completely before serving, about 15-20 minutes.
Notes
The cake balls need to be cold when you dip them—cold enough that they feel firm to the touch. But the white chocolate should be warm and fluid. Work in small batches, taking out 4-5 cake balls from the freezer at a time. For a professional-looking drizzle, use a fork, not a spoon. These cake pops can be stored in an airtight container in the refrigerator for up to 5 days, or frozen for up to 2 months. The flavors actually improve after a day in the fridge.
- Prep Time: 20 minutes
- Cook Time: 25-30 minutes
- Category: Dessert
- Cuisine: American
Nutrition
- Serving Size: 1 cake pop
- Calories: 180200
- Sugar: 1618
- Sodium: 150200
- Fat: 910
- Saturated Fat: 56
- Carbohydrates: 2426
- Fiber: 1
- Protein: 23
Keywords: Christmas cake pops, easy cake pops, white chocolate drizzle, holiday treats, no-bake dessert, cake pops recipe, Christmas baking