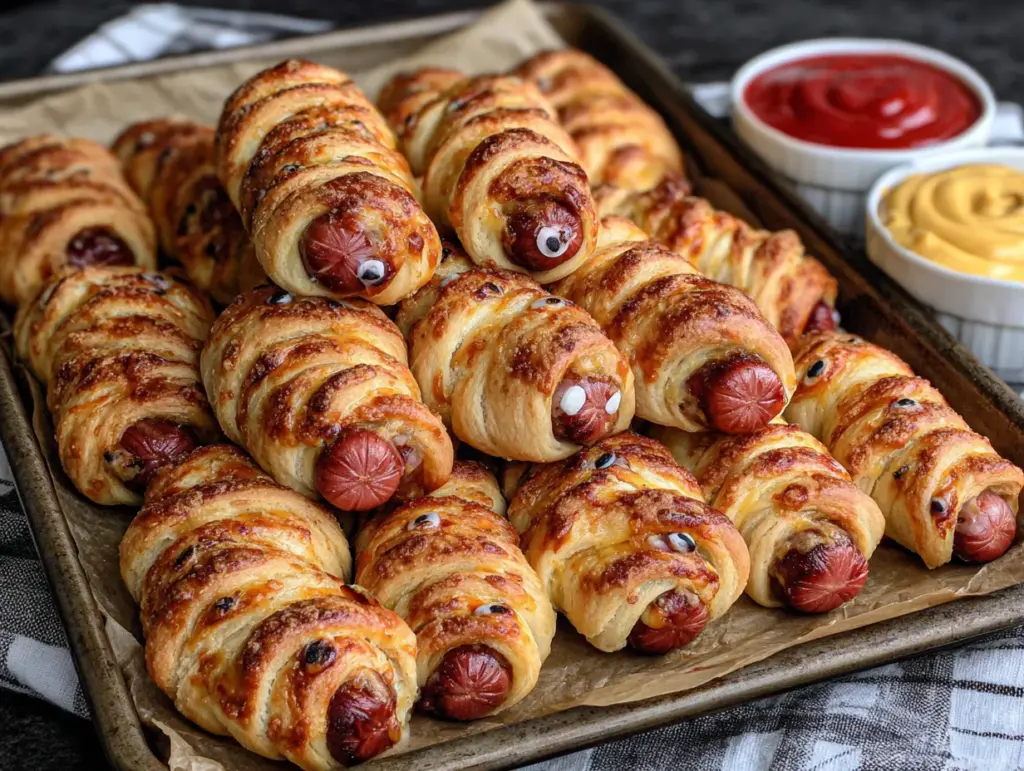
My nephew took one bite, looked at the plate, and then very seriously asked if the hot dog was going to come back to life. He was four, and he wasn’t joking. That moment—watching him hold a mummy hot dog up to the light, checking for movement—is when I knew this recipe was a winner. It wasn’t just cute. It was interactive. And honestly, that’s the secret to feeding kids at a Halloween party.
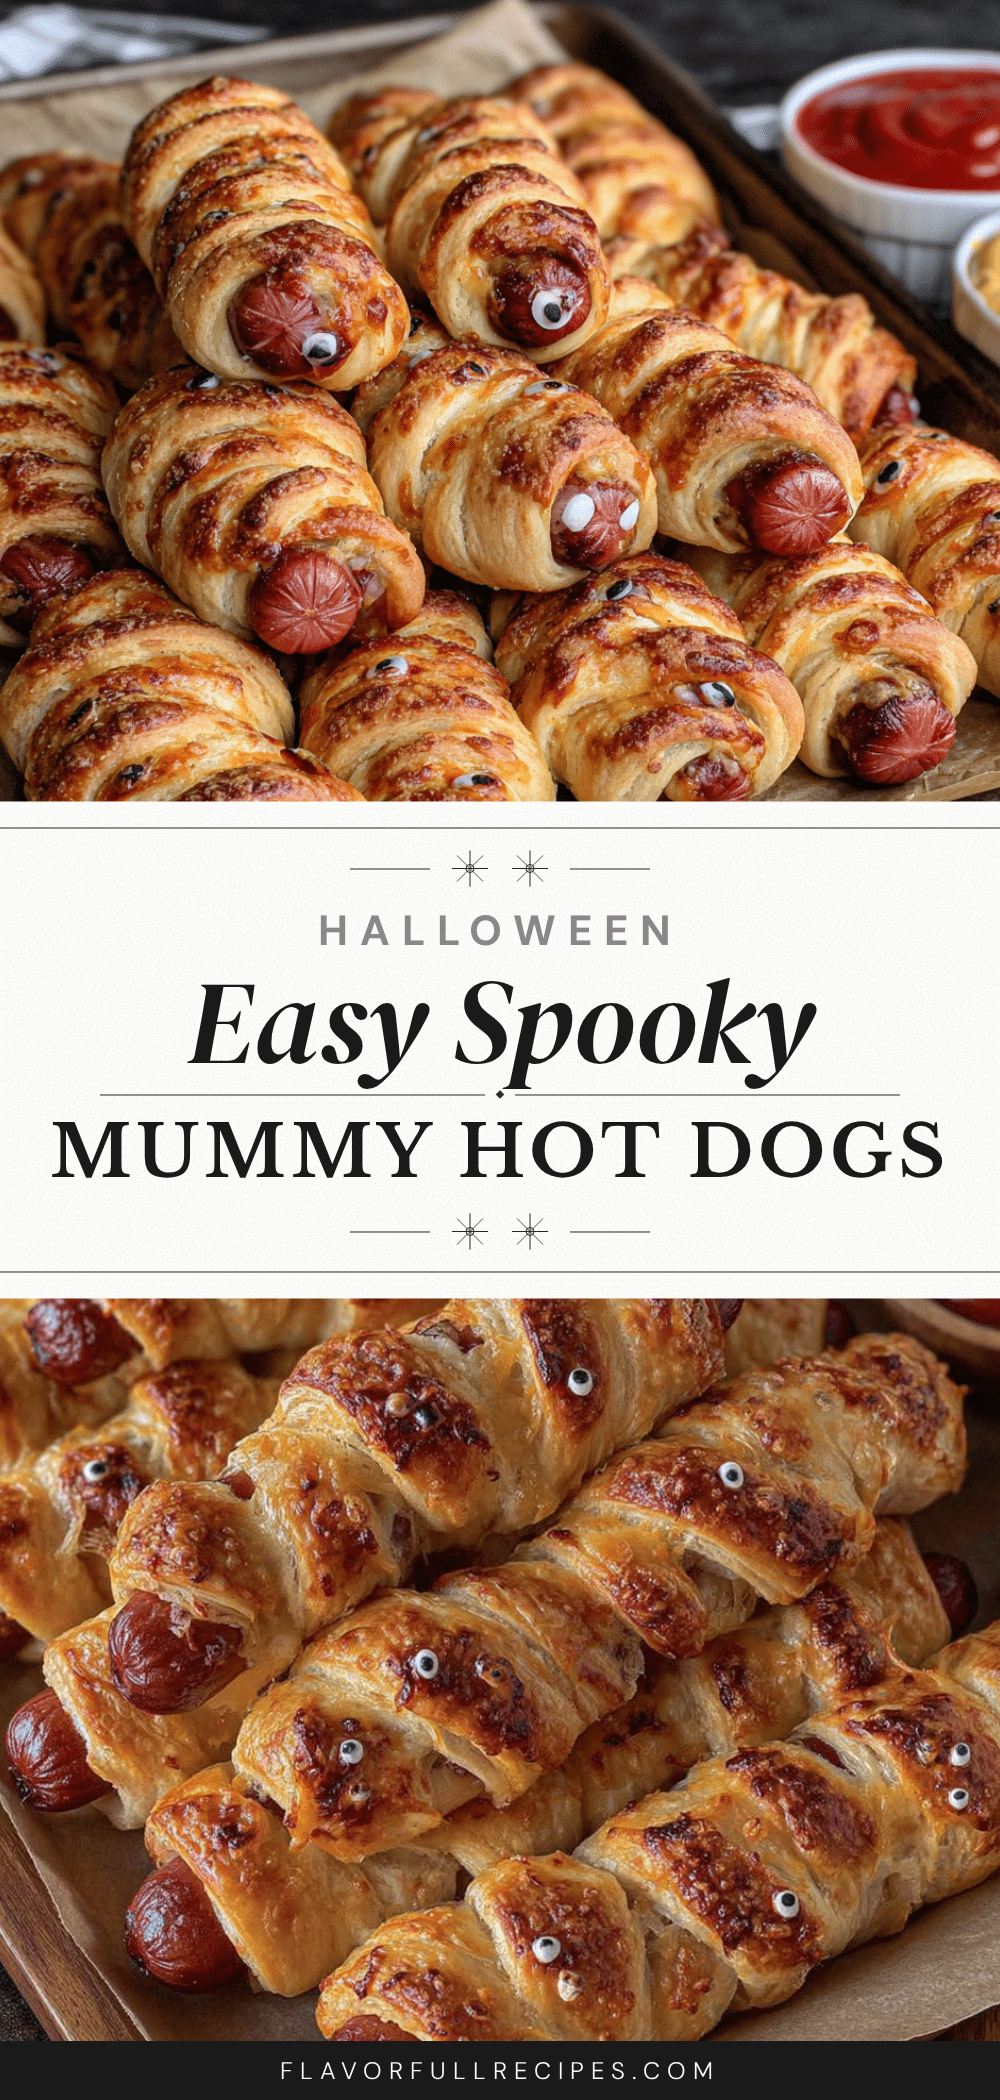
These Easy Mummy Hot Dogs for Halloween Parties are the kind of appetizer that disappears before the punch bowl gets a second fill. They’re simple enough that you can make a whole tray without breaking a sweat, but they look like you actually tried. The crescent dough wraps around each hot dog like a gauze bandage, and once they bake up golden, you just add two tiny mustard eyes. That’s it. No fancy piping, no food coloring, no stress.
I started making these for our annual neighborhood Halloween gathering a few years ago, and they’ve become the thing people ask for. Not the spooky cupcakes or the caramel apples. The mummy dogs. There’s something about the combination of salty hot dog and buttery, flaky dough that hits different when it’s shaped like a little wrapped-up creature. Plus, kids actually eat them, which is more than I can say for the veggie platter shaped like a pumpkin.
If you’re looking for a Halloween appetizer that’s equal parts fun and filling, this is it. No gimmicks. Just good food that happens to look a little undead.
Why You’ll Love This Recipe
These mummy hot dogs aren’t just another Pinterest fail waiting to happen. I’ve tested them every which way, and here’s why they work.
- Quick & Easy: From fridge to table in under 20 minutes. You can prep the whole tray while the oven preheats, no problem.
- Simple Ingredients: Hot dogs, crescent dough, and mustard. That’s literally the whole shopping list. You probably already have all of it.
- Perfect for Halloween Parties: These are the appetizer that bridges the gap between “cute for the kids” and “actually good for the adults.” Everyone grabs one.
- Crowd-Pleaser: I’ve seen picky eaters devour three of these in a row. The flaky dough and salty hot dog combo is basically irresistible.
- Unbelievably Delicious: The edges of the crescent dough get all crispy and golden while the hot dog stays juicy. It’s a texture thing, and it works.
What makes this version different? I figured out the perfect dough-to-hot-dog ratio so the mummies look wrapped but not swallowed. I also tested the best way to keep the dough from unraveling during baking. Spoiler: it involves a little overlap technique I’ll show you below. This isn’t just another version of the recipe—it’s the one that actually holds together and looks like a real mummy when it comes out of the oven.
Honestly, the first time I made these, I wrapped them too tight and the dough split. The second time, I used too little dough and they looked like sad, half-dressed hot dogs. By batch three, I had it dialed in. Now I’m sharing all those little tweaks so you can nail it on the first try.
What Ingredients You Will Need
This recipe uses simple, pantry-friendly ingredients to deliver big flavor and maximum Halloween fun without the fuss. Here’s what you’ll need:
- Hot dogs (1 package, about 8-10 hot dogs) – Standard-size hot dogs work best. I prefer all-beef hot dogs for better flavor, but any brand will do. Avoid jumbo or cocktail-sized for this recipe.
- Crescent roll dough (2 cans, 8 oz each) – I recommend Pillsbury Original Crescents for the best texture and buttery flavor. The refrigerated dough is easy to work with and bakes up perfectly golden.
- Yellow mustard (for the eyes) – Classic yellow mustard gives the best color contrast. You can also use Dijon or honey mustard if that’s what you have on hand.
- Optional: Cooking spray or butter – For greasing the baking sheet. Parchment paper also works great.
- Optional: Everything bagel seasoning or sesame seeds – For a fun twist, sprinkle these on before baking. It adds a little extra texture and flavor.
That’s it. Five ingredients (or fewer) and you’re ready to go. The beauty of this recipe is that it’s built on basics. You don’t need to hunt down specialty items or make a separate trip to the store. Everything is available at your regular grocery store, probably in the same aisle.
Equipment Needed
You don’t need much to pull these off, which is part of why I love them for parties.
- Baking sheet – A standard half-sheet pan works perfectly. Line it with parchment paper for easy cleanup.
- Parchment paper – Not strictly necessary, but it prevents sticking and makes cleanup a breeze. I never skip it.
- Sharp knife or pizza cutter – For cutting the crescent dough into strips. A pizza cutter gives you clean, even lines.
- Small bowl – For the mustard. You’ll dip a toothpick or the end of a knife to dot the eyes.
- Toothpick or small knife tip – For applying the mustard eyes. A toothpick gives you more control for tiny dots.
- Cooling rack – Optional, but helps the mummy dogs stay crispy instead of getting soggy on the bottom.
If you don’t have a pizza cutter, a regular knife works fine. Just make sure it’s sharp so you don’t squish the dough. I’ve used both, and honestly, the pizza cutter is faster but not essential.
Preparation Method
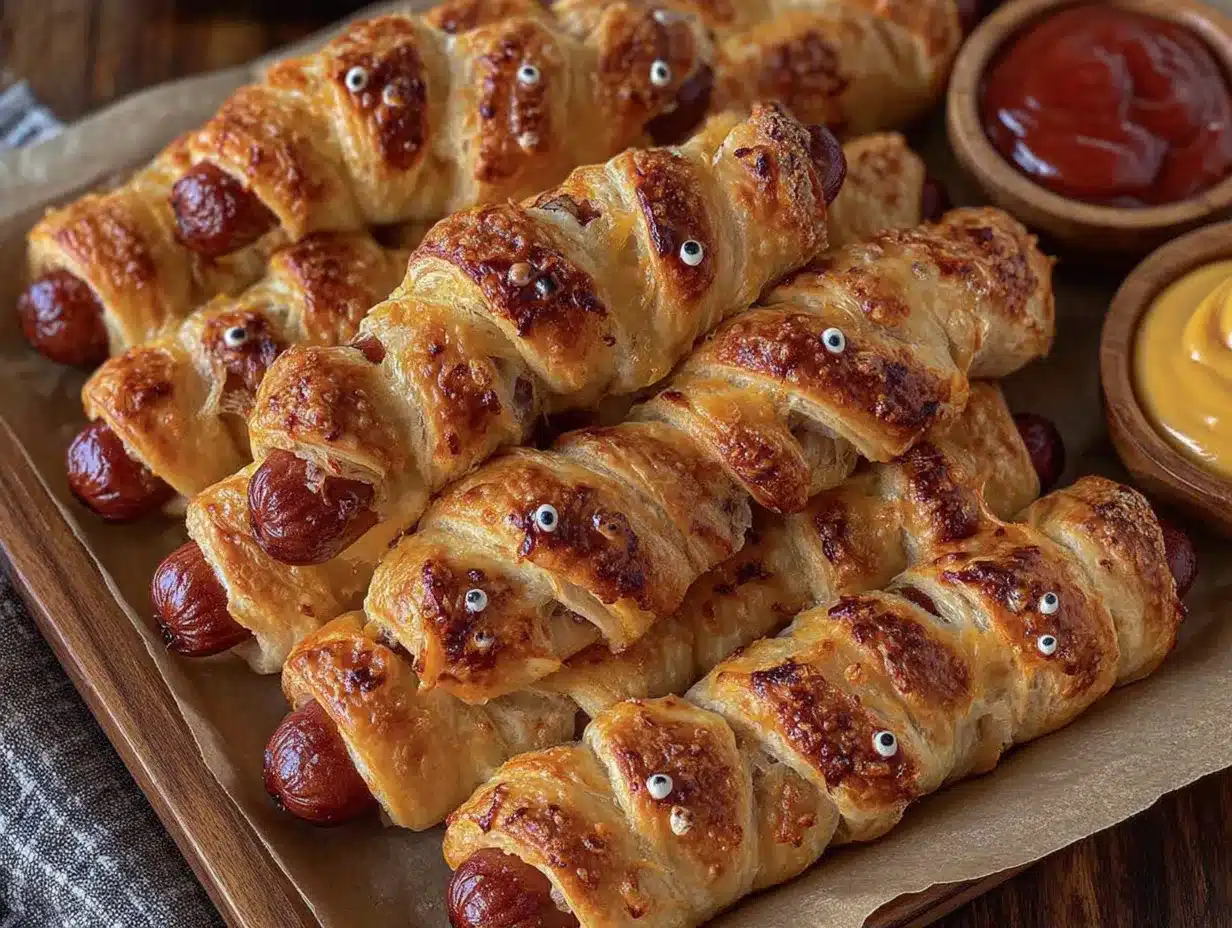
Let me walk you through this step by step. I’ll include all the little details I wish someone had told me the first time.
- Preheat your oven to 375°F (190°C). Line a baking sheet with parchment paper. This is your safety net—nothing sticks, nothing burns.
- Unroll the crescent dough. Open one can at a time. You’ll see the dough is perforated into triangles. Separate them along the perforations. You should have 8 triangles per can.
- Cut each triangle into strips. Using a sharp knife or pizza cutter, slice each triangle lengthwise into 3-4 thin strips. The strips should be about 1/2 inch wide. Don’t worry if they’re not perfectly even—mummies aren’t supposed to look perfect anyway.
- Wrap the hot dogs. Take one hot dog and start wrapping a strip of dough around it, slightly overlapping as you go. Leave a small gap at the top for the face. The dough should look like bandages, not a full body suit. Aim for 3-4 wraps per hot dog, depending on strip length.
- Place on the baking sheet. Arrange the wrapped hot dogs on the prepared baking sheet, leaving about 1 inch of space between each one. They won’t spread much, but a little breathing room helps them bake evenly.
- Repeat with remaining hot dogs. Work through all your hot dogs, using up the dough strips. You’ll get about 8-10 mummy dogs per batch, depending on how many strips you cut per triangle.
- Bake for 12-15 minutes. The dough should be golden brown and puffed. The hot dogs will be heated through. Keep an eye on them after the 12-minute mark—you want golden, not burnt.
- Let them cool slightly. Remove from the oven and let them rest on the baking sheet for about 2-3 minutes. This lets the dough set so it doesn’t fall apart when you move them.
- Add the eyes. Dip a toothpick into yellow mustard and dot two small eyes onto the exposed hot dog at the top of each mummy. Don’t make them too big—tiny dots look cuter and more mummy-like.
- Serve warm. Transfer to a serving platter and watch them disappear. They’re best eaten within 15-20 minutes of coming out of the oven.
A few notes from experience: if the dough strips feel too sticky, dust your hands lightly with flour. If the dough starts to unravel as you’re wrapping, tuck the end underneath the hot dog before placing it on the baking sheet. The heat will seal it in place. And if you’re making a big batch, keep the second can of dough in the fridge until you’re ready to use it—cold dough is easier to handle.
Cooking Tips & Techniques
I’ve made these mummy dogs at least a dozen times, and I’ve picked up a few tricks along the way. Here are the ones that actually matter.
Don’t over-wrap. The biggest mistake I made early on was wrapping the dough too tightly. It looks neat, but the dough splits as it bakes. Leave a little slack, like you’re loosely bandaging a wound. The dough needs room to puff up.
Use refrigerated dough. If your kitchen is warm, the crescent dough gets sticky fast. Keep the second can in the fridge until you’re ready. Cold dough cuts cleaner, wraps easier, and holds its shape better in the oven.
Space them out. I once crammed 12 mummy dogs onto one sheet pan. The ones in the middle came out pale and doughy. Give them space—about an inch apart—so the heat circulates evenly and every mummy gets golden.
Watch the last few minutes. Ovens vary. My old oven needed the full 15 minutes. My current one is done at 12. Check at the 10-minute mark and look for golden edges. Once they’re golden, pull them out.
Make the eyes pop. Use a toothpick for the mustard dots, not a squeeze bottle. A toothpick gives you control for tiny, precise dots. Big blobs of mustard look messy and less mummy-like. Trust me on this one.
Serve immediately. These are best straight from the oven. The dough is flaky, the hot dog is hot, and the mustard is fresh. After 30 minutes, the dough softens. If you’re serving at a party, time the baking so they come out right when guests arrive.
One more thing: I learned the hard way that parchment paper is non-negotiable. The first batch I made directly on a greased sheet pan stuck in places. Parchment paper eliminates that problem completely. It’s worth the extra 30 seconds.
Variations & Adaptations
These mummy hot dogs are forgiving, so feel free to play around. Here are some variations I’ve tried and loved.
Cheesy Mummy Dogs: Before wrapping, slice the hot dog lengthwise (not all the way through) and stuff a thin strip of cheddar or mozzarella cheese inside. Wrap as usual. The cheese melts into the hot dog and makes it extra gooey. My kids beg for this version.
Spicy Mummy Dogs: Use spicy Italian sausage or chorizo-style hot dogs instead of regular ones. The heat pairs surprisingly well with the buttery crescent dough. Add a tiny dot of sriracha next to the mustard eyes for a little extra kick.
Veggie Mummy Dogs: Swap the hot dogs for plant-based sausages. I’ve tried several brands, and Field Roast and Beyond Meat both work well. Just note that plant-based sausages can be a little softer, so wrap them gently.
Breakfast Mummy Dogs: Use breakfast sausage links instead of hot dogs. Serve them with a side of maple syrup for dipping. It’s weird, but it works. I made these for a Halloween morning breakfast and they were a hit.
Gluten-Free Option: Use gluten-free crescent dough or puff pastry. The texture is slightly different, but the concept holds up. Just follow the package directions for baking time, as gluten-free doughs can vary.
Bacon-Wrapped Mummy Dogs: Wrap a half-slice of bacon around the hot dog first, then add the crescent dough strips. Bake as directed. The bacon gets crispy and adds a smoky depth. Just be aware that bacon adds extra grease, so drain on paper towels after baking.
My personal favorite variation is the cheesy one. I accidentally discovered it when I had leftover cheese sticks from a party and thought, why not? The melted cheese inside the hot dog is next-level. It’s the version I make for our Halloween party now, and it always gets the most compliments.
Serving & Storage Suggestions
These mummy hot dogs are best served warm, straight from the oven. The dough is flaky, the hot dog is juicy, and the mustard eyes are still fresh. I like to arrange them on a large platter with a small bowl of extra mustard or ketchup for dipping. You can also add a side of ranch dressing or honey mustard for variety.
For a Halloween party spread, pair them with other finger foods. I’ve served them alongside these savory mini Philly cheesesteak sliders and a bowl of loaded bacon ranch football dip for a complete appetizer table. The combination of flavors works perfectly for a crowd.
Storage: If you have leftovers (unlikely, but possible), store them in an airtight container in the refrigerator for up to 3 days. The dough will soften, but they’re still tasty.
Reheating: The best way to reheat is in the oven or air fryer. Pop them in a 350°F (175°C) oven for 5-7 minutes, or in an air fryer at 350°F (175°C) for 3-4 minutes. The microwave works in a pinch, but the dough will be soft and less flaky.
Freezing: You can freeze the unbaked mummy dogs. Arrange them on a baking sheet and freeze until solid, then transfer to a freezer bag. Bake from frozen, adding 2-3 minutes to the baking time. I’ve done this for party prep, and it works beautifully.
One thing I’ve noticed: the flavors actually meld a little if you make them ahead and reheat. The mustard sets into the hot dog, and the dough absorbs some of the savory juices. It’s not better than fresh, but it’s still good enough for a party.
Nutritional Information & Benefits
Let’s be real—these are not health food. They’re a fun Halloween treat. But here’s the estimated nutritional breakdown per mummy dog (based on standard hot dogs and crescent dough):
- Calories: Approximately 180-220 per mummy dog
- Protein: 7-9 grams
- Carbohydrates: 14-18 grams
- Fat: 11-14 grams
- Sodium: 500-650 mg
Health Benefits: Hot dogs provide some protein, and the crescent dough offers quick energy from carbohydrates. If you use all-beef hot dogs, you’re getting a decent amount of iron and B vitamins. The mustard adds a tiny amount of turmeric, which has anti-inflammatory properties. Okay, I’m stretching here, but every little bit counts.
Dietary Considerations: This recipe is not gluten-free unless you use gluten-free dough. It contains dairy (from the crescent dough) and processed meats. For a lower-sodium option, use low-sodium hot dogs. For a vegetarian version, use plant-based sausages.
Allergens: Contains wheat, milk, and soy (from the crescent dough). Check your hot dog labels for additional allergens.
My personal take? These are a once-a-year treat for Halloween. I don’t stress about the nutritional numbers because they’re part of the fun. Everything in moderation, right?
Conclusion
These Easy Mummy Hot Dogs for Halloween Parties are the kind of recipe that makes you look like a hero without any of the work. They’re cute enough for the kids to love, tasty enough for the adults to sneak a few, and simple enough that you can make them while juggling a million other party prep tasks.
I love that this recipe is flexible. You can dress them up with cheese or bacon, keep them classic, or let the kids help with the wrapping. The first time my nephew helped make these, he wrapped his mummy so tight it looked like a sausage in a straitjacket. It was hilarious, and it still tasted great.
If you try these, I’d love to hear how they turn out. Leave a comment below and let me know if your kids asked the same question mine did—whether the mummy was going to come back to life. And if you have a favorite variation, share that too. I’m always looking for new ideas.
Go ahead, make a batch for your next Halloween gathering. Your guests will thank you. And if they don’t, just make another batch. No one can resist a mummy dog.
FAQs
Can I make these mummy hot dogs ahead of time?
Yes, you can prep them up to 24 hours in advance. Wrap the hot dogs with the crescent dough strips and place them on a parchment-lined baking sheet. Cover with plastic wrap and refrigerate. Bake them just before serving for the best texture. If you need to reheat leftovers, use the oven or air fryer to restore some of the flakiness.
What’s the best way to keep the dough from unraveling?
The key is to overlap the dough strips slightly as you wrap. Tuck the end of the strip underneath the hot dog before placing it on the baking sheet. The heat from the oven seals the dough in place. Also, make sure your dough is cold—refrigerated dough holds its shape much better than room-temperature dough.
Can I use puff pastry instead of crescent dough?
Absolutely. Puff pastry gives a flakier, more buttery texture. Thaw the puff pastry according to package directions, then cut it into thin strips (about 1/2 inch wide). Wrap and bake as directed. Note that puff pastry may need an extra minute or two in the oven to fully puff and turn golden.
How do I make the mustard eyes look neat?
Use a toothpick for precise control. Dip the tip into yellow mustard and gently dot two small eyes onto the exposed hot dog. Don’t squeeze from a bottle—you’ll end up with blobs. If you want the eyes to look more expressive, make one dot slightly larger than the other for a winking mummy effect.
Can I freeze these for later?
Yes, and it’s a great time-saver for parties. Arrange the unbaked mummy dogs on a baking sheet and freeze until solid (about 2 hours). Transfer to a freezer bag or airtight container. Bake from frozen at 375°F (190°C) for 14-17 minutes, or until golden brown. Add the mustard eyes after baking for the freshest look.
Pin This Recipe!
Easy Mummy Hot Dogs: Best Halloween Party Appetizer
- Total Time: 25 minutes
- Yield: 8-10 servings 1x
Description
These Easy Mummy Hot Dogs for Halloween Parties are the kind of appetizer that disappears before the punch bowl gets a second fill. They’re simple enough that you can make a whole tray without breaking a sweat, but they look like you actually tried.
Ingredients
- 1 package (8-10) hot dogs, standard-size (all-beef recommended)
- 2 cans (8 oz each) crescent roll dough (Pillsbury Original Crescents recommended)
- Yellow mustard (for the eyes)
- Optional: Cooking spray or butter (for greasing the baking sheet)
- Optional: Everything bagel seasoning or sesame seeds (for sprinkling before baking)
Instructions
- Preheat your oven to 375°F (190°C). Line a baking sheet with parchment paper.
- Unroll the crescent dough. Open one can at a time. Separate the dough into 8 triangles per can along the perforations.
- Cut each triangle into strips. Using a sharp knife or pizza cutter, slice each triangle lengthwise into 3-4 thin strips, about 1/2 inch wide.
- Wrap the hot dogs. Take one hot dog and start wrapping a strip of dough around it, slightly overlapping as you go. Leave a small gap at the top for the face. Aim for 3-4 wraps per hot dog.
- Place on the baking sheet. Arrange the wrapped hot dogs on the prepared baking sheet, leaving about 1 inch of space between each one.
- Repeat with remaining hot dogs, using up the dough strips. You’ll get about 8-10 mummy dogs per batch.
- Bake for 12-15 minutes, until the dough is golden brown and puffed and the hot dogs are heated through.
- Let them cool slightly. Remove from the oven and let them rest on the baking sheet for about 2-3 minutes.
- Add the eyes. Dip a toothpick into yellow mustard and dot two small eyes onto the exposed hot dog at the top of each mummy.
- Serve warm. Transfer to a serving platter and serve within 15-20 minutes of coming out of the oven.
Notes
Don’t over-wrap the dough; leave a little slack so the dough can puff up. Keep the second can of dough refrigerated until ready to use. Space the mummy dogs about an inch apart on the baking sheet. Check at the 10-minute mark for golden edges. Use a toothpick for precise mustard dots. Serve immediately for best texture. Parchment paper is recommended to prevent sticking.
- Prep Time: 10 minutes
- Cook Time: 15 minutes
- Category: Appetizer
- Cuisine: American
Nutrition
- Serving Size: 1 mummy dog
- Calories: 200
- Sugar: 3
- Sodium: 575
- Fat: 12.5
- Saturated Fat: 4
- Carbohydrates: 16
- Protein: 8
Keywords: mummy hot dogs, Halloween appetizer, easy Halloween recipe, hot dog recipe, crescent roll recipe, party appetizer, kid-friendly Halloween