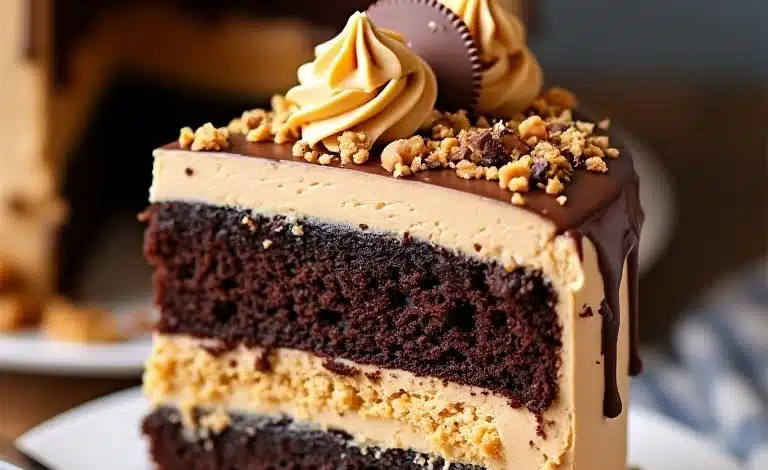
If you’re a fan of peanut butter cups (and who isn’t?), this peanut butter cup layer cake recipe is about to become your absolute favorite dessert. Imagine rich layers of moist chocolate cake, creamy peanut butter frosting, and the perfect topping of mini peanut butter cups. It’s indulgent, stunning, and surprisingly straightforward to make. Whether you’re baking for a birthday, holiday, or just because, this cake will steal the show every single time.
Growing up, peanut butter cups were always my favorite treat, and this cake is my homage to those sweet memories. It’s like taking your favorite candy and transforming it into a sliceable masterpiece. Trust me, once you make this cake, you’ll wonder why you didn’t try it sooner!
The Story Behind Peanut Butter Cup Layer Cake
Peanut butter and chocolate is one of those classic flavor pairings that’s been beloved for decades. It’s no wonder this recipe feels like comfort food and a celebration all at once. While the peanut butter cup itself was invented back in the 1920s, the idea of turning it into a layered cake feels like a modern twist on a nostalgic treat.
For me, this cake was born out of a craving for something rich and indulgent during the colder months. There’s something magical about a dessert that’s both cozy and decadent. Plus, peanut butter cups are available year-round, making this cake perfect for any season. I’ve tweaked this recipe over time—adding a touch more peanut butter here, a sprinkling of candy there—to create what I think is the ultimate version. It’s a dessert that’s both comforting and celebratory, perfect for sharing with loved ones.
If you’re looking for a show-stopping dessert, this is it. The layers of chocolate cake combined with that creamy peanut butter frosting and the crunch of the peanut butter cup topping create a symphony of flavors and textures. And honestly, who doesn’t love a cake that’s as much fun to eat as it is to look at?
Ingredients You’ll Need
Let’s talk about the ingredients that make this peanut butter cup layer cake so special. Each component adds to the flavor and texture, and I’ve got tips for choosing the best options.
- All-purpose flour: Go for unbleached flour for a richer flavor. If you’re gluten-free, use a 1:1 gluten-free baking flour.
- Cocoa powder: Dutch-process cocoa gives a deeper chocolate flavor, but natural cocoa powder works if that’s what you have.
- Granulated sugar: White sugar provides sweetness without overpowering the other flavors.
- Brown sugar: Adds a slight caramel note and keeps the cake moist.
- Eggs: Large eggs are essential for structure. Room temperature eggs will mix better.
- Milk: Whole milk is preferred for richness, but you can swap with almond or oat milk for a dairy-free option.
- Vegetable oil: Keeps the cake tender and moist. Canola oil works too.
- Peanut butter: Use creamy peanut butter for the frosting; natural peanut butter can be too thick.
- Butter: Unsalted butter is best for controlling salt levels in the frosting.
- Mini peanut butter cups: These are the star of the show! You can chop full-sized cups if minis aren’t available.
- Powdered sugar: For that silky-smooth frosting texture.
- Baking soda and baking powder: Ensure your cake rises evenly.
- Vanilla extract: A dash of vanilla ties everything together.
Keep in mind that quality ingredients make a difference! I love using name-brand peanut butter cups for the topping—they’re just the right balance of sweet and salty. Also, fresh eggs and dairy will give the cake its best texture.
Equipment Needed
Here’s what you’ll need to make this stunning cake:
- Two 9-inch round cake pans: Nonstick pans work great, but you can also line them with parchment paper for easier removal.
- Mixing bowls: At least three for dry ingredients, wet ingredients, and frosting.
- Electric mixer: A stand mixer or hand mixer will make the frosting silky smooth.
- Rubber spatula: For scraping down the sides of the bowl.
- Offset spatula: Helps spread the frosting evenly on the cake layers.
- Cooling rack: Essential for cooling the cakes completely before frosting.
- Knife or candy chopper: To cut the peanut butter cups for the topping.
Don’t have an offset spatula? No worries—a butter knife will work in a pinch. And if you’re missing the cooling rack, just flip the cakes onto parchment paper to cool.
Preparation Method
- Prepare the pans: Preheat your oven to 350°F (175°C). Grease two 9-inch round cake pans with butter or nonstick spray, then line the bottoms with parchment paper.
- Mix the dry ingredients: In a large bowl, whisk together 2 1/2 cups (310g) of flour, 3/4 cup (70g) of cocoa powder, 1 tsp of baking soda, 1 tsp of baking powder, and 1/2 tsp of salt.
- Combine wet ingredients: In another bowl, mix 1 cup (200g) of sugar, 1 cup (200g) of brown sugar, 3 large eggs, 1 cup (240ml) of milk, 1/2 cup (120ml) of vegetable oil, and 2 tsp of vanilla extract until smooth.
- Combine wet and dry: Gradually add the dry ingredients to the wet mixture, stirring until fully combined.
- Bake the cakes: Divide the batter evenly between the prepared pans. Bake for 30-35 minutes, or until a toothpick inserted in the center comes out clean.
- Cool the cakes: Let the cakes cool in the pans for 10 minutes, then transfer to a cooling rack to cool completely.
- Make the frosting: Beat 1 cup (240g) of creamy peanut butter, 1/2 cup (115g) of unsalted butter, and 3 cups (360g) of powdered sugar until light and fluffy. Add 2-3 tbsp of milk if needed for consistency.
- Assemble the cake: Place one cake layer on a plate or stand. Spread a thick layer of frosting on top, then add the second cake layer. Frost the top and sides of the cake.
- Decorate: Chop mini peanut butter cups and sprinkle them generously over the top of the cake.
Pro tip: Chill the cake for 15 minutes before slicing to make it easier to cut clean pieces!
Cooking Tips & Techniques
Here are a few tips to help you nail this peanut butter cup layer cake:
- Room temperature ingredients: Make sure your eggs, milk, and butter are at room temperature to ensure smooth mixing.
- Don’t overmix: Overmixing the batter can make your cake dense instead of fluffy.
- Sift your powdered sugar: This prevents lumps in the frosting.
- Chill the frosting: If your frosting feels too soft, pop it in the fridge for 10 minutes before spreading.
- Layer evenly: Use a serrated knife to level the cake layers if needed.
Variations & Adaptations
This recipe is super flexible! Here are a few ways to make it your own:
- Gluten-free version: Use a 1:1 gluten-free flour blend.
- Vegan option: Swap the eggs for flax eggs, the milk for almond milk, and the butter for vegan butter.
- Seasonal twist: Add crushed peppermint candies for a holiday version or caramel drizzle for a fall-inspired cake.
- Peanut allergy adaptation: Use almond butter or sunflower seed butter instead of peanut butter.
My personal favorite variation? Adding a layer of chocolate ganache between the cake layers for extra richness!
Serving & Storage Suggestions
This cake is best served at room temperature, but it can be refrigerated for longer storage. Here’s how:
- Serving: Slice the cake and serve with a cold glass of milk or a cup of coffee. It’s a dessert lover’s dream!
- Storage: Cover the cake tightly and refrigerate for up to 5 days. Let it come to room temperature before serving.
- Freezing: Wrap individual slices in plastic wrap and freeze for up to 2 months. Thaw overnight in the fridge.
Bonus tip: The flavors deepen after a day in the fridge, making leftovers even better!
Nutritional Information & Benefits
Here’s a rough breakdown per slice (based on 12 slices):
- Calories: 480
- Protein: 8g
- Fat: 25g
- Carbs: 55g
- Sugar: 38g
Peanut butter adds healthy fats and a bit of protein, while cocoa powder brings antioxidants to the mix. If you’re looking for a treat that’s indulgent but still has some redeeming qualities, this cake fits the bill!
Conclusion
So, there you have it—the ultimate peanut butter cup layer cake recipe. This dessert is rich, decadent, and guaranteed to impress your friends and family. Whether you follow the recipe to the letter or add your own twist, I know you’re going to love it as much as I do.
Give it a try and let me know how it turns out! Drop a comment below, share your variations, or tag me on social media with your creations. I can’t wait to see how you make this recipe your own. Happy baking!
FAQs
Can I make this cake ahead of time?
Yes! You can bake the cake layers up to 2 days in advance and store them wrapped tightly at room temperature. Frost and decorate the day you plan to serve.
Can I use natural peanut butter?
Natural peanut butter can work, but it may make the frosting thicker and less smooth. Stir it well before using!
What’s the best way to chop peanut butter cups?
A sharp knife works best! If they’re sticking, chill them in the fridge first.
Can I use a different frosting?
Absolutely! Chocolate buttercream or cream cheese frosting would be delicious alternatives.
How do I keep the cake layers from sticking to the pans?
Grease the pans thoroughly and line the bottoms with parchment paper for easy removal.