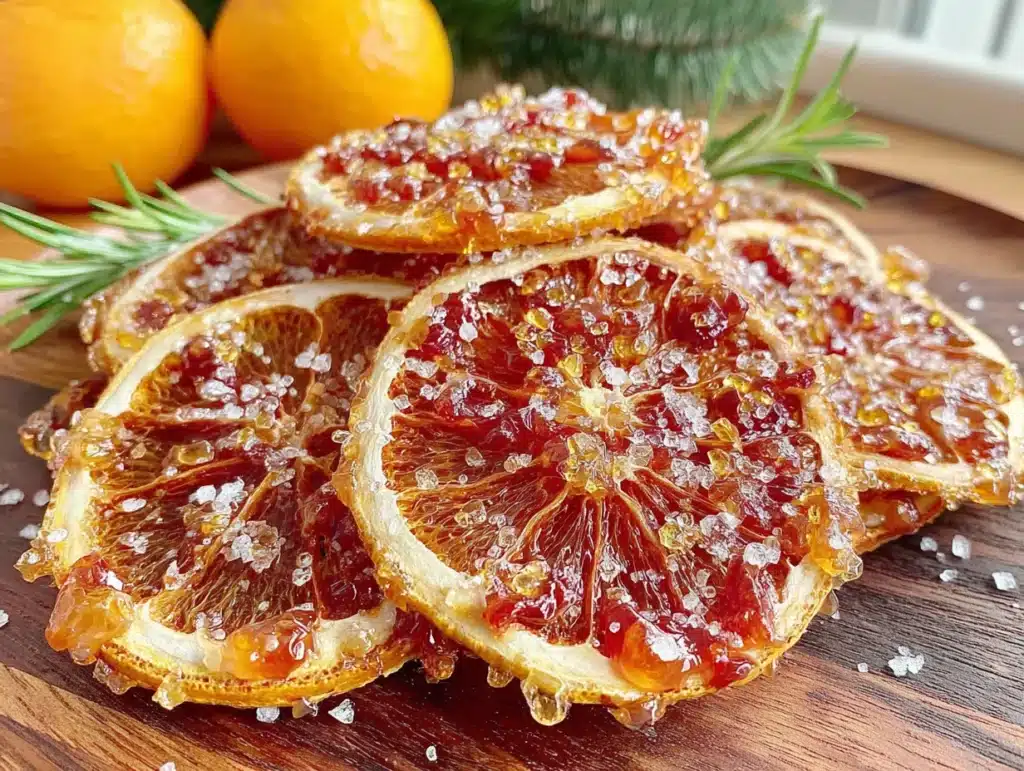
It was 11:47 PM on a random Wednesday, and I had a very specific craving for something I couldn’t name. Not hungry, exactly—just restless. I found myself standing in front of the pantry, door open, staring at a bag of oranges that were starting to look a little sad. I didn’t have a plan, but I had three oranges that needed using and a sudden, almost irrational urge to make something pretty. The idea just arrived, fully formed: dry them. In the oven. At nearly midnight.
Honestly, I’d never thought about making homemade oven-dried orange slices before that moment. It felt a little ridiculous, turning on the oven so late for something so simple. But there’s something about the quiet of late night that makes you follow through on weird impulses. I sliced them thin—maybe too thin on the first one, which fell apart—laid them on a baking sheet, and slid them into a low oven. The smell that filled my tiny kitchen was pure magic. It was like someone bottled sunshine and turned it into a fragrance.
I sat on the counter and watched them through the oven door for a solid ten minutes, which is honestly a little embarrassing to admit. But there was something hypnotic about watching the edges curl and the color deepen. By the time I pulled them out, they were chewy and sweet and absolutely nothing like the store-bought versions. I ate three slices standing over the sink, juice-free and slightly sticky. Maybe you’ve been there—that late-night kitchen experiment that turns into a new favorite thing. These orange slices have become my go-to for everything from cocktails to Christmas gifts, and I keep making them because they feel like a secret little luxury that costs almost nothing.
Why You’ll Love This Recipe
Let me tell you why these homemade oven-dried orange slices are about to become your new kitchen obsession. I’ve tested this method at least a dozen times—different temperatures, different thicknesses, different orange varieties—and this 3-step process is the one that works every single time. No fancy dehydrator needed, no complicated techniques. Just your oven, some oranges, and a little patience.
- Incredibly Simple : Three ingredients (oranges, that’s it) and three steps. Slice, arrange, bake. You don’t need to be a baker or a chef to nail this.
- Budget-Friendly : A bag of oranges costs a few dollars, and you get a batch of beautiful dried slices that look like they came from a fancy boutique.
- Perfect for Gifting : These make the most gorgeous homemade gifts. Pop them in a jar with a ribbon, and everyone thinks you spent hours.
- Versatile Beyond Belief : Use them in cocktails, teas, baked goods, or just as a healthy snack. They’re not just pretty—they’re useful.
- No Added Sugar Needed : The natural sweetness of the oranges concentrates as they dry. No syrups, no preservatives, just pure fruit.
What makes this recipe different from the dozens you’ll find online? It’s the temperature and timing. I’ve burned plenty of batches (and learned from every one) to find the sweet spot where the slices dry through without turning into brittle, flavorless discs. They stay slightly chewy, intensely orange-flavored, and absolutely addictive. This isn’t just another version of dried oranges—it’s the one that actually works in a regular home oven without babysitting.
Honestly, the first time I made these, I didn’t really believe they’d turn out. I mean, drying fruit in an oven feels like something that should require special equipment. But the first bite of that chewy, concentrated orange slice made me close my eyes and lean against the counter. It’s that good. Pure comfort in a tiny, sun-colored package.
What Ingredients You Will Need
This recipe uses the simplest ingredient possible—oranges. But not all oranges are created equal when it comes to drying. Here’s what you need to know to pick the perfect ones and get the best results every time.
- Fresh Oranges (3-4 medium-sized): Look for oranges that are firm, heavy for their size, and have smooth, unblemished skin. Navel oranges are my go-to because they’re sweet, seedless, and widely available. Valencia oranges also work beautifully, especially if you want a slightly tarter edge. Avoid oranges with soft spots or wrinkled skin—they won’t dry evenly and may develop off-flavors. I personally prefer organic oranges because the peel is the star of the show here, and you don’t want any wax or pesticide residue on those beautiful slices.
- Optional: Cinnamon Sticks or Vanilla Beans : If you want to infuse extra flavor, you can add a cinnamon stick or split vanilla bean to the baking sheet. The heat will release their aromas, and the orange slices will pick up subtle notes. Totally optional, but a lovely touch for gifting.
- Optional: Powdered Sugar or Cocoa Powder : For a sweet or chocolatey finish, you can dust the dried slices lightly. I’ve done this for holiday cookie platters, and they disappear fast.
Ingredient Selection Tips : The thinner you slice the oranges, the faster they dry—but also the easier they burn. I recommend using a sharp knife or a mandoline slicer set to about 1/8-inch thickness. If your slices are uneven, some will be done before others, and you’ll end up pulling out individual pieces at different times. Trust me, I’ve done this. A mandoline makes life so much easier here.
Substitution Guidance : While oranges are the star, you can absolutely use this same method for lemons, limes, or grapefruits. Just adjust the drying time slightly—thinner citrus like limes may dry faster, while grapefruits may need an extra 15-20 minutes. I’ve also tried blood oranges for a dramatic color, and they’re stunning in cocktails.
Where to Buy : I’ve had the best luck with oranges from local farmers’ markets during citrus season (winter through early spring). They’re fresher, juicier, and the peels have a more intense oil content. If you’re shopping at a grocery store, look for the ones with the strongest orange scent—that’s a sign of good flavor.
Equipment Needed
You don’t need a dehydrator or any fancy gadgets for this recipe. Here’s what you’ll actually use:
- Baking Sheet (1-2, depending on batch size): A standard half-sheet pan works perfectly. No need for a special non-stick surface—just a regular metal pan.
- Parchment Paper or Silicone Baking Mat : This is non-negotiable. The orange slices will stick to bare metal, and peeling them off is a nightmare. Parchment paper makes cleanup effortless and prevents sticking.
- Sharp Knife or Mandoline Slicer : A mandoline is my strong recommendation for consistent thickness. I use a basic $20 model, and it’s paid for itself many times over. If you’re using a knife, make sure it’s razor-sharp—dull knives squish the oranges and create uneven slices.
- Cutting Board : Any sturdy board works. I prefer a large wooden one because it doesn’t slide around.
- Paper Towels : For patting the slices dry before baking. This step is easy to skip, but it makes a big difference in drying time.
- Cooling Rack (optional but helpful): If you have one, placing the slices on a cooling rack set over the baking sheet allows air to circulate underneath, speeding up the drying process. I don’t always use one, and it still works fine.
Budget-Friendly Tip : If you don’t own a mandoline, you can absolutely use a sharp chef’s knife. Just take your time and aim for even slices. The first batch I ever made was with a slightly dull knife, and the slices ranged from paper-thin to almost half an inch thick. The thin ones burned, and the thick ones never dried properly. Learn from my mistake!
Preparation Method
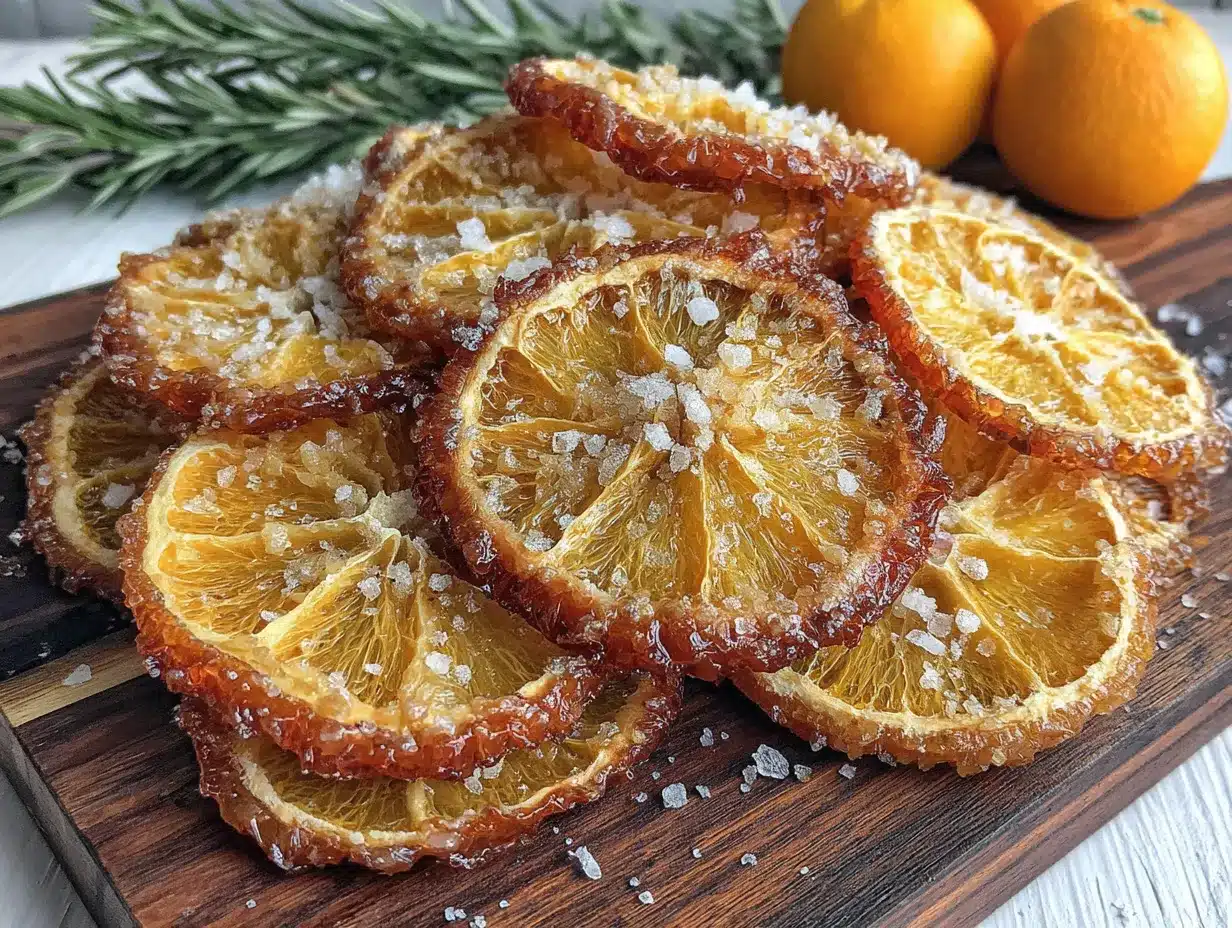
This is where the magic happens. Follow these steps, and you’ll have beautiful, chewy oven-dried orange slices every single time.
- Preheat your oven to 200°F (93°C). Yes, that low. Higher temperatures will cook the oranges instead of drying them, leading to bitter, burnt edges. I learned this the hard way when I tried 250°F and ended up with charcoal-flavored slices. Low and slow is the secret here. Line your baking sheets with parchment paper while the oven heats up.
- Wash and dry the oranges thoroughly. Even if they’re organic, give them a good scrub under warm water. Pat them completely dry with a clean kitchen towel or paper towels. Any moisture on the skin will create steam in the oven, which slows down drying and can cause the slices to stick.
- Slice the oranges into even rounds, about 1/8-inch (3mm) thick. If using a mandoline, set it to the thinnest setting that still gives you a solid slice. If using a knife, go slowly and aim for uniform thickness. You should get about 8-10 slices per medium orange. Discard the very ends—they’re mostly peel and won’t dry nicely.
- Blot the slices with paper towels. Lay the slices in a single layer on a stack of paper towels, then gently press another paper towel on top to absorb excess juice. This step removes surface moisture and helps the slices dry faster and more evenly. Don’t skip it—I’ve tried, and it adds an extra 30-45 minutes to the drying time.
- Arrange the slices in a single layer on the prepared baking sheets. Make sure they’re not touching or overlapping. If they’re crowded, the trapped moisture will steam them instead of drying them, and you’ll end up with soggy, sticky slices. Use two baking sheets if needed.
- Bake for 2.5 to 3 hours, flipping halfway through. After about 1.5 hours, use tongs to carefully flip each slice. The bottoms will be slightly more dried than the tops, and flipping ensures even drying. At the 2.5-hour mark, start checking for doneness. The slices should be dry to the touch, slightly leathery, and the edges should be curling up just a bit. They won’t be crispy like store-bought versions—they should still have a little give when you bend them.
- Let them cool completely on the baking sheets. As they cool, they’ll continue to firm up. Don’t rush this step—if you try to move them while they’re still warm, they might stick to the parchment or tear. Give them at least 30 minutes at room temperature.
- Test for doneness. A properly dried orange slice should be pliable but not sticky. If it feels tacky or moist in the center, return it to the oven for another 15-20 minutes. If it’s brittle and snaps easily, it’s slightly overdone but still usable—just crumble it into tea or use it as a garnish rather than a snack.
Troubleshooting Tip : If your slices are taking longer than 3 hours, your oven might run cool. I’ve had ovens that needed a full 4 hours at 200°F. If they’re browning too quickly, your oven runs hot—reduce the temperature to 180°F (82°C) and extend the time. Every oven is different, so treat the first batch as a test run.
Sensory Cue : Your kitchen will smell like a citrus orchard by the 1-hour mark. The slices will start to look translucent around the edges, and the centers will deepen in color. When they’re done, they should feel dry to the touch, and the orange aroma will be concentrated and sweet—almost candy-like.
Cooking Tips & Techniques
After making these orange slices more times than I can count, I’ve picked up a few tricks that make the process foolproof. Here’s what I wish someone had told me before my first attempt.
Don’t rush the temperature. I know it’s tempting to crank the oven to 300°F and hope for the best. I tried it once when I was in a hurry, and the slices turned brown and bitter while the centers stayed wet. Low heat is not negotiable here. Think of it as a long, gentle hug for the oranges—not a blast of heat.
Thickness is everything. Slices that are too thick will take forever to dry and might spoil before they’re done. Slices that are too thin will burn before the moisture evaporates. That 1/8-inch sweet spot is where it’s at. If you don’t have a mandoline, use a ruler to check the first few slices until your eye gets used to the thickness.
Rotate your baking sheets halfway through. Most ovens have hot spots—the back might be hotter than the front, or one side runs warmer. Rotating the sheets front to back and swapping the top and bottom racks ensures even drying. I forgot to do this once, and half the batch was perfect while the other half was still wet.
Patience with the flip. When you flip the slices at the 1.5-hour mark, they’ll be delicate and a little sticky. Use tongs and be gentle. If a slice tears, don’t worry—just lay the pieces back down. They’ll still dry fine, and no one will notice once they’re in a cocktail.
My biggest failure : The first time I made these, I didn’t blot the slices at all. I thought the extra juice would just evaporate in the oven. Instead, the slices steamed and turned into sticky, gummy messes that never fully dried. I ended up tossing the whole batch. Now I blot religiously, and the difference is night and day.
Multitasking strategy : Since the oven does most of the work, use that 3-hour window to do other things. I usually make these while I’m working from home or watching a movie. Just set a timer for the flip and another for the final check. It’s a low-effort, high-reward project.
Variations & Adaptations
Once you’ve mastered the basic recipe, the possibilities are endless. Here are some of my favorite ways to switch things up.
Spiced Orange Slices : Before baking, sprinkle the slices lightly with cinnamon, nutmeg, or cardamom. The warm spices complement the citrus beautifully. I made a batch with cinnamon for a holiday party, and they were gone in minutes. Just go easy—a little goes a long way.
Herb-Infused Slices : Lay a few sprigs of fresh rosemary or thyme on the baking sheet alongside the orange slices. The herbs release their oils as they warm, and the oranges pick up a subtle savory note. These are incredible in gin cocktails or as a garnish for roasted chicken.
Chocolate-Dipped Orange Slices : Once the slices are fully dry and cool, dip half of each slice in melted dark chocolate and let it set on parchment paper. The combination of chewy, tangy orange and rich chocolate is absolutely addictive. I made these for a friend’s birthday, and she asked for the recipe before she finished the first one.
Dietary Adaptation : These are naturally gluten-free, vegan, and paleo-friendly. No substitutions needed. If you’re watching sugar intake, these are a great alternative to candy because the sweetness comes entirely from the fruit.
Different Citrus Fruits : Try this method with lemons, limes, or grapefruits. Lemons and limes dry faster (check at 2 hours), while grapefruits may need an extra 30 minutes. Blood oranges create a stunning deep red color that’s gorgeous in cocktails or as a garnish for desserts.
Personal Variation : My favorite experiment was adding a split vanilla bean to the baking sheet. The vanilla scent infused the entire batch, and the oranges took on a subtle floral sweetness that was incredible in iced tea. I’ve also tried sprinkling them with flaky sea salt right after baking—the salt cuts the sweetness and makes them dangerously snackable.
Serving & Storage Suggestions
These oven-dried orange slices are incredibly versatile. Here’s how to use them and keep them fresh.
Serving Temperature and Presentation : Serve at room temperature. They’re beautiful arranged in a clear glass jar or layered on a wooden board with cheese and nuts. For cocktails, drop a slice into a glass of prosecco, gin and tonic, or hot tea. The slice will rehydrate slightly and release its concentrated flavor. For baking, chop them up and fold into scones, cookies, or quick breads.
Complementary Dishes and Beverages : These pair beautifully with dark chocolate, sharp cheddar cheese, or almond biscotti. For drinks, try them in mulled wine, hot cider, or a simple glass of sparkling water. I love floating one in a cup of Earl Grey tea—it adds a bright citrus note that’s perfect for cold afternoons.
Storage Instructions : Store in an airtight container at room temperature for up to 2 weeks. If your kitchen is humid, they may soften slightly—just pop them back in a 200°F oven for 10-15 minutes to re-crisp them. For longer storage, keep them in the refrigerator for up to a month, or freeze for up to 6 months. To freeze, layer them between sheets of parchment paper in a freezer-safe bag or container.
Reheating Methods : These are best at room temperature, but if they’ve softened from humidity, spread them on a baking sheet and warm them at 200°F for 10 minutes. Let them cool completely before storing again.
Flavor Development : The flavor actually improves after a day or two. The natural sugars continue to concentrate, and the texture becomes more chewy and uniform. I always make a batch at least 24 hours before I plan to use them for gifting or entertaining.
Nutritional Information & Benefits
These oven-dried orange slices are a healthy treat that you can feel good about snacking on. Here’s the breakdown.
Estimated Nutritional Values (per 3 slices) : Approximately 60 calories, 0g fat, 15g carbohydrates, 3g fiber, 12g sugar (all natural), 1g protein. These values are approximate and depend on the size and variety of oranges used.
Health Benefits of Key Ingredients : Oranges are packed with vitamin C, which supports immune function and skin health. The drying process concentrates these nutrients, so even a small serving delivers a good dose. Oranges also contain antioxidants like flavonoids and carotenoids, which help reduce inflammation and support heart health. The fiber content is preserved in the drying process, making these a satisfying snack that won’t spike your blood sugar.
Dietary Considerations : This recipe is naturally gluten-free, dairy-free, vegan, paleo-friendly, and Whole30-compliant. There are no added sugars, preservatives, or artificial ingredients. If you’re on a low-FODMAP diet, these are generally safe in small servings, but check your tolerance since dried fruit can be higher in certain sugars.
Potential Allergens : Oranges themselves are not common allergens, but if you add any optional ingredients like chocolate or spices, be mindful of potential allergens. Always check labels if you’re serving to others with dietary restrictions.
Personal Wellness Perspective : I love that these orange slices let me enjoy a sweet treat without the guilt. They’re my go-to when I’m craving something candy-like but want to stick with whole foods. Plus, the act of making them—slicing, arranging, watching them transform—is oddly meditative. It’s a small act of kitchen mindfulness that leaves me with something beautiful and delicious.
Conclusion
Honestly, these homemade oven-dried orange slices have become one of my most-used recipes, and I never expected that. They started as a late-night whim and turned into a staple that I make year-round. They’re simple enough for a beginner, versatile enough for a seasoned cook, and beautiful enough to give as gifts. I love that I can make something so elegant from a humble bag of oranges.
I hope you give these a try—and don’t be afraid to make them your own. Add spices, dip them in chocolate, or just enjoy them plain. The beauty of this recipe is that it’s a starting point, not a rulebook. If your slices come out a little thicker or a little thinner, that’s fine. If they take an extra 20 minutes, that’s okay too. The best version is the one that works for you.
I’d love to hear how yours turn out! Drop a comment below and let me know what you used them for—cocktails, baking, snacking, or something I haven’t thought of. And if you have a favorite variation, please share it. That’s how recipes evolve, and I’m always looking for new ideas. Happy drying, friends—you’ve got this.
Frequently Asked Questions
Can I use a dehydrator instead of an oven?
Absolutely! A dehydrator works even better than an oven for this recipe. Set it to 135°F (57°C) and dry for 4-6 hours, checking periodically. The lower temperature preserves more of the color and flavor. I’ve used both methods, and the dehydrator gives a slightly more even result, but the oven is perfectly fine if that’s what you have.
How do I know when the orange slices are fully dried?
The slices should feel dry to the touch, slightly leathery, and the edges should curl up. They should bend without cracking, and there should be no sticky or moist spots in the center. If they feel tacky or wet, they need more time. When in doubt, let them go another 15 minutes—it’s better to over-dry slightly than under-dry and risk spoilage.
Can I use these in baking?
Yes, but with a caveat. Whole dried slices can be tough in baked goods. I recommend chopping them into small pieces before folding into scones, cookies, or quick breads. They’ll soften slightly during baking and add concentrated orange flavor. I’ve used them in orange cranberry scones, and they were a hit.
Why did my orange slices turn brown?
Browning usually happens when the oven temperature is too high or the slices are too thin. If your oven runs hot, reduce the temperature to 180°F (82°C). Also, make sure you’re not using oranges with any bruises or soft spots—those will brown faster. A little browning is normal, but if they’re dark brown or black, the temperature needs adjusting.
How long do these last in storage?
At room temperature in an airtight container, they’ll stay good for up to 2 weeks. In the refrigerator, they’ll last about a month. In the freezer, they’ll keep for up to 6 months. Just make sure they’re completely cool and dry before storing, and use parchment paper between layers to prevent sticking. If they soften from humidity, a quick 10-minute reheat at 200°F will restore their texture.
Pin This Recipe!


Homemade Oven-Dried Orange Slices: Easy 3-Step Recipe
- Total Time: 3 hours 15 minutes
- Yield: 24-30 slices (about 8-10 per orange) 1x
Description
Learn how to make beautiful, chewy oven-dried orange slices with just one ingredient and three simple steps. Perfect for cocktails, gifts, baking, or a healthy snack.
Ingredients
- 3–4 medium fresh oranges (preferably organic navel or Valencia)
- Optional: cinnamon sticks or vanilla beans for infusion
- Optional: powdered sugar or cocoa powder for dusting
Instructions
- Preheat your oven to 200°F (93°C). Line baking sheets with parchment paper.
- Wash and dry the oranges thoroughly. Pat completely dry with a clean towel.
- Slice the oranges into even rounds, about 1/8-inch (3mm) thick. Discard the ends.
- Blot the slices with paper towels to remove excess surface moisture.
- Arrange the slices in a single layer on the prepared baking sheets, not touching or overlapping.
- Bake for 2.5 to 3 hours, flipping halfway through (at about 1.5 hours).
- Let the slices cool completely on the baking sheets for at least 30 minutes.
- Test for doneness: slices should be pliable but not sticky. If tacky, return to oven for 15-20 minutes.
Notes
Low and slow is key—do not exceed 200°F. Blotting slices before baking is crucial to avoid steaming. Oven temperatures vary; check at 2.5 hours and adjust time as needed. Slices will continue to firm up as they cool. For longer storage, freeze between layers of parchment paper for up to 6 months.
- Prep Time: 15 minutes
- Cook Time: 3 hours
- Category: Snack
- Cuisine: American
Nutrition
- Serving Size: 3 slices
- Calories: 60
- Sugar: 12
- Carbohydrates: 15
- Fiber: 3
- Protein: 1
Keywords: dried orange slices, oven-dried oranges, homemade dried fruit, citrus snacks, edible gifts, cocktail garnish, healthy snack, gluten-free, vegan, paleo