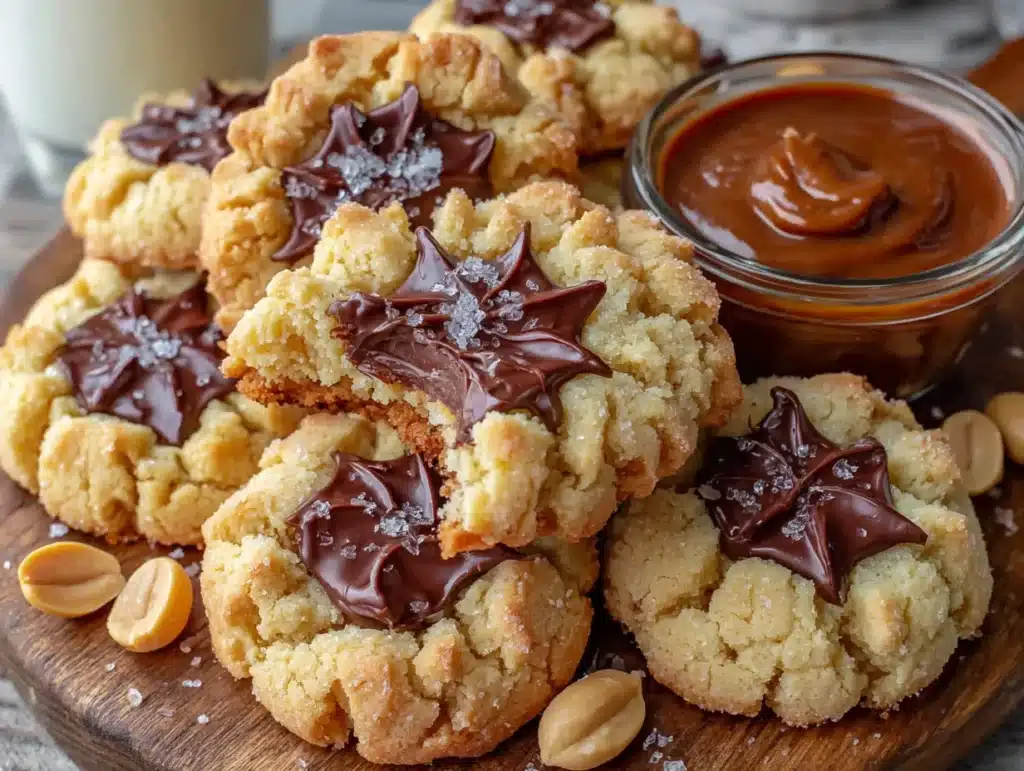
I was digging through the back of my pantry last Tuesday, hunting for a bag of chocolate chips I knew I had stashed somewhere, when my fingers brushed against a dusty, half-crushed bag of star-shaped dark chocolate melts. And just like that—I was seven years old, standing on a step stool in my neighbor Mrs. Kowalski’s kitchen, watching her press a chocolate kiss into the center of a warm peanut butter cookie. The smell of toasted peanuts and butter hit me so hard I nearly sat down right there on the linoleum floor. Honestly, I’d forgotten all about those afternoons.
Mrs. K wasn’t my grandmother or even a relative. She was just the lady next door who let me “help” bake after school while my mom worked late. She had this way of making you feel important, even when you were just handing her the wrong measuring spoon for the tenth time. I can still see her flour-dusted hands and the way she’d say “close enough” when my cookies came out lopsided. That memory—the smell, the warmth, the feeling of being trusted with something sweet—stuck with me in a way I didn’t fully understand until I tried to recreate it.
So when I found those dark chocolate stars, I knew exactly what I had to make. Not the classic version with milk chocolate kisses—that’s Mrs. K’s territory, and I won’t mess with it. But these easy peanut butter blossom cookies with dark chocolate stars? They’re my little nod to her. A bit darker, a bit more grown-up, but still that same soft, salty-sweet peanut butter cookie you remember. Maybe you’ve got a memory like that too, one that comes back when you least expect it. This is my attempt to hold onto mine, one cookie at a time.
Why You’ll Love This Recipe
Let’s be real for a second. Weeknight baking is a gamble. You’re tired, the kitchen’s a mess from dinner, and the last thing you want is a project that leaves you scrubbing bowls until 10 PM. That’s exactly why these easy peanut butter blossom cookies with dark chocolate stars are my go-to. They’re the kind of recipe that respects your time and energy.
- Quick & Easy : From start to finish, you’re looking at about 25 minutes. No chilling the dough, no complicated steps. Just mix, roll, bake, and press. Perfect for those evenings when a cookie craving hits out of nowhere.
- Simple Ingredients : You probably have everything in your pantry right now. Peanut butter, sugar, butter, an egg, flour, and baking soda. That’s it. No fancy extracts or specialty flours needed.
- Perfect for Weeknights : These come together so fast you can make them while the pasta water’s boiling. Seriously. I’ve done it more times than I can count.
- Crowd-Pleaser : Kids love the classic shape, and adults appreciate the dark chocolate twist. They disappear from cookie plates faster than anything else.
- Unbelievably Delicious : The combo of soft, salty peanut butter cookie and rich, slightly bitter dark chocolate is next-level. It’s comfort food that feels a little fancy without trying too hard.
What makes this version different? It’s the dark chocolate stars. Most recipes use milk chocolate kisses, which are sweet on sweet. The dark chocolate cuts through the richness of the peanut butter and adds this little grown-up edge. Plus, the star shape is fun without being fussy. Trust me, this isn’t just another peanut butter cookie recipe. It’s the one you’ll keep coming back to on a Tuesday night when you need something good, fast, and familiar.
What Ingredients You Will Need
This recipe uses simple, everyday ingredients to create something that feels special. No hunting down obscure items at three different stores. Here’s what you’ll need:
For the Cookie Dough
- 1/2 cup unsalted butter, softened to room temperature (I use Kerrygold for the richness, but any brand works)
- 1/2 cup creamy peanut butter (Jif or Skippy work best here—natural peanut butter that separates can make the cookies greasy)
- 1/2 cup granulated sugar, plus extra for rolling
- 1/2 cup packed light brown sugar (adds moisture and a hint of molasses flavor)
- 1 large egg, room temperature (cold egg can seize the butter mixture)
- 1 teaspoon vanilla extract (pure vanilla, not imitation, if you can swing it)
- 1 1/2 cups all-purpose flour (spooned and leveled—don’t scoop straight from the bag)
- 1 teaspoon baking soda (check the expiration date, old baking soda won’t give you lift)
- 1/2 teaspoon salt (if you’re using salted butter, reduce this to 1/4 teaspoon)
For the Topping
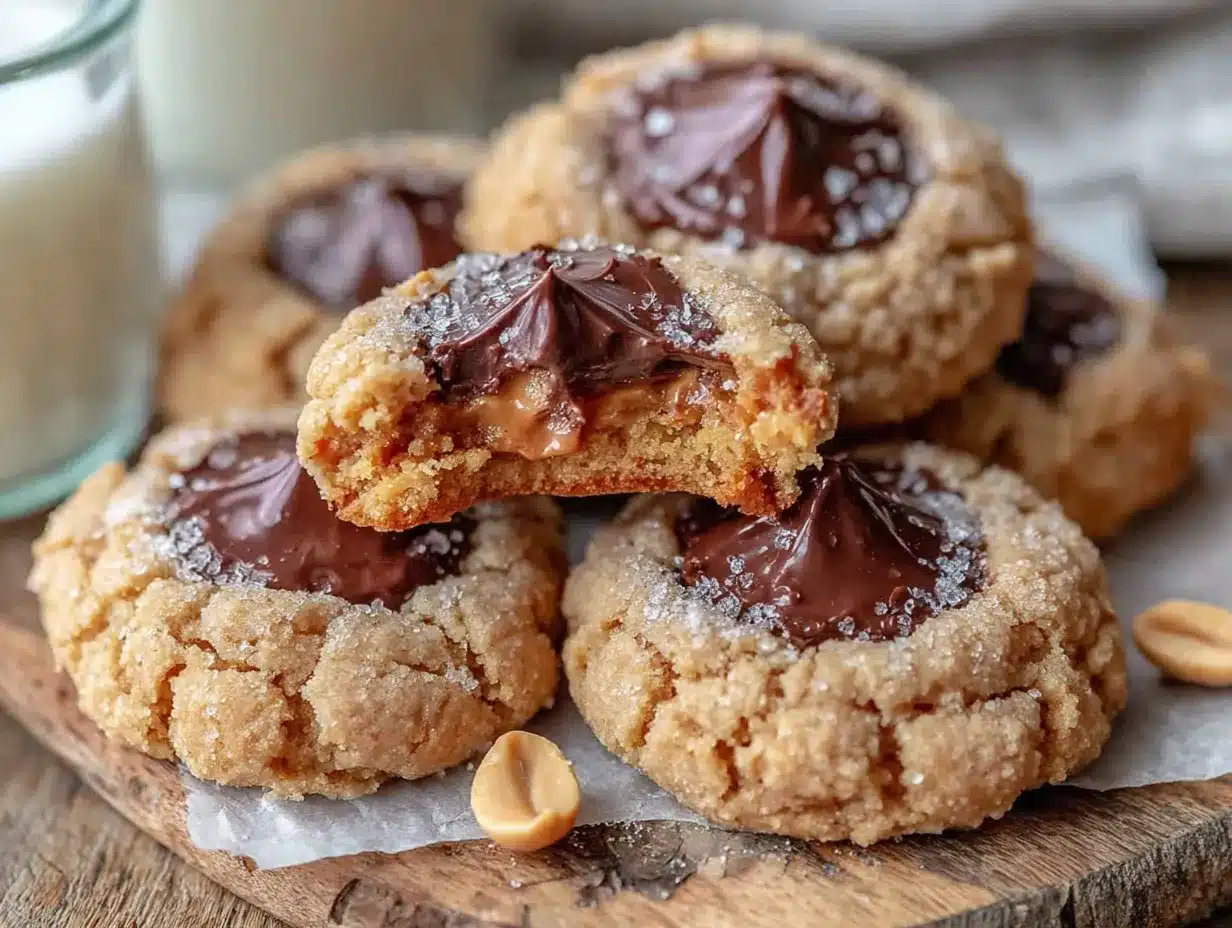
- 24-30 dark chocolate stars (I use Ghirardelli dark chocolate melting wafers in star shape—they’re widely available and melt beautifully without blooming)
- Extra granulated sugar for rolling the dough balls
A few notes on ingredients. For the peanut butter, stick with the processed stuff for this recipe. I know, I know, natural peanut butter is healthier. But here’s the thing—natural peanut butter has oil that separates, and it can make the cookies spread too much and turn greasy. The stabilizers in Jif or Skippy keep the texture consistent. If you only have natural peanut butter, give it a really good stir and expect slightly flatter cookies.
As for the chocolate stars, you can find them in the baking aisle near the chocolate chips, or online. If you can’t find stars, dark chocolate kisses or even chopped dark chocolate bars pressed into the center work great. Just make sure whatever chocolate you use is high quality enough to melt smoothly. Nobody wants waxy chocolate on a perfect peanut butter cookie.
For a gluten-free option, swap the all-purpose flour with a 1:1 gluten-free baking flour blend. I’ve done it with Bob’s Red Mill and the texture was nearly identical. Just don’t overmix the dough.
Equipment Needed
You don’t need a fancy kitchen to pull these off. Here’s what you’ll actually use:
- Electric hand mixer or stand mixer (a hand mixer is fine, but a stand mixer makes creaming the butter and sugars effortless)
- Large mixing bowl
- Medium mixing bowl for dry ingredients
- Measuring cups and spoons (dry measuring cups for flour and sugar, liquid measuring cup for nothing here—easy)
- Baking sheets (I prefer light-colored aluminum sheets for even browning—dark sheets can burn the bottoms)
- Parchment paper or silicone baking mat (parchment is cheaper and disposable, silicone mats are reusable—both work great)
- Cooling rack (wire rack for letting cookies cool properly so the chocolate sets)
- Small bowl for rolling sugar
- Spatula for scraping the bowl
If you don’t have an electric mixer, you can cream the butter and sugars by hand with a wooden spoon. It’ll take a few extra minutes and a bit of elbow grease, but the cookies will still turn out great. I’ve done it plenty of times when my mixer was buried under a pile of Tupperware.
One tip on baking sheets—if yours are old and dark, consider lining them with parchment and keeping an eye on the bake time. Dark pans absorb more heat and can brown cookies faster. You might need to reduce the baking time by a minute or two.
Preparation Method
Alright, let’s get to it. This is straightforward, but I’ll walk you through every step so you get perfect cookies on your first try.
- Preheat your oven to 375°F (190°C). Line two baking sheets with parchment paper or silicone mats. Getting the oven hot before you start mixing is key—you want it ready to go when the dough is done.
- Cream the butter and sugars. In a large mixing bowl, beat the softened butter, granulated sugar, and brown sugar together until light and fluffy, about 2-3 minutes with an electric mixer on medium speed. Scrape down the sides of the bowl halfway through. The mixture should look pale and slightly increased in volume. This is where the texture starts to come together, so don’t rush it.
- Add the peanut butter, egg, and vanilla. Beat in the peanut butter until fully combined, then add the egg and vanilla extract. Mix until just incorporated. The mixture will look smooth and creamy, almost like a thick frosting. If it looks separated or greasy, your butter might have been too soft—don’t worry, it’ll still bake up fine.
- Combine the dry ingredients. In a separate medium bowl, whisk together the flour, baking soda, and salt. Whisking aerates the flour and ensures the baking soda is evenly distributed, so you don’t end up with one cookie that tastes metallic.
- Mix the dry ingredients into the wet. Gradually add the flour mixture to the peanut butter mixture, mixing on low speed until just combined. Stop as soon as you don’t see any more streaks of flour. Overmixing at this stage develops gluten and makes the cookies tough. The dough will be soft and slightly sticky, but it should hold together when you pinch it.
- Roll the dough balls. Pour about 1/4 cup of granulated sugar into a small bowl. Scoop tablespoon-sized portions of dough (about 1.5 tablespoons each) and roll them into smooth balls between your palms. Roll each ball in the sugar to coat completely. Place them on the prepared baking sheets, spacing them about 2 inches apart. You should get about 24-30 cookies depending on how generous you are with your scoops.
- Bake the cookies. Bake one sheet at a time in the preheated oven for 8-10 minutes. The cookies should look puffed and slightly cracked on top, with the edges just beginning to turn golden. They’ll look underdone in the center—that’s exactly what you want. Overbaked cookies won’t be soft enough to hold the chocolate star without cracking.
- Press in the chocolate stars immediately. As soon as the cookies come out of the oven, gently press a dark chocolate star into the center of each one. Don’t push too hard or the cookie will crack around the edges. The residual heat will soften the chocolate just enough to create that classic look. If the chocolate doesn’t melt slightly, your cookies might have cooled too much—work in batches if needed.
- Cool completely on the baking sheet. Let the cookies cool on the baking sheet for 5 minutes, then transfer them to a wire rack to cool completely. The chocolate needs time to set, so resist the urge to eat them right away. I know, I know. But trust me, it’s worth the wait.
A quick note on timing: if you’re multitasking, start scooping the dough balls while the first batch bakes. That way, the second batch goes in the oven as soon as the first comes out. Efficiency is the name of the game on a weeknight.
Cooking Tips & Techniques
After making these easy peanut butter blossom cookies with dark chocolate stars about a dozen times, I’ve picked up a few things worth sharing. Some through success, some through spectacular failure.
Don’t skip the extra sugar coating. I tried making these without rolling the dough balls in sugar once because I was in a hurry and thought, “Eh, it’ll be fine.” It was not fine. The cookies came out pale and flat, and they didn’t have that signature crackly top. The sugar coating does two things: it adds a slight crunch to the outside, and it helps the cookies spread just the right amount. Skip it at your own risk.
Watch your baking time like a hawk. The difference between a perfect cookie and a dry one is about 90 seconds. At 8 minutes, the cookies will be very soft and puffy. At 10 minutes, they’ll be set but still tender. Anything past 11 minutes and you’re in crunchy territory. I set my timer for 8 minutes and check every 30 seconds after that. Your oven might run hot or cold, so get to know its quirks.
Press the chocolate in while the cookies are still hot. This is non-negotiable. If you wait even 2-3 minutes, the cookies start to set and the chocolate won’t sink in properly. I press the stars in as soon as the baking sheet comes out of the oven, working quickly from cookie to cookie. If the chocolate doesn’t soften at all, pop the cookies back in the oven for 30 seconds to rewarm them.
Room temperature ingredients matter. Cold butter won’t cream properly with the sugar, and cold egg can seize the mixture. If you forgot to take the butter out ahead of time, cut it into small cubes and microwave it in 5-second bursts until it’s soft but not melted. For the egg, place it in a bowl of warm water for 5 minutes.
One mistake I made early on: I used crunchy peanut butter because I thought the texture would be nice. It was not. The peanut pieces made it hard to roll smooth dough balls, and they poked through the surface during baking. Stick with creamy for this recipe. Save the crunchy for toast.
Variations & Adaptations
One of the best things about this recipe is how easy it is to change up. Here are a few ways I’ve adapted it depending on what I have on hand or who I’m baking for.
Chocolate Swap: If you can’t find dark chocolate stars, use dark chocolate kisses, chopped dark chocolate bars, or even dark chocolate chips pressed into the center. I’ve used Ghirardelli dark chocolate chips in a pinch and they look rustic but taste amazing. For a sweeter version, go with milk chocolate stars or classic Hershey’s kisses.
Peanut Butter Alternatives: Almond butter or cashew butter work well if you need a nut-free option for school events. Just note that they can be a bit oilier, so you might need to chill the dough for 15 minutes before rolling. Sunflower seed butter is also great for nut-free kitchens, but the cookies will turn greenish from a natural reaction with the baking soda. They’re still safe to eat, just a little weird looking.
Gluten-Free Version: As I mentioned, a 1:1 gluten-free flour blend works perfectly. I’ve tested this with Bob’s Red Mill and King Arthur Measure for Measure, and both produced soft, tender cookies. Just don’t overmix the dough.
Holiday Twist: For Christmas, use red and green sprinkles mixed into the rolling sugar. For Halloween, press in orange or purple chocolate melts. For Valentine’s Day, use pink or red chocolate stars. The cookie base is so versatile that it works for any occasion.
My personal favorite variation? I made these for a friend’s birthday and swapped the dark chocolate stars for caramel-filled chocolate squares. The caramel got all gooey in the center and it was absolutely ridiculous. I haven’t done it again because I can’t be trusted around them, but it’s worth trying if you’re feeling dangerous.
Serving & Storage Suggestions
These cookies are best served at room temperature, which is convenient because that’s how they’ll be after cooling. The chocolate should be fully set but still soft enough to bite through without shattering. If you’re serving them at a party or potluck, arrange them on a plate with the chocolate stars facing up so everyone can see that beautiful dark chocolate center.
They pair beautifully with a cold glass of milk (obviously), but also with a hot cup of coffee or a mug of spiced chai. The bitterness of the coffee plays off the dark chocolate in a way that feels very adult. For a dessert spread, serve them alongside vanilla ice cream or a simple chocolate pudding.
Storage: Keep these cookies in an airtight container at room temperature for up to 5 days. Layer them between sheets of parchment paper so the chocolate stars don’t stick to each other. If your kitchen runs warm, store them in a cooler spot—the chocolate can soften and smear if it’s too hot.
Freezer Instructions: These freeze beautifully. Place the cooled cookies in a single layer on a baking sheet and freeze until solid, about 1 hour. Transfer to a freezer-safe bag or container, layering with parchment paper. They’ll keep for up to 3 months. To thaw, let them sit at room temperature for about 20 minutes. You can also freeze the unbaked dough balls—just roll them in sugar, place them on a baking sheet, freeze until solid, then transfer to a bag. Bake from frozen, adding 1-2 minutes to the bake time.
Reheating: If you like your cookies slightly warm (I do), pop one in the microwave for 10-15 seconds. The chocolate will get soft and the cookie will taste fresh out of the oven. Just don’t overdo it or the chocolate will melt into a puddle.
One thing I’ve noticed: these cookies actually taste better on day two. The flavors meld together and the peanut butter flavor deepens. If you can manage to hide a few from your family, you’ll be rewarded the next day.
Nutritional Information & Benefits
Let’s be honest—these are cookies, not health food. But they’re made with real ingredients, and that counts for something. Here’s the estimated nutritional breakdown per cookie (based on 28 cookies):
- Calories: 145
- Total Fat: 8g
- Saturated Fat: 3.5g
- Cholesterol: 18mg
- Sodium: 95mg
- Total Carbohydrates: 17g
- Dietary Fiber: 1g
- Sugars: 11g
- Protein: 3g
The peanut butter provides a small amount of protein and healthy fats, which helps make these slightly more satisfying than a plain sugar cookie. Dark chocolate contains antioxidants and flavonoids, which is my favorite excuse to eat a few extra. If you’re watching your sugar intake, you can reduce the sugar in the dough by 2 tablespoons without affecting the texture too much.
For those with dietary concerns: these cookies contain peanuts, dairy (butter), eggs, and gluten. They are not suitable for vegan or dairy-free diets as written, but you can try vegan butter and a flax egg if you’re experimenting. The texture won’t be identical, but it’ll still be a cookie.
I’m not a nutritionist, and I don’t pretend to be one. But I do believe that a homemade cookie made with real butter and actual peanut butter is better for you than anything that comes out of a package with a dozen unpronounceable ingredients. Moderation is key, and these are worth every single calorie.
Conclusion
These easy peanut butter blossom cookies with dark chocolate stars are more than just a quick weeknight treat. They’re a little time machine, a way to hold onto a memory that might otherwise fade. Every time I press that dark chocolate star into the center of a warm cookie, I think of Mrs. Kowalski and her flour-dusted hands and the way she never made me feel like I was in the way. That’s the power of a good recipe, isn’t it? It connects us to people and places we’ve loved.
I hope you’ll give these a try, whether you’re chasing a memory of your own or just need something sweet and satisfying after a long day. Don’t be afraid to make them your own—swap the chocolate, change the shape, add some sprinkles. The cookie dough is forgiving, and the result is always delicious.
When you make them—and I hope you do—come back and let me know how they turned out. Did you use dark chocolate stars or something totally different? Did your kids help you press the chocolate in? I’d love to hear your story. Leave a comment below or tag me in your photos. Happy baking, friend. You’ve got this.
Frequently Asked Questions
Can I use natural peanut butter in this recipe?
You can, but the cookies may spread more and turn out slightly greasier. Processed peanut butter like Jif or Skippy gives the best texture because the stabilizers help the dough hold its shape. If you only have natural peanut butter, stir it very well before measuring and expect slightly flatter cookies.
Why did my cookies spread too much?
This usually happens for one of three reasons: your butter was too soft or melted, you didn’t use enough flour, or your baking sheet was too warm. Make sure your butter is softened but not greasy, measure your flour by spooning it into the cup and leveling it off, and let your baking sheets cool completely between batches.
Can I freeze the dough instead of baking all at once?
Absolutely. Roll the dough into balls, coat them in sugar, and place them on a baking sheet in the freezer until solid. Transfer to a freezer bag and bake straight from frozen when you need cookies, adding 1-2 minutes to the bake time. This is my favorite weeknight hack.
What if I can’t find dark chocolate stars?
No worries at all. You can use dark chocolate kisses, chopped dark chocolate bars, or even dark chocolate chips pressed into the center. The star shape is fun, but the flavor is what matters. Milk chocolate or white chocolate also work if you prefer a sweeter cookie.
How do I keep the chocolate from melting into a puddle?
Press the chocolate into the cookies as soon as they come out of the oven, but don’t push too hard. The residual heat should soften the chocolate just enough to hold it in place without melting it completely. If your chocolate is melting too much, let the cookies cool on the baking sheet for 1-2 minutes before pressing.
Pin This Recipe!

Easy Peanut Butter Blossom Cookies with Dark Chocolate Stars
- Total Time: 25 minutes
- Yield: 24-30 cookies 1x
Description
These easy peanut butter blossom cookies with dark chocolate stars are a quick weeknight treat that combines a soft, salty-sweet peanut butter cookie with a rich, slightly bitter dark chocolate center. Perfect for when you need something good, fast, and familiar.
Ingredients
- 1/2 cup unsalted butter, softened to room temperature
- 1/2 cup creamy peanut butter (Jif or Skippy recommended)
- 1/2 cup granulated sugar, plus extra for rolling
- 1/2 cup packed light brown sugar
- 1 large egg, room temperature
- 1 teaspoon vanilla extract
- 1 1/2 cups all-purpose flour, spooned and leveled
- 1 teaspoon baking soda
- 1/2 teaspoon salt (reduce to 1/4 teaspoon if using salted butter)
- 24–30 dark chocolate stars (e.g., Ghirardelli dark chocolate melting wafers)
- Extra granulated sugar for rolling
Instructions
- Preheat your oven to 375°F (190°C). Line two baking sheets with parchment paper or silicone mats.
- In a large mixing bowl, beat the softened butter, granulated sugar, and brown sugar together until light and fluffy, about 2-3 minutes with an electric mixer on medium speed. Scrape down the sides of the bowl halfway through.
- Beat in the peanut butter until fully combined, then add the egg and vanilla extract. Mix until just incorporated.
- In a separate medium bowl, whisk together the flour, baking soda, and salt.
- Gradually add the flour mixture to the peanut butter mixture, mixing on low speed until just combined. Do not overmix.
- Pour about 1/4 cup of granulated sugar into a small bowl. Scoop tablespoon-sized portions of dough (about 1.5 tablespoons each) and roll them into smooth balls. Roll each ball in the sugar to coat completely. Place them on the prepared baking sheets, spacing them about 2 inches apart.
- Bake one sheet at a time for 8-10 minutes. The cookies should look puffed and slightly cracked on top, with the edges just beginning to turn golden.
- As soon as the cookies come out of the oven, gently press a dark chocolate star into the center of each one. Do not push too hard.
- Let the cookies cool on the baking sheet for 5 minutes, then transfer them to a wire rack to cool completely.
Notes
For best results, use processed peanut butter (like Jif or Skippy) rather than natural peanut butter, as natural peanut butter can cause the cookies to spread more and become greasy. If you can’t find dark chocolate stars, dark chocolate kisses or chopped dark chocolate bars work well. The cookies taste even better on day two. To freeze, place cooled cookies in a single layer on a baking sheet, freeze until solid, then transfer to a freezer-safe bag for up to 3 months.
- Prep Time: 15 minutes
- Cook Time: 10 minutes
- Category: Dessert
- Cuisine: American
Nutrition
- Serving Size: 1 cookie
- Calories: 145
- Sugar: 11
- Sodium: 95
- Fat: 8
- Saturated Fat: 3.5
- Carbohydrates: 17
- Fiber: 1
- Protein: 3
Keywords: peanut butter blossom cookies, dark chocolate stars, easy cookie recipe, weeknight baking, peanut butter cookies