The last strawberry had been eaten, and I was licking the corner of the spatula. My sister looked at me, fork still in hand, and said, “You have to make this again for the Fourth.” Not a request, really—more of a statement. And honestly, I was already planning to. That’s the thing about this Easy No-Bake Strawberry Shortcake Icebox Cake. It doesn’t just disappear; it leaves a kind of happy silence at the table. People stop talking, which for my family, is a miracle.
I stumbled onto this idea during a heatwave last June. The oven was off-limits—it was too hot to even think about turning it on. I wanted something that felt like summer, something with fresh berries and cream, but I wasn’t about to make a complicated layer cake. I remembered those old icebox cakes from the 80s, the ones my mom used to make with graham crackers and pudding. But I wanted a strawberry shortcake version. So I grabbed a box of vanilla wafers, a carton of heavy cream, and a pint of strawberries from the farmer’s market. I was honestly just winging it.
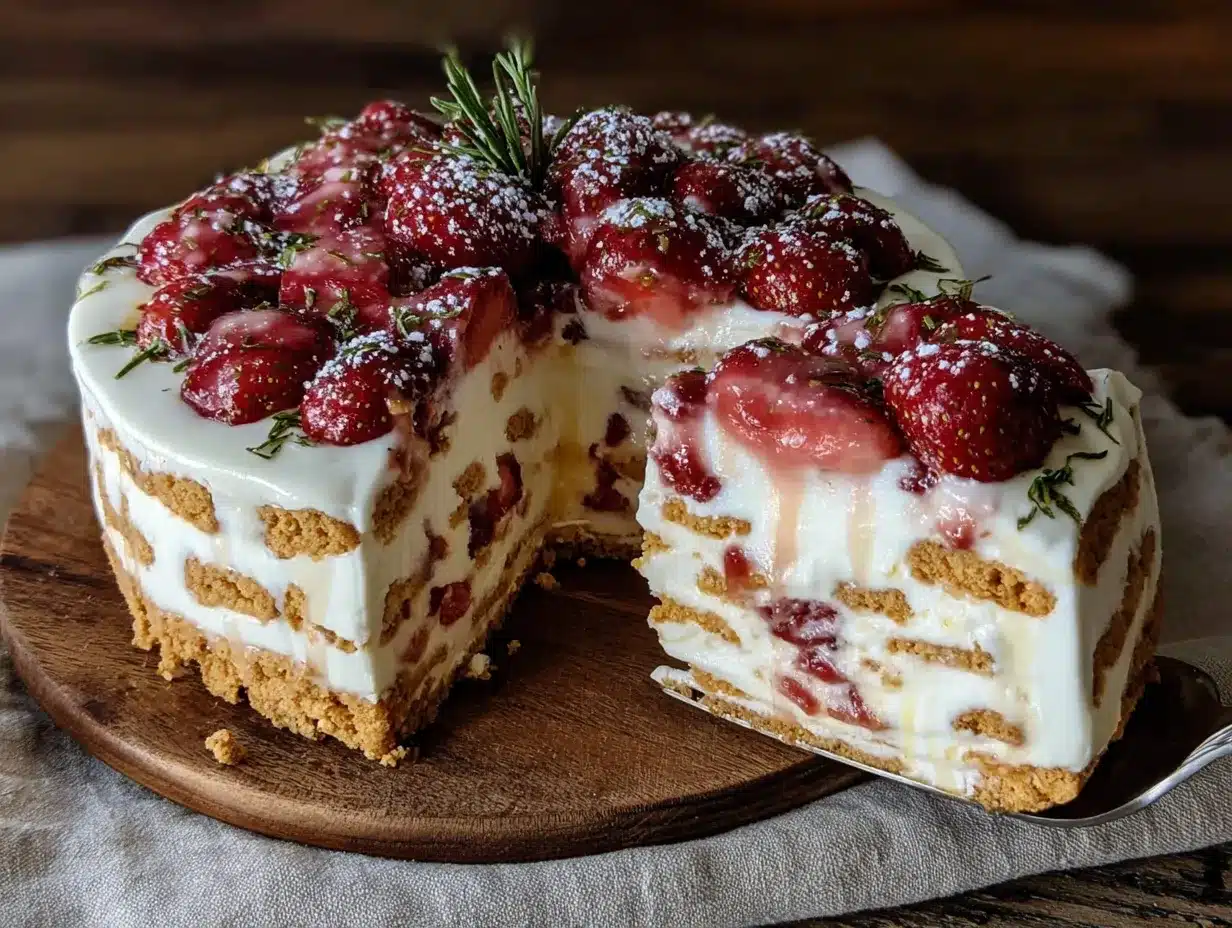
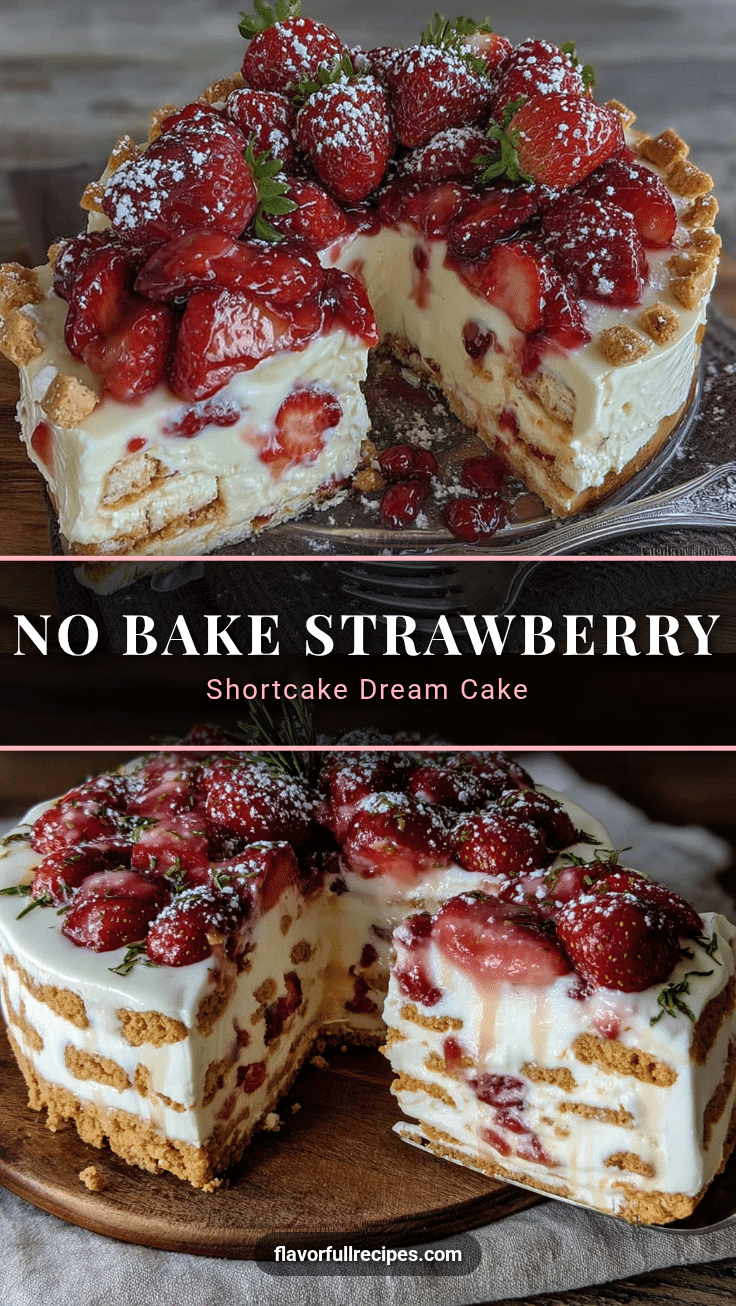
The first bite was a revelation. The wafers had softened into a cake-like texture, the cream was light and sweet, and the strawberries—those juicy, ruby-red berries—were the star. It was better than any baked shortcake I’d ever made. And the best part? No oven, no sweat, no fuss. It was just a quiet, happy accident that turned into my go-to summer dessert. I’ve made it for potlucks, barbecues, and lazy Sunday afternoons, and it never fails. It’s the kind of recipe you can trust.
Why You’ll Love This Recipe
Let me tell you why this Easy No-Bake Strawberry Shortcake Icebox Cake is about to become your favorite summer dessert. It’s not just good—it’s the kind of dessert that makes people ask for the recipe before they’ve even finished their slice. Here’s what makes it special:
- No Oven Required: When it’s 90 degrees outside, the last thing you want to do is heat up your kitchen. This recipe comes together on the countertop, no baking needed. It’s a total lifesaver during those sticky summer months.
- Simple Ingredients: You probably have most of this stuff in your pantry right now. Vanilla wafers, heavy cream, powdered sugar, fresh strawberries. No fancy grocery store runs required.
- Perfect for Summer Gatherings: This is the ultimate potluck or barbecue dessert. It travels well, feeds a crowd, and looks impressive without any stress. I’ve brought it to more cookouts than I can count, and it’s always the first dish to come back empty.
- Crowd-Pleaser: Kids love the creamy, cookie-like layers. Adults love the fresh, not-too-sweet flavor. It’s one of those rare desserts that makes everyone happy.
- Unbelievably Delicious: The texture is what gets me every time. The wafers soften into a tender, cake-like crumb, while the cream stays light and fluffy. It’s comfort food at its finest, but somehow lighter and more refreshing.
What makes this version different from the rest? It’s the balance. I’ve tested this recipe a dozen times to get the perfect ratio of cream to cookie to fruit. It’s not too sweet, not too heavy, and the strawberries stay bright and fresh. This isn’t just another icebox cake—it’s the best one. It’s the dessert that makes you close your eyes after the first bite and just enjoy the moment.
What Ingredients You Will Need
This recipe uses simple, wholesome ingredients to create something truly special. You don’t need a long list of exotic items—just a few good-quality staples that work together beautifully.
- Vanilla Wafers (about 1 box, 12 ounces): These are the backbone of the cake. I like using Nilla Wafers for their classic flavor and sturdy texture. They soften perfectly overnight without turning into mush. If you can find them, the mini ones work great too, but the standard size is easier to layer.
- Fresh Strawberries (2 pounds, hulled and sliced): This is non-negotiable. Fresh, ripe strawberries are what make this dessert sing. Look for berries that are deep red, fragrant, and firm. In the summer, I get mine from the local farmer’s market—they’re so much sweeter than the grocery store ones. If you’re making this in the off-season, you can use frozen strawberries, but thaw and drain them well first to avoid a watery mess.
- Heavy Whipping Cream (2 cups, cold): This is what gives the cake its luscious, airy texture. Make sure it’s cold straight from the fridge—warm cream won’t whip up properly. I recommend using a brand like Land O’Lakes or Horizon Organic for the best results. Do not substitute with half-and-half or milk; you need the high fat content for stability.
- Powdered Sugar (1/2 cup): This sweetens the cream without making it grainy. It dissolves instantly, which is exactly what you want. You can adjust the amount to your taste, but I find 1/2 cup is the sweet spot—enough to balance the tartness of the berries, but not so much that it’s cloying.
- Vanilla Extract (1 teaspoon): A good quality vanilla extract adds warmth and depth to the cream. I use pure vanilla extract, not imitation, because the flavor is noticeably better. If you’re feeling fancy, you can scrape the seeds from half a vanilla bean.
- Lemon Zest (1 teaspoon, optional): This is my little secret. A tiny bit of lemon zest brightens the whole dessert and makes the strawberries taste even more vibrant. It’s not essential, but it takes the cake from great to unforgettable.
- Mint Leaves (for garnish, optional): A few fresh mint leaves add a pop of color and a refreshing finish. It’s purely for presentation, but it makes the cake look like it came from a bakery.
Substitution Guidance
If you need to make adjustments, here are a few swaps I’ve tested:
- Gluten-Free: Use gluten-free vanilla wafers or gluten-free graham crackers. The texture will be slightly different, but it still works beautifully.
- Dairy-Free: Swap the heavy cream for a full-fat coconut cream (chilled overnight) and use dairy-free vanilla wafers. The coconut flavor is subtle and pairs nicely with the strawberries.
- Lower Sugar: You can reduce the powdered sugar to 1/4 cup or use a sugar-free alternative like monk fruit sweetener. The strawberries will still provide plenty of natural sweetness.
Equipment Needed
You don’t need a lot of fancy gadgets for this recipe, which is part of its charm. Here’s what you’ll need:
- Electric Mixer (hand or stand): While you can whip cream by hand with a whisk, it’s a real arm workout. An electric mixer makes the job quick and easy. I use my trusty KitchenAid hand mixer for this—it’s perfect for small batches.
- Large Mixing Bowl: You need a bowl big enough to hold the cream as it whips and doubles in volume. A glass or stainless steel bowl works best because it stays cold.
- 8×8-inch Baking Dish or 9-inch Springform Pan: An 8×8 dish gives you tall, neat layers. A springform pan makes it easier to remove the cake for serving. I’ve used both, and I slightly prefer the springform pan for presentation, but a regular dish works just fine.
- Sharp Knife and Cutting Board: For hulling and slicing the strawberries. A sharp knife makes clean cuts and prevents the berries from getting mushy.
- Spatula: For spreading the whipped cream into even layers. A rubber spatula is ideal for getting into the corners.
- Plastic Wrap: Essential for covering the cake as it chills. It keeps the cream from absorbing any fridge odors.
If you don’t have a springform pan, don’t worry. An 8×8 dish works perfectly—just scoop the cake out with a large spoon. I’ve also made this in a 9×13 dish for a thinner, more casual version, and it’s great for feeding a crowd.
Preparation Method
This is where the magic happens. Follow these steps carefully, and you’ll have a gorgeous, crowd-pleasing dessert in no time.
- Whip the Cream (5 minutes): Pour the cold heavy cream into a large mixing bowl. Add the powdered sugar and vanilla extract. Using your electric mixer, start on low speed to avoid splashing, then gradually increase to high speed. Whip until stiff peaks form—this means when you lift the beaters, the cream stands up in firm peaks that don’t droop. Be careful not to overwhip, or you’ll end up with butter. It should take about 3-4 minutes. If you’re using the lemon zest, fold it in gently at the end.
- Prepare the Strawberries (5 minutes): Wash the strawberries under cold water and pat them dry with a paper towel. Hull them by cutting off the green tops, then slice them into thin, even slices—about 1/8 inch thick. Set aside a handful of the prettiest slices for the top garnish. You should have about 4 cups of sliced berries.
- Layer the Cake (10 minutes): Start by spreading a thin layer of whipped cream (about 1/4 cup) on the bottom of your 8×8 dish or springform pan. This helps the first layer of wafers stick. Then, arrange a single layer of vanilla wafers over the cream, covering the bottom completely. Break a few wafers in half to fill in any gaps. Next, spread 1/3 of the remaining whipped cream over the wafers, using your spatula to make an even layer. Arrange 1/3 of the sliced strawberries over the cream. Repeat the layers: wafers, cream, strawberries, wafers, cream, strawberries. You should have three layers of wafers and three layers of cream and berries. End with a final layer of cream on top.
- Garnish and Chill (6 hours minimum): Arrange the reserved strawberry slices on top of the final cream layer in a decorative pattern. If you’re using mint leaves, tuck them in between the berries. Cover the dish tightly with plastic wrap and refrigerate for at least 6 hours, but overnight is best. The chilling time is crucial—it allows the wafers to soften and absorb the cream, turning into a cake-like texture. Don’t skip this step, or you’ll end up with crunchy cookies instead of a tender cake.
- Serve (2 minutes): When you’re ready to serve, remove the cake from the fridge. If you used a springform pan, run a knife around the edge and release the sides. If you used an 8×8 dish, just scoop it out. Slice into squares or wedges and serve cold. The cake will be soft and luscious, with the perfect balance of creamy, fruity, and sweet.
Troubleshooting Tips
- Runny Cream: If your cream isn’t whipping up, it might be too warm. Pop the bowl and beaters in the freezer for 10 minutes, then try again.
- Soggy Layers: If your cake is too wet, you might have used too many strawberries or not drained them well. Pat the berries dry with paper towels before slicing.
- Crunchy Wafers: If the wafers are still crunchy after 6 hours, give the cake more time. Some brands of wafers take longer to soften. Overnight is always the safest bet.
Cooking Tips & Techniques
Over the years, I’ve learned a few tricks that make this Easy No-Bake Strawberry Shortcake Icebox Cake even better. Here are my best tips:
- Keep Everything Cold: Cold cream whips faster and holds its shape better. I even chill my mixing bowl and beaters for 15 minutes before starting. It makes a noticeable difference.
- Don’t Overmix the Cream: Once you see stiff peaks, stop. Overwhipped cream turns grainy and eventually separates into butter and buttermilk. It’s a sad mistake I’ve made more than once.
- Use Ripe Strawberries: The flavor of this cake depends entirely on the quality of the fruit. If your strawberries are pale or tart, the whole dessert will be disappointing. Taste one before you start—if it’s not sweet and juicy, wait for a better batch.
- Layer with Care: Don’t just dump the cream and berries on top of the wafers. Spread them evenly with a spatula so every bite has the perfect ratio of cookie to cream to fruit. It’s worth the extra minute.
- Plan Ahead: This is the ultimate make-ahead dessert. It actually gets better after a day in the fridge, as the flavors meld together. I often make it the night before a party, and it’s always a hit.
Common Mistakes to Avoid
- Using Warm Ingredients: Warm cream won’t whip, and warm berries release too much juice. Keep everything chilled.
- Skipping the Chill Time: I know it’s tempting to dig in right away, but the cake needs time to set. Trust me, the wait is worth it.
- Overloading on Strawberries: It’s easy to get carried away, but too many berries make the cake unstable and watery. Stick to the measurements in the recipe.
Variations & Adaptations
One of the best things about this recipe is how easy it is to customize. Here are a few variations I’ve tried and loved:
- Chocolate Strawberry Shortcake: Swap the vanilla wafers for chocolate wafers or thin chocolate cookies. The chocolate and strawberry combo is classic for a reason. I’ve used Oreo thins for this, and it’s divine.
- Lemon Berry Icebox Cake: Add 1 tablespoon of lemon juice to the whipped cream and use a mix of strawberries and blueberries. The lemon brightens everything up and makes it taste even more summery. This version is perfect for a brunch table.
- Vegan Version: Use full-fat coconut cream (chilled overnight) in place of heavy cream, and use vegan vanilla wafers. The coconut flavor is subtle and pairs beautifully with the strawberries. I’ve made this for a vegan friend, and she couldn’t believe it was dairy-free.
- Mini Individual Cakes: Instead of a large dish, use small mason jars or ramekins. Layer the wafers, cream, and berries in each jar, then chill. These are perfect for parties or picnics—no slicing required.
- Peach Shortcake Variation: In late summer, swap the strawberries for fresh, ripe peaches. Slice them thin and use them the same way. The flavor is completely different but just as delicious. If you love stone fruits, this is a must-try.
Serving & Storage Suggestions
This Easy No-Bake Strawberry Shortcake Icebox Cake is best served cold, straight from the fridge. The texture is at its peak when it’s firm but still creamy. Here’s how to make the most of it:
- Serving Temperature: Serve the cake chilled. If it sits out for more than 30 minutes, it can start to soften and lose its structure. I like to slice it right from the fridge and serve it immediately.
- Presentation: Garnish each slice with a fresh mint leaf and a extra strawberry slice for a pop of color. A light dusting of powdered sugar also looks beautiful. If you’re serving it at a party, place the whole cake on a cake stand for a wow factor.
- Complementary Dishes: This cake pairs wonderfully with a cup of coffee or a glass of cold milk. For a full summer spread, serve it alongside a light salad or some easy garlic butter baked salmon foil packets for a sweet and savory combo. It’s also great after a bowl of slow cooker potato soup on a cooler summer evening.
- Storage: Cover the cake tightly with plastic wrap or transfer leftovers to an airtight container. It will keep in the refrigerator for up to 3 days. The texture changes slightly over time—the wafers get even softer—but it’s still delicious. I actually like it better on day two.
- Freezing: You can freeze this cake for up to 1 month. Wrap it tightly in plastic wrap and then foil. Thaw it in the refrigerator overnight before serving. The texture will be a bit icier, but it’s still a tasty treat.
- Flavor Development: The flavors really meld together after 24 hours. The strawberries release their juices into the cream, and the wafers become perfectly tender. If you have the time, make this a day ahead for the best results.
Nutritional Information & Benefits
While this is definitely a treat, it’s not without its redeeming qualities. Here’s a rough estimate of the nutritional values per serving (based on 9 servings):
- Calories: Approximately 320
- Fat: 18g
- Carbohydrates: 38g
- Protein: 3g
- Fiber: 2g
- Sugar: 24g
Health Benefits of Key Ingredients
- Strawberries: These little berries are packed with vitamin C, antioxidants, and fiber. They’re great for your immune system and skin health. Plus, they add natural sweetness, which means you can use less sugar in the recipe.
- Heavy Cream: While it’s high in fat, heavy cream is also a good source of fat-soluble vitamins like A and D. When eaten in moderation, it can be part of a balanced diet. Plus, the fat helps you feel satisfied, so you’re less likely to overeat.
- Vanilla Extract: Vanilla has antioxidant properties and a calming aroma. It’s a small addition, but it adds a lot of flavor without any extra calories.
Dietary Considerations
- Gluten-Free: Use gluten-free vanilla wafers to make this recipe celiac-friendly.
- Vegetarian: This recipe is naturally vegetarian.
- Potential Allergens: This recipe contains dairy and gluten (from the wafers). If you have allergies, see the substitution notes above.
Conclusion
This Easy No-Bake Strawberry Shortcake Icebox Cake is more than just a dessert—it’s a summer memory waiting to happen. It’s the kind of recipe that brings people together, whether you’re sharing it at a backyard barbecue or enjoying a quiet slice on a warm evening. The best part? It’s so simple that anyone can make it, yet it tastes like something you’d get at a fancy bakery.
I love this recipe because it reminds me that cooking doesn’t have to be complicated to be special. Sometimes the best things come from a happy accident, a hot day, and a willingness to try something new. So go ahead—make this cake your own. Add extra berries, swap in chocolate wafers, or serve it in little jars. Whatever you do, I promise you’ll love it.
If you try this recipe, I’d love to hear about it. Leave a comment below and let me know how it turned out, or share your own twist on it. And if you’re looking for more no-bake desserts, check out this creamy banana pudding icebox cake for another easy, crowd-pleasing treat. Happy cooking, friends!
Frequently Asked Questions
Can I use frozen strawberries instead of fresh?
Yes, you can, but you need to thaw and drain them thoroughly first. Frozen strawberries release a lot of liquid, which can make your cake watery. Pat them dry with paper towels before slicing.
How long does this cake need to chill?
At least 6 hours, but overnight is best. The chilling time allows the wafers to soften and absorb the cream, creating that perfect cake-like texture. Don’t rush it!
Can I make this cake ahead of time?
Absolutely! This cake is actually better when made a day ahead. The flavors have time to meld, and the texture becomes even more tender. Just cover it tightly and keep it in the fridge.
What can I use instead of vanilla wafers?
You can use graham crackers, shortbread cookies, or even thin chocolate cookies. Each will give a slightly different flavor and texture. I’ve used all three, and they all work beautifully.
Can I use whipped topping instead of heavy cream?
You can, but I don’t recommend it. Homemade whipped cream has a much better flavor and texture. Whipped topping is more stable and won’t deflate, but it lacks the rich, creamy taste that makes this cake so special.
Pin This Recipe!
Easy No-Bake Strawberry Shortcake Icebox Cake: Best Summer Dessert
- Total Time: 6 hours 20 minutes (includes chilling)
- Yield: 9 servings 1x
Description
This no-bake strawberry shortcake icebox cake is the perfect summer dessert. Layers of vanilla wafers, fresh strawberries, and homemade whipped cream create a tender, cake-like texture without turning on the oven.
Ingredients
- 1 box (12 ounces) vanilla wafers (e.g., Nilla Wafers)
- 2 pounds fresh strawberries, hulled and sliced
- 2 cups cold heavy whipping cream
- 1/2 cup powdered sugar
- 1 teaspoon vanilla extract
- 1 teaspoon lemon zest (optional)
- Mint leaves for garnish (optional)
Instructions
- Whip the cream: In a large mixing bowl, combine cold heavy cream, powdered sugar, and vanilla extract. Beat with an electric mixer on low speed, then increase to high until stiff peaks form (about 3-4 minutes). If using lemon zest, fold it in gently.
- Prepare the strawberries: Wash, hull, and slice strawberries into thin, even slices (about 1/8 inch thick). Set aside a handful of the prettiest slices for garnish.
- Layer the cake: Spread a thin layer of whipped cream (about 1/4 cup) on the bottom of an 8×8-inch baking dish or 9-inch springform pan. Arrange a single layer of vanilla wafers over the cream, breaking some to fill gaps. Spread 1/3 of the remaining cream over the wafers, then arrange 1/3 of the sliced strawberries on top. Repeat layers: wafers, cream, strawberries, wafers, cream, strawberries, ending with a final layer of cream on top.
- Garnish and chill: Arrange reserved strawberry slices on top in a decorative pattern. Add mint leaves if desired. Cover tightly with plastic wrap and refrigerate for at least 6 hours, preferably overnight.
- Serve: Remove from fridge. If using a springform pan, run a knife around the edge and release sides. Slice into squares or wedges and serve cold.
Notes
For best results, chill the cake overnight. Keep all ingredients cold. Do not skip the chilling time—it allows the wafers to soften into a cake-like texture. If using frozen strawberries, thaw and drain thoroughly before slicing.
- Prep Time: 20 minutes
- Cook Time: 0 minutes
- Category: Dessert
- Cuisine: American
Nutrition
- Serving Size: 1 slice (1/9 of cake
- Calories: 320
- Sugar: 24
- Sodium: 120
- Fat: 18
- Saturated Fat: 11
- Carbohydrates: 38
- Fiber: 2
- Protein: 3
Keywords: no-bake strawberry shortcake, icebox cake, summer dessert, easy dessert, no-bake dessert, strawberry dessert