My friend Jen asked why I couldn’t just pipe the meringue into ghost shapes instead of using a cookie cutter. I started to explain why that wouldn’t work — then stopped. Honestly, I had no good reason. I was so used to doing things the “right” way, with a cutter and careful trimming, that I’d never even considered just piping them freehand. It was one of those moments where you realize you’ve been making things harder than they need to be.
That was a Tuesday night, about three years ago. Jen had come over to help me test Halloween recipes for a blog post, and I was getting frustrated with the meringue sticking to my fancy ghost-shaped cutter. She watched me struggle for a solid ten minutes before she finally spoke up. “Why not just pipe them?” she asked, reaching for the piping bag. I almost told her meringue was too delicate, that they wouldn’t hold their shape. But you know what? I handed her the bag instead.
She piped the first ghost, and it was perfect. Better than any of the ones I’d cut out. There was something wonderfully imperfect about it — a little lopsided, with a tiny peak on top that looked like a little hat. I felt this weird mix of embarrassment and pure delight. Here I was, the one who was supposed to be the “expert,” learning a lesson from someone who just thought it made sense. And she was right. It made so much sense.
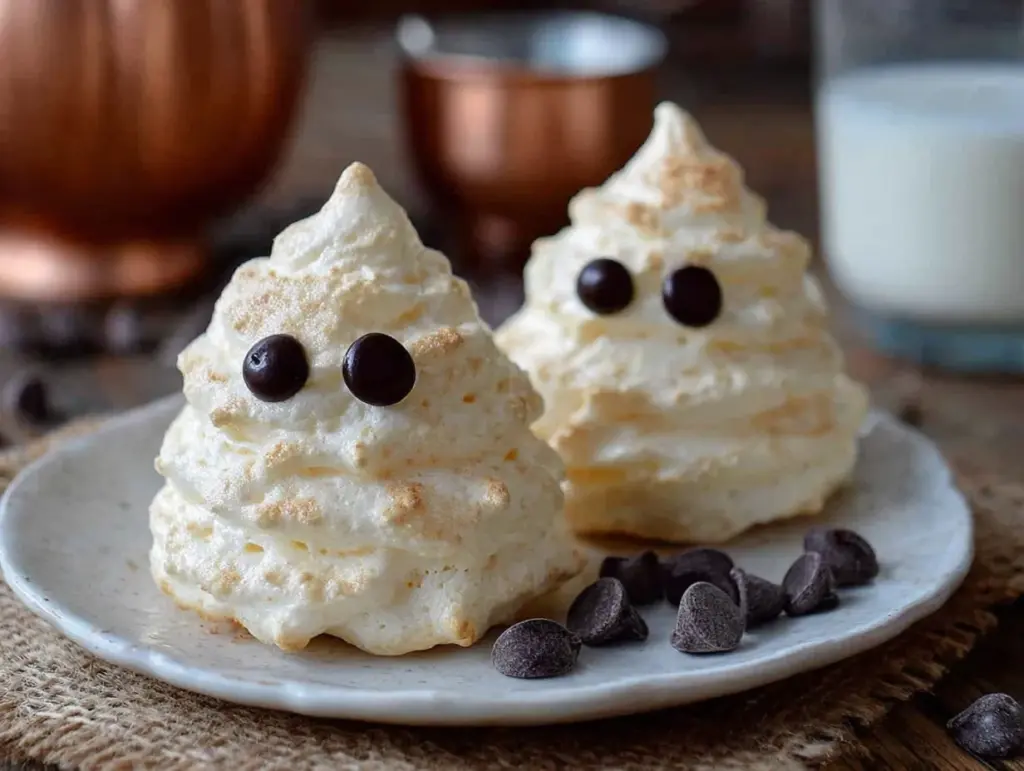
These cozy ghost meringue cookies with chocolate chip eyes have become my go-to for fall baking ever since. They’re not fussy or demanding. They’re the kind of recipe you can make on a chilly October evening when you just want something warm and sweet in the oven, even if it’s just meringue. Maybe you’ve been there — wanting to make something festive but dreading the complicated steps and specialty tools. These ghosts are the opposite of that. They’re forgiving, they’re cute, and they taste like little clouds of vanilla and sugar. Every time I make them, I think of Jen standing in my kitchen with flour on her cheek, proving that sometimes the simplest idea is the best one.
Why You’ll Love This Recipe
I’ve tested this recipe about six times to get it just right, and let me tell you — each batch taught me something new. The first batch was too flat. The second was too sweet. The third, well, I forgot the cream of tartar and ended up with a sticky mess. But by the sixth batch, I had it dialed in. These ghosts are everything I want in a Halloween treat.
- Quick & Easy : From start to finish, these come together in about 45 minutes of active time. The oven does most of the work after that.
- Simple Ingredients : You probably have everything already — egg whites, sugar, vanilla, cream of tartar, and chocolate chips. No weird extracts or specialty flours.
- Perfect for Halloween : They’re festive without being scary. Great for kids’ parties, classroom treats, or just a cozy night in.
- Crowd-Pleaser : I’ve brought these to three different gatherings, and they disappear faster than anything else on the table. Kids love the ghost shape, adults love the light, airy texture.
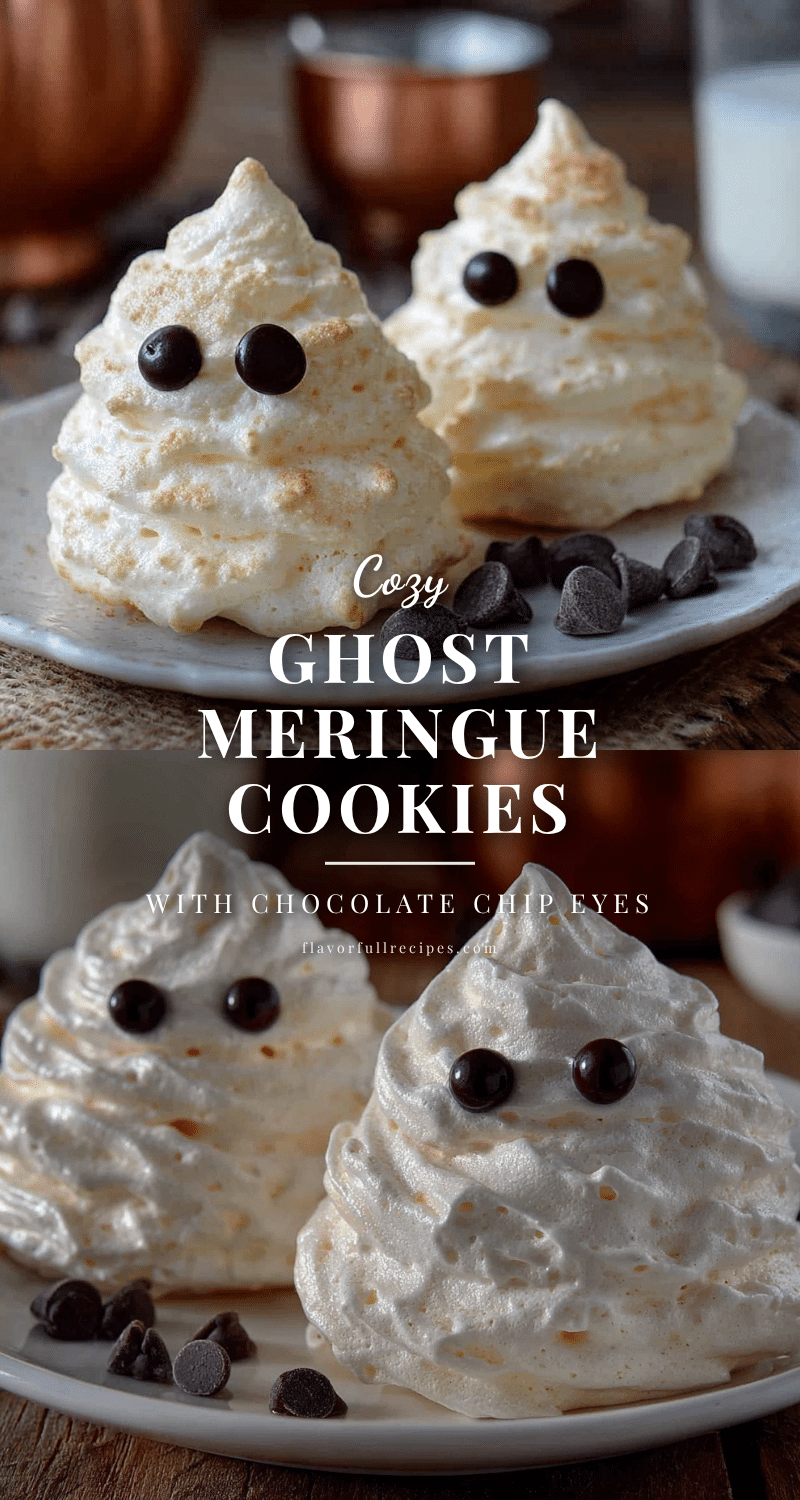
- Unbelievably Delicious : The outside is crisp and slightly crackled, while the inside stays soft and marshmallowy. The chocolate chip eyes add just the right amount of richness.
What makes this version different from all the other ghost meringue recipes out there? It’s the technique. I use a slightly lower oven temperature and a longer drying time, which gives you that perfect texture — crunchy on the outside, tender on the inside, without any browning. Plus, I add a tiny pinch of salt to balance the sweetness, which most recipes skip. It’s a small thing, but it makes a big difference.
These cookies aren’t just good — they’re the kind that make you close your eyes after the first bite. That light, airy sweetness melting on your tongue, with a little pop of chocolate at the end. It’s comfort food in its purest form. And honestly? They make me happy every single time I make them.
What Ingredients You Will Need
This recipe uses simple, pantry-friendly ingredients to create something that feels special. Each one plays a specific role in getting that perfect ghost texture and flavor.
- Egg whites — 4 large, room temperature (this is important! Cold eggs won’t whip up as high)
- Granulated sugar — 1 cup (200g) (use superfine if you have it, but regular works fine)
- Cream of tartar — 1/2 teaspoon (stabilizes the egg whites and helps them hold their shape)
- Vanilla extract — 1 teaspoon (pure vanilla, not imitation, for the best flavor)
- Salt — 1/8 teaspoon (just a pinch, to balance the sweetness)
- Mini chocolate chips — 1/4 cup (for the eyes; I like Nestle or Enjoy Life for allergen-friendly)
Ingredient tips from my kitchen:
For the egg whites, I’ve learned that separating them while they’re cold is easier, but let them sit on the counter for about 30 minutes before you start whipping. Room temperature egg whites whip up to a much higher volume — it’s not just a rumor, it really works. If you’re in a hurry, you can put the bowl with the egg whites into a larger bowl of warm water for 5 minutes.
The cream of tartar is non-negotiable here. I know it’s one of those ingredients that sits in your cabinet for years, but it’s what gives meringue its structure. Without it, your ghosts might weep or collapse. If you don’t have any, you can substitute 1 teaspoon of lemon juice or white vinegar, but cream of tartar works best.
For the chocolate chips, mini chips are key. Regular-sized chips will be too heavy and might sink into the meringue or make the ghosts look like they have giant bug eyes instead of cute ghost eyes. Trust me on this one — I tried both, and mini chips are the way to go.
Equipment Needed
You don’t need much for these ghost cookies, which is part of why I love them. Here’s what you’ll need:
- Electric mixer — Handheld or stand mixer works. I use my KitchenAid stand mixer because it frees up my hands, but a hand mixer works just fine. You’ll be whipping for about 8-10 minutes, so handheld might make your arm a little tired.
- Large mixing bowl — Make sure it’s completely clean and dry. Any grease or residue will prevent your egg whites from whipping up.
- Piping bag — A reusable silicone one or disposable pastry bags. I’ve used both, and I actually prefer disposable for meringue because they’re easier to clean up.
- Large round piping tip — A Wilton 1A or similar, about 1/2 inch opening. This gives you that nice, ghostly shape.
- Baking sheets — Two large sheets, lined with parchment paper. Do not use wax paper or foil — parchment is the only thing that works here.
- Cooling rack — For letting the ghosts cool completely before storing.
Budget-friendly tip: If you don’t have a piping bag, you can use a sturdy zip-top bag with the corner snipped off. Just be careful not to cut too big of an opening. I’ve done this in a pinch, and it works surprisingly well. Also, if you don’t have a stand mixer, a hand mixer will work — just be prepared to hold it for a while.
Preparation Method
Let me walk you through this step by step. I’ve made these about a dozen times now, so I’ve learned all the little tricks that make the difference between good ghosts and great ghosts.
- Preheat your oven to 200°F (95°C). Yes, this is very low. We’re not baking the meringue so much as drying it out. Line two large baking sheets with parchment paper. Don’t skip the parchment — meringue sticks to everything else.
- Separate your eggs carefully. Crack each egg and let the white fall into a small bowl first, then transfer to your large mixing bowl. This way, if you accidentally get yolk in one, you only lose that egg white, not the whole batch. Any trace of yolk will prevent your whites from whipping up properly. I learned this the hard way — ruined a whole batch once because one tiny speck of yolk got in.
- Add the cream of tartar and salt. Sprinkle them over the egg whites before you start whipping. This helps stabilize the foam from the beginning.
- Start whipping on medium speed. Let the mixer run for about 2-3 minutes until the egg whites become foamy and start to look like bubble bath. The bubbles should be small and uniform.
- Gradually add the sugar. With the mixer still running on medium, add the sugar one tablespoon at a time. I know this feels tedious, but trust me — adding it all at once will deflate your meringue. Take your time. This should take about 2-3 minutes.
- Add the vanilla. Once all the sugar is in, add the vanilla extract and increase the speed to medium-high.
- Whip until stiff peaks form. This usually takes about 5-7 more minutes. You’re looking for a glossy, thick mixture that holds its shape when you lift the whisk. The bowl should feel cool to the touch. To test, dip a spatula in and lift it up — the meringue should stand up in a peak that doesn’t droop. If it flops over, keep whipping.
- Test for graininess. Rub a tiny bit of meringue between your fingers. If it feels gritty, the sugar hasn’t dissolved completely. Keep whipping for another minute or two. Smooth meringue = perfect texture.
- Prepare your piping bag. Fit your piping bag with the large round tip. If you’re using a zip-top bag, snip about 1/2 inch off the corner. Fold the top of the bag over your hand to create a cuff, then scoop the meringue in. Don’t overfill — about half full is perfect.
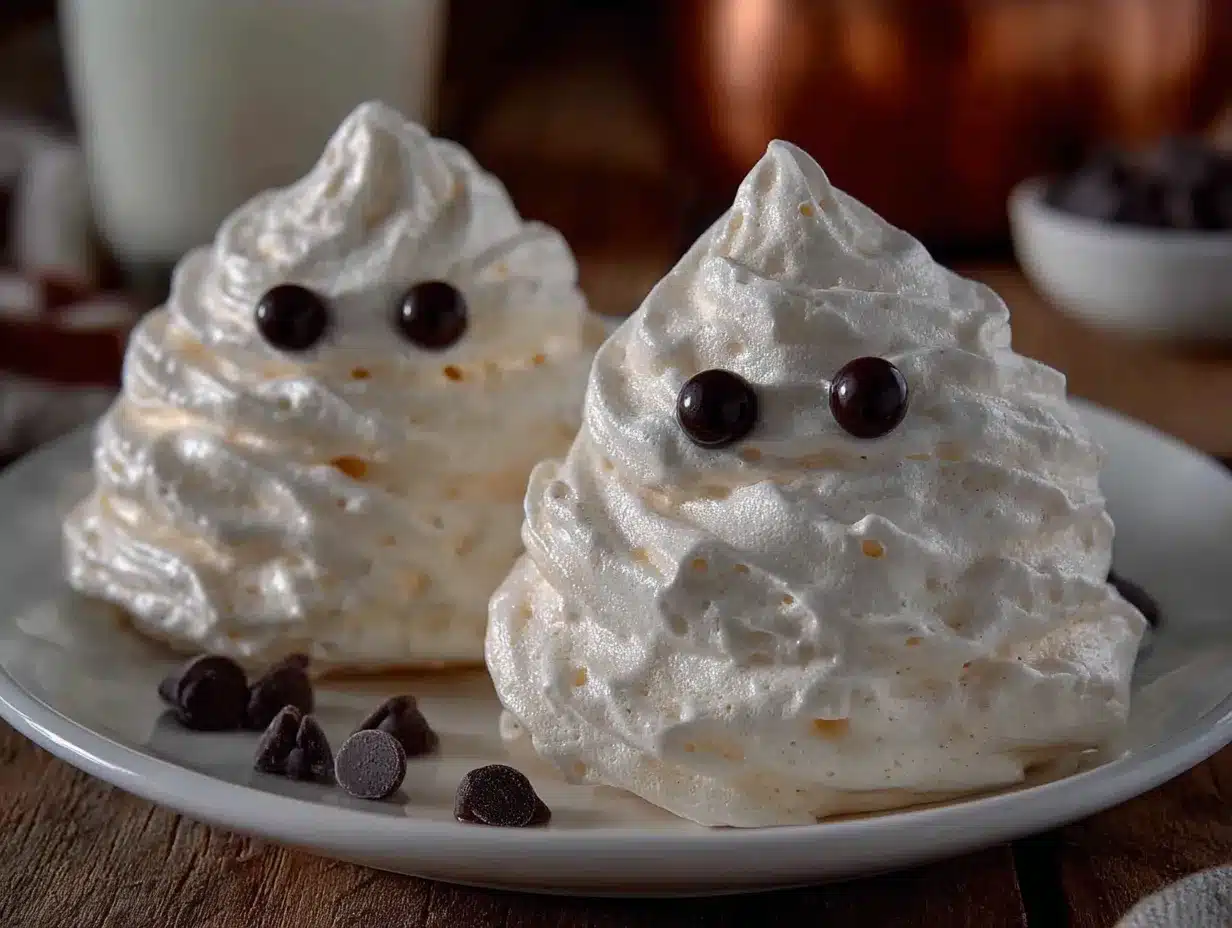
- Pipe the ghosts. Hold the bag straight up and down, about 1/2 inch above the parchment. Squeeze gently to create a round base, about 1.5 inches wide. Then, as you lift the bag, ease up on the pressure slightly to create a taller, narrower body. Finish with a little flick of your wrist to create the ghost’s tail. Space them about 1 inch apart — they don’t spread much, but they need a little breathing room.
- Add the eyes. Before the meringue sets (work quickly!), gently press two mini chocolate chips into each ghost for eyes. Don’t push them in too deep — you want them to be visible. I like to place them slightly asymmetrical for a more whimsical look.
- Bake for 90 minutes. Place the baking sheets in the preheated oven. Bake for 1 hour and 30 minutes. Do not open the oven door during this time! The temperature change can cause the meringues to crack or collapse.
- Turn off the oven and let them cool inside. After 90 minutes, turn off the oven but leave the ghosts inside with the door closed. Let them cool completely in the oven, which usually takes another 1-2 hours. This step is crucial for getting that perfect dry, crisp texture.
- Test for doneness. A perfectly baked ghost meringue should lift easily off the parchment paper. The bottom should be dry, not sticky. If they stick, they need more time in the oven.
Sensory cues to watch for: When you pipe the ghosts, the meringue should feel thick and luxurious, like marshmallow fluff. As they bake, you won’t see much change — they might get slightly shinier, but they shouldn’t brown at all. If your oven runs hot and they start to brown, reduce the temperature to 180°F (82°C) next time. The finished ghosts should be light as air and practically melt on your tongue.
Cooking Tips & Techniques
I’ve messed up this recipe more times than I’d like to admit. Here’s what I’ve learned so you don’t have to make the same mistakes.
The biggest mistake people make is not whipping the meringue long enough. I did this with my very first batch. The ghosts looked beautiful going into the oven, but they came out flat and weepy. The meringue had little beads of moisture on the surface — that’s what we call “weeping,” and it happens when the sugar isn’t fully dissolved. Whip until that mixture is glossy and thick, and don’t rush the sugar addition.
Another common issue is humidity. Meringue is basically sugar and egg white, and sugar attracts moisture like crazy. If you’re making these on a rainy or humid day, they might not dry out properly. I learned this the hard way during a particularly damp September. Now I check the weather forecast before I make meringue. If it’s humid, I wait for a drier day or run a dehumidifier in the kitchen.
Timing strategy: I like to make these in the evening. I pipe them, pop them in the oven, and then go watch a movie. By the time the movie is over, I turn off the oven and let them cool overnight. In the morning, I have perfectly dry, crisp ghost cookies waiting for me. It’s almost magical.
For consistent shapes, practice makes perfect. Your first few ghosts might look a little wonky, and that’s okay — they’re ghosts! They’re supposed to be a little irregular. If you want them all the same size, you can draw circles on the parchment paper as a guide before piping. Just flip the paper over so the pencil marks don’t touch the meringue.
One thing I wish I’d known earlier: You can re-whip meringue if it starts to separate. If you pipe a few ghosts and notice the meringue in your bag is getting watery, just squeeze it back into the bowl and whip it for another minute. It will come back together. I’ve done this mid-batch and it works perfectly.
Variations & Adaptations
One of the best things about this recipe is how easy it is to adapt. Here are some variations I’ve tried and loved.
Vegan version: You can use aquafaba (the liquid from a can of chickpeas) instead of egg whites. Use 1/2 cup of aquafaba for every 4 egg whites. Whip it exactly the same way, with the same amount of cream of tartar and sugar. The texture is slightly different — a little softer — but it works surprisingly well. I tested this for a friend who’s vegan, and she said they were the best meringues she’d had in years.
Flavor variations: Swap the vanilla for peppermint extract for a wintery twist, or add a teaspoon of cocoa powder for chocolate ghosts. I once made a batch with orange extract and a drop of orange food coloring for Halloween, and they were a hit. Just be careful with extracts — they’re more concentrated than vanilla, so start with 1/2 teaspoon and taste the meringue before adding more.
Colorful ghosts: Add a few drops of food coloring to the meringue before piping. Gel food coloring works best because it doesn’t add extra liquid. I’ve made purple ghosts for a friend’s birthday party and green ones for St. Patrick’s Day. Just swirl the color in gently — you don’t want to overmix and deflate the meringue.
Different decorations: Instead of chocolate chip eyes, try using mini M&Ms, sprinkles, or even tiny dots of frosting. For a more sophisticated look, I’ve dusted the finished ghosts with a light sprinkle of powdered sugar to look like they’re floating in snow. You can also pipe little smiles on them with melted chocolate for an extra-cute touch.
Seasonal adaptations: In the fall, I add a pinch of pumpkin pie spice to the meringue. In winter, I use crushed candy canes on top. For spring, I tint them pastel pink and use white chocolate chips for eyes. The basic recipe is so versatile that you can adapt it for almost any occasion.
Serving & Storage Suggestions
These ghost meringue cookies are best served at room temperature, straight from the oven or storage container. They have the most amazing texture — crisp on the outside, soft and airy on the inside, with that little burst of chocolate from the eyes.
How to serve: Arrange them on a pretty plate or in a jar for a Halloween party. They make great party favors — just put a few in a small cellophane bag with a ribbon. I’ve also used them as cupcake toppers for Halloween cupcakes, which looks adorable. For a cozy night in, serve them with a cup of hot cocoa or a warm mug of tea. The sweetness of the meringue pairs perfectly with something warm and slightly bitter.
Storage instructions: Store your ghost meringues in an airtight container at room temperature. Do not refrigerate them! The moisture in the fridge will make them sticky and soft. They’ll keep for up to 2 weeks if stored properly, but honestly, they never last that long in my house. Layer them with parchment paper between each layer to prevent them from sticking together.
Freezer instructions: You can freeze baked meringues for up to 3 months. Place them in a single layer in a freezer-safe container with parchment paper between layers. To thaw, let them sit at room temperature for about 30 minutes. Don’t open the container while they’re thawing, or condensation might form and make them sticky.
Reheating tip: If your meringues have softened from humidity or storage, you can crisp them up by placing them in a 200°F (95°C) oven for 10-15 minutes. Let them cool completely before serving. This trick has saved many a batch for me.
Flavor development: These ghosts actually taste best after they’ve been stored for a day or two. The flavors meld together, and the texture becomes perfectly balanced. If you can resist eating them right away, they’ll reward you.
Nutritional Information & Benefits
While these ghost meringue cookies are definitely a treat, they have a few surprising benefits. Here’s the breakdown per cookie (based on about 24 ghosts per batch):
| Nutrient | Amount per cookie |
|---|---|
| Calories | 45 |
| Total Fat | 0.5g |
| Saturated Fat | 0.3g |
| Cholesterol | 0mg |
| Sodium | 15mg |
| Total Carbohydrates | 10g |
| Sugars | 9g |
| Protein | 1g |
Health highlights: These cookies are naturally fat-free (except for the tiny bit from the chocolate chips) and cholesterol-free. They’re also gluten-free, which makes them a great option for people with celiac disease or gluten sensitivity. The egg whites provide a small amount of protein, and the sugar gives you a quick energy boost — perfect for a little afternoon pick-me-up.
Dietary considerations: This recipe is naturally gluten-free and can be made vegan by using aquafaba. It contains eggs and dairy (from the chocolate chips), but you can use dairy-free chocolate chips to make it completely dairy-free. If you’re watching your sugar intake, you can reduce the sugar by up to 25% without affecting the texture too much, though the cookies won’t be as crisp.
Personal note: I love that these cookies let me enjoy something sweet and festive without feeling overly indulgent. One or two of them satisfies my sweet tooth without making me feel heavy or sluggish. They’re the perfect little treat for when you want something special but not too much.
Conclusion
These cozy ghost meringue cookies with chocolate chip eyes have become a fall tradition in my kitchen, and I hope they become one in yours too. They’re proof that sometimes the best recipes come from letting go of what you think you know and listening to the person standing next to you — even if that person is just asking a simple question.
I love how forgiving these cookies are. They don’t care if your piping skills are perfect or if your ghosts look a little lopsided. They just want to be made with love and shared with people you care about. Every time I make them, I think about that Tuesday night with Jen, and I smile.
So go ahead — give them a try. Experiment with the variations. Make them your own. And when you do, I’d love to hear about it. Drop a comment below and tell me how your ghosts turned out, or share a photo on social media and tag me. Did you try a different flavor? Did your kids help pipe them? I want to know all about it.
Remember, the best recipes are the ones that make you happy. And if these little ghosts don’t make you smile, I don’t know what will. Happy baking, friends!
Frequently Asked Questions
Can I make these ghost meringue cookies ahead of time?
Absolutely! In fact, they’re perfect for making ahead. Store them in an airtight container at room temperature for up to 2 weeks. They actually taste better after a day or two as the flavors meld together.
Why did my meringue collapse?
This usually happens for one of three reasons: your egg whites weren’t whipped enough (they should be stiff and glossy), you added the sugar too quickly, or there was a trace of yolk or grease in the bowl. Make sure your bowl is spotless and your egg whites are at room temperature.
Can I use liquid egg whites from a carton?
I don’t recommend it. Liquid egg whites are pasteurized, which changes the protein structure and makes them harder to whip into stiff peaks. Fresh egg whites from whole eggs work much better for meringue.
How do I know when the meringues are done baking?
They should lift easily off the parchment paper without sticking. The bottom should be dry, not tacky. If they stick, they need more time in the oven. Remember, they continue to dry out as they cool in the oven, so don’t rush the process.
Can I double this recipe?
Yes! This recipe doubles beautifully. Just make sure you have enough oven space — you might need to bake in batches or use multiple racks. If using multiple racks, rotate the pans halfway through baking for even drying.
Pin This Recipe!
Cozy Ghost Meringue Cookies with Chocolate Chip Eyes
- Total Time: 2 hours 15 minutes (plus cooling time)
- Yield: 24 cookies 1x
Description
These light and airy ghost-shaped meringue cookies are perfect for Halloween. They’re crisp on the outside, soft and marshmallowy on the inside, with cute chocolate chip eyes.
Ingredients
- 4 large egg whites, room temperature
- 1 cup (200g) granulated sugar
- 1/2 teaspoon cream of tartar
- 1 teaspoon vanilla extract
- 1/8 teaspoon salt
- 1/4 cup mini chocolate chips
Instructions
- Preheat oven to 200°F (95°C). Line two large baking sheets with parchment paper.
- Separate eggs carefully, placing whites in a large clean bowl. Add cream of tartar and salt.
- Whip on medium speed for 2-3 minutes until foamy.
- Gradually add sugar, one tablespoon at a time, while mixing on medium speed (about 2-3 minutes).
- Add vanilla extract and increase speed to medium-high. Whip until stiff, glossy peaks form (5-7 minutes). The mixture should hold its shape and feel smooth when rubbed between fingers.
- Fit a piping bag with a large round tip (Wilton 1A or similar). Fill bag with meringue.
- Pipe ghosts onto prepared baking sheets: squeeze a round base about 1.5 inches wide, then lift while easing pressure to create a taller body, finishing with a flick for the tail. Space 1 inch apart.
- Gently press two mini chocolate chips into each ghost for eyes before meringue sets.
- Bake for 90 minutes without opening the oven door.
- Turn off oven and let ghosts cool completely inside with door closed (1-2 hours).
- Test for doneness: ghosts should lift easily off parchment with dry bottoms.
Notes
For best results, ensure egg whites are at room temperature and bowl is completely clean and dry. Avoid making meringue on humid days. If meringue starts to separate, re-whip for a minute. Store in an airtight container at room temperature for up to 2 weeks. Do not refrigerate.
- Prep Time: 45 minutes
- Cook Time: 90 minutes
- Category: Dessert
- Cuisine: American
Nutrition
- Serving Size: 1 cookie
- Calories: 45
- Sugar: 9
- Sodium: 15
- Fat: 0.5
- Saturated Fat: 0.3
- Carbohydrates: 10
- Protein: 1
Keywords: ghost meringue cookies, Halloween cookies, meringue ghosts, chocolate chip eyes, easy Halloween treat