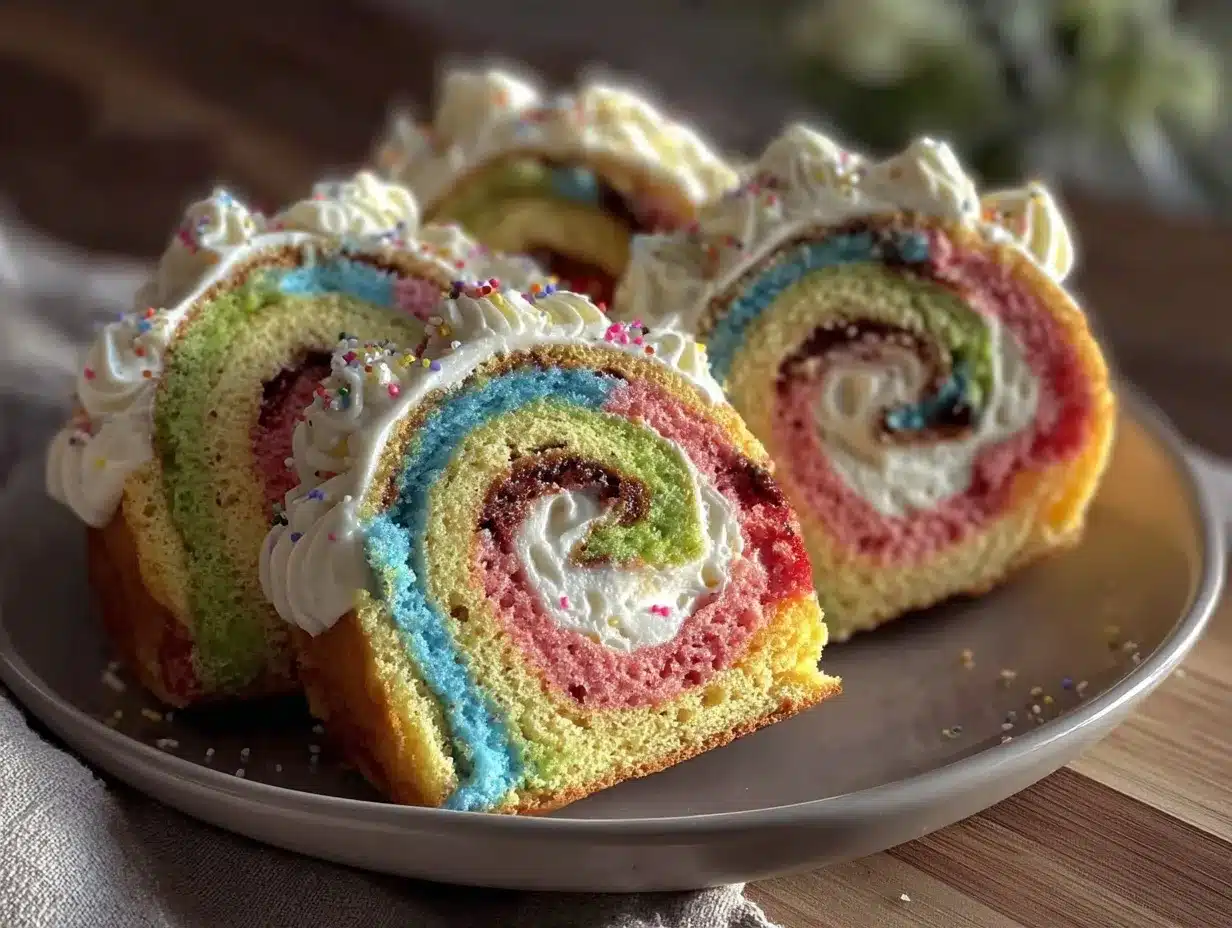
Let me tell you, the sight of this Perfect Dr. Seuss Multi-Color Jelly Roll Cake fresh out of the oven is like catching a glimpse of a rainbow bursting with flavor. The bright, playful swirls of red, blue, yellow, and green cake layers make it impossible not to smile, while the sweet vanilla aroma wafting through the kitchen instantly sparks childhood memories. The first time I baked this whimsical jelly roll cake, I was instantly hooked—the kind of moment where you pause, take a deep breath, and just smile because you know you’re onto something truly special.
Years ago, when I was knee-high to a grasshopper, my grandma used to make simple jelly rolls, but this version takes that nostalgic treat to a whole new level. I stumbled upon the idea while trying to recreate a cake perfect for a Dr. Seuss-themed birthday party, and honestly, I wish I’d discovered this recipe much sooner. My family couldn’t stop sneaking slices off the cooling rack (and I can’t really blame them). This cake is dangerously easy, bursts with color, and delivers pure, nostalgic comfort—perfect for brightening up any celebration or sweetening up your Pinterest cookie board.
After testing this recipe multiple times (in the name of research, of course), it’s become a staple for family gatherings and gifting. Whether you’re planning a whimsical birthday bash or just want a slice of happiness, this multi-color jelly roll cake feels like a warm hug you’ll want to bookmark and make again and again.
Why You’ll Love This Recipe
Honestly, this Perfect Dr. Seuss Multi-Color Jelly Roll Cake is one of those recipes that checks all the boxes. Here’s why it’s a total winner:
- Quick & Easy: Comes together in under 45 minutes, perfect for busy weeknights or last-minute celebrations.
- Simple Ingredients: No fancy grocery trips needed; you likely already have everything in your pantry.
- Perfect for Parties: Great for birthdays, themed celebrations, or anytime you want to wow your guests with minimal fuss.
- Crowd-Pleaser: Kids and adults alike rave about the fun colors and light, fluffy texture.
- Unbelievably Delicious: The tender sponge combined with the sweet, creamy filling is pure joy in every bite.
This isn’t just another jelly roll cake. The trick here is in the perfectly balanced vanilla sponge that’s divided and colored with food-safe gels to get that bold Dr. Seuss vibe. Plus, the light whipped cream filling adds just the right amount of sweetness without overpowering the cake layers. It’s comfort food with a playful twist—healthier than heavy buttercream cakes but with all the smiles and none of the guilt.
You know what makes this recipe truly special? It’s the kind of cake that makes you close your eyes after the first bite and grin. Whether you’re impressing guests without stress or turning a simple dessert into something memorable, this multi-color jelly roll cake is your go-to.
What Ingredients You Will Need
This recipe uses simple, wholesome ingredients to deliver bold flavor and satisfying texture without the fuss. Most of these are pantry staples, and the vibrant colors come from easy-to-use food coloring gels—making this a fun project with big payoff.
- For the Cake Batter:
- 4 large eggs, room temperature (for light, airy sponge)
- ¾ cup (150 g) granulated sugar
- 1 teaspoon pure vanilla extract (use a trusted brand like Nielsen-Massey for best aroma)
- ¾ cup (95 g) all-purpose flour, sifted
- ¼ teaspoon salt
- Gel food coloring in red, blue, yellow, and green (AmeriColor or Wilton brands work great)
- For the Filling:
- 1 cup (240 ml) heavy whipping cream, chilled (adds richness and fluffy texture)
- 2 tablespoons powdered sugar (for gentle sweetness)
- 1 teaspoon vanilla extract
- Optional Decorations:
- Powdered sugar for dusting
- Fresh berries or sprinkles for extra fun
Feel free to swap all-purpose flour with gluten-free flour blend if you want a gluten-free version. For a dairy-free option, use coconut cream or a non-dairy whipped topping for the filling. When selecting eggs, fresher is better—that’s one secret to the perfect sponge. If you want to add a fruity twist, a teaspoon of lemon zest in the batter adds a subtle brightness, but keep it classic for that Dr. Seuss magic.
Equipment Needed
- Jelly roll pan or rimmed baking sheet (approximately 10×15 inches or 25×38 cm) – If you don’t have a jelly roll pan, a rimmed cookie sheet works just fine.
- Mixing bowls – One large and a few small ones for dividing batter.
- Electric mixer or stand mixer – Hand mixers can do the job too, but a stand mixer makes whipping the cream a breeze.
- Rubber spatula – For folding flour gently into the batter.
- Wire cooling rack – To cool the cake evenly and prevent sogginess.
- Parchment paper – Essential for lining the pan for easy cake release.
- Measuring cups and spoons – Accuracy is key for this delicate sponge.
Personally, I’ve used both budget-friendly silicone spatulas and high-end ones, and honestly, any flexible spatula will do. If you bake jelly rolls often, investing in a quality jelly roll pan with higher sides can make your life easier. Maintenance-wise, always hand wash your pans and avoid abrasive scrubbers to keep that non-stick surface happy.
Preparation Method
- Preheat your oven to 375°F (190°C). Line your jelly roll pan with parchment paper and lightly grease it. This prevents the cake from sticking and keeps the roll smooth.
- Beat the eggs and sugar: In a large bowl, use your mixer to beat 4 large eggs and ¾ cup (150 g) sugar on high speed for about 5 minutes, until the mixture is pale, thick, and ribbons form when you lift the beaters. This step traps air, giving the sponge its signature lightness.
- Add vanilla extract: Gently mix in 1 teaspoon of vanilla extract, folding carefully to keep the air bubbles intact.
- Sift and fold dry ingredients: In a separate bowl, sift together ¾ cup (95 g) all-purpose flour and ¼ teaspoon salt. Gradually fold this into the egg mixture using a rubber spatula, doing so gently to avoid deflating your batter.
- Divide and color the batter: Evenly divide the batter into four small bowls. Add a few drops of gel food coloring to each bowl (red, blue, yellow, and green). Mix each gently until you achieve vibrant colors. Remember, a little goes a long way!
- Layer the colors: Starting with one color, spoon thin lines or patches of batter side by side into the prepared pan. Repeat with the other colors, filling the pan with fun, overlapping swirls. Don’t worry about perfect patterns—this is where the magic happens!
- Bake: Place the pan in the oven and bake for 12-15 minutes or until the cake springs back lightly to the touch and a toothpick inserted comes out clean.
- Cool and roll: While the cake is baking, lay out a clean kitchen towel and sprinkle it with powdered sugar. When the cake is done, immediately invert it onto the towel, remove the parchment paper, and gently roll the cake up in the towel starting from the short end. Let it cool completely rolled up (this prevents cracking later).
- Prepare the filling: Whip 1 cup (240 ml) heavy cream with 2 tablespoons powdered sugar and 1 teaspoon vanilla extract until soft peaks form. Be careful not to overwhip or it will become grainy.
- Unroll, fill, and reroll: Carefully unroll the cooled cake, spread the whipped cream evenly over the surface, leaving a small border around the edges. Then, gently reroll the cake without the towel.
- Chill before serving: Wrap the cake in plastic wrap and refrigerate for at least 1 hour to set the filling and make slicing easier.
Pro tip: If you notice cracks while rolling, it means the cake needs a bit more rest or was rolled too tightly. Let it cool fully and roll gently next time. The texture should be soft and springy—not dry or crumbly.
Cooking Tips & Techniques
The secret to this multi-color jelly roll cake is in the sponge’s texture and the way you handle it. Here are some tips I’ve learned (sometimes the hard way):
- Beat the eggs well: Don’t rush this step. The air you whip in is what makes the cake light and rollable.
- Fold gently: When adding flour, fold slowly with a spatula to keep air bubbles intact. Overmixing leads to a dense cake.
- Use gel food coloring: These provide vibrant colors without thinning your batter. Liquid colors can make the batter too runny.
- Don’t overbake: The cake should spring back lightly. Overbaking makes it dry and prone to cracking.
- Roll while warm: Rolling the cake immediately after baking while it’s still warm prevents cracks during the final roll.
- Whip cream to soft peaks: If you overwhip, the filling turns grainy; underwhip and it won’t hold shape.
- Multitask efficiently: Prepare your filling while the cake cools rolled in the towel to save time.
One time, I got impatient and tried rolling a cold cake, only to end up with a bunch of cracks and a sad-looking roll. Live and learn, right? Taking your time here truly pays off.
Variations & Adaptations
This recipe is a great canvas for your creativity! Here are some ways you can switch things up:
- Dietary Variations: Swap all-purpose flour for almond or coconut flour for a low-carb twist. Use coconut cream or soy-based whipped topping to make it dairy-free.
- Flavor Twists: Add a teaspoon of lemon or orange zest to the batter for a citrusy note. Try a strawberry or raspberry puree folded into the whipped cream for a fruity filling.
- Color Adjustments: Use pastels for a softer look, perfect for baby showers or spring celebrations. Or go all out with neon colors for a bold Dr. Seuss vibe.
- Cooking Methods: If you don’t have an oven, you can try a steamed version, but it will be less dry and more pudding-like—still tasty but different texture.
- Personal Variation: I once added crushed freeze-dried fruit to the whipped cream for a little crunch and surprise bursts of flavor—highly recommended if you like texture contrast.
Serving & Storage Suggestions
Serve this multi-color jelly roll cake chilled or at room temperature for the best texture and flavor. Slice it into 1-inch (2.5 cm) thick rounds to show off those beautiful swirls inside. It pairs wonderfully with a cup of tea or bright, fruity punch for celebrations.
To store, wrap the cake tightly in plastic wrap and keep it in the refrigerator for up to 3 days. For longer storage, you can freeze wrapped slices individually in airtight containers for up to 2 months. Thaw in the fridge overnight and gently re-whip the cream if it looks a bit loose.
The flavors actually deepen after a day in the fridge, so if you can resist, letting it rest overnight is a treat. Just watch out—friends and family might sneak bites before the party even starts!
Nutritional Information & Benefits
One slice (about 1/12th of the cake) contains approximately 180 calories, 8 grams of fat, 25 grams of carbohydrates, and 3 grams of protein. The egg-rich sponge provides a good source of protein, while the whipped cream adds some calcium and fat, making it a satisfying treat.
Using fresh, high-quality ingredients means you’re getting more nutrients and flavor. Plus, this cake is free from artificial preservatives and uses natural food coloring gels. For those watching gluten or dairy, simple substitutions keep this recipe inclusive and delicious.
From my perspective, this cake strikes a lovely balance between indulgence and simplicity—perfect for celebrating without overdoing it on sugar or heaviness.
Conclusion
The Perfect Dr. Seuss Multi-Color Jelly Roll Cake is a cheerful, fun dessert that’s as delightful to make as it is to eat. Its vibrant colors, tender sponge, and fluffy cream filling combine to create a treat that’s hard to forget. You can easily customize it to suit your taste or dietary needs, making it a versatile star for any celebration.
I love this recipe because it brings together nostalgia, creativity, and deliciousness in one slice. Whether it’s your first time or your tenth, it never fails to brighten the day. So, go ahead, give it a try—and don’t be shy about sharing your results or tweaks. I’d love to hear how you make this colorful cake your own!
Remember to leave a comment, share on social, or tag your photos. Happy baking, and here’s to many joyful celebrations with this multi-color jelly roll cake!
FAQs
How do I prevent the jelly roll cake from cracking when rolling?
Roll the cake immediately after baking while it’s still warm, using a powdered sugar-dusted towel to help it hold shape. Cooling it rolled helps prevent cracks during final rolling with filling.
Can I make this cake ahead of time?
Yes! You can bake and roll the cake a day ahead, keep it refrigerated, and assemble with filling the next day for the best results.
What can I use instead of heavy cream for the filling?
You can use coconut cream or dairy-free whipped toppings for a dairy-free alternative. Whip them until soft peaks form just like with traditional cream.
Is this recipe suitable for kids to help with?
Absolutely! Kids love mixing the batter and adding colors. Just handle the baking and rolling parts yourself for safety.
Can I use natural food coloring instead of gels?
Natural colors like beet juice or spinach puree can work but may affect the batter texture and flavor. Gel colors are recommended for vibrant, consistent hues.
Pin This Recipe!

Perfect Dr Seuss Multi-Color Jelly Roll Cake Easy Recipe for Celebrations
- Total Time: 45 minutes
- Yield: 12 servings 1x
Description
A vibrant, playful multi-color jelly roll cake with a light vanilla sponge and fluffy whipped cream filling, perfect for celebrations and themed parties.
Ingredients
- 4 large eggs, room temperature
- 3/4 cup (150 g) granulated sugar
- 1 teaspoon pure vanilla extract
- 3/4 cup (95 g) all-purpose flour, sifted
- 1/4 teaspoon salt
- Gel food coloring in red, blue, yellow, and green
- 1 cup (240 ml) heavy whipping cream, chilled
- 2 tablespoons powdered sugar
- 1 teaspoon vanilla extract
- Optional: powdered sugar for dusting
- Optional: fresh berries or sprinkles for decoration
Instructions
- Preheat oven to 375°F (190°C). Line a jelly roll pan (10×15 inches) with parchment paper and lightly grease it.
- Beat 4 large eggs and 3/4 cup sugar on high speed for about 5 minutes until pale, thick, and ribbons form.
- Gently mix in 1 teaspoon vanilla extract.
- Sift together 3/4 cup all-purpose flour and 1/4 teaspoon salt. Gradually fold into egg mixture gently with a rubber spatula.
- Divide batter evenly into four bowls. Add gel food coloring to each bowl (red, blue, yellow, green) and mix gently.
- Spoon thin lines or patches of each colored batter side by side into the prepared pan, creating swirls.
- Bake for 12-15 minutes until cake springs back lightly and a toothpick comes out clean.
- Immediately invert cake onto a powdered sugar-dusted kitchen towel, remove parchment, and roll cake up in the towel from the short end. Let cool completely rolled.
- Whip 1 cup heavy cream with 2 tablespoons powdered sugar and 1 teaspoon vanilla extract until soft peaks form.
- Unroll cooled cake, spread whipped cream evenly over surface leaving a small border, then gently reroll without the towel.
- Wrap cake in plastic wrap and refrigerate for at least 1 hour before slicing and serving.
Notes
Roll the cake immediately after baking while warm to prevent cracking. Use gel food coloring for vibrant colors. Whip cream to soft peaks to avoid grainy texture. For gluten-free, substitute flour with gluten-free blend; for dairy-free, use coconut cream or non-dairy whipped topping.
- Prep Time: 15 minutes
- Cook Time: 15 minutes
- Category: Dessert
- Cuisine: American
Nutrition
- Serving Size: 1 slice (1/12th of c
- Calories: 180
- Fat: 8
- Carbohydrates: 25
- Protein: 3
Keywords: jelly roll cake, multi-color cake, Dr Seuss cake, celebration cake, easy cake recipe, vanilla sponge, whipped cream filling