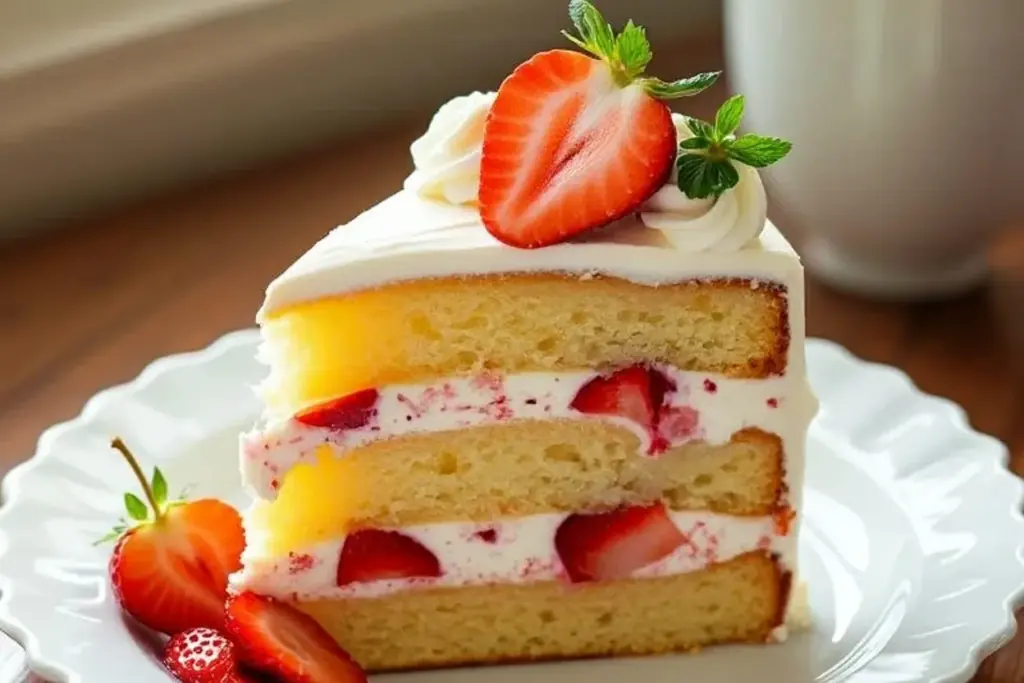
There’s just something magical about a Strawberry Shortcake Cake that screams summer! Imagine layers of fluffy vanilla cake, sweet juicy strawberries, and a whipped cream frosting so light it feels like clouds on your tongue. This recipe is perfect for celebrations, picnics, or just because you’re craving a little slice of sunshine. Let’s dive into how you can make this delightful dessert—a treat that’s as beautiful as it is tasty.
The Story Behind Strawberry Shortcake Cake
Strawberry shortcake has been a beloved dessert for centuries, but turning it into a layer cake takes it to a whole new level. Traditionally, shortcake refers to crumbly, biscuit-like cakes paired with strawberries and cream, originating from England in the 16th century. Over time, the American version evolved to feature fluffy sponge cakes, making this dessert lighter and more decadent.
I remember the first time I made this cake—it was for a summer birthday party, and let me tell you, it stole the show! The combination of fresh strawberries and homemade whipped cream frosting instantly became a family favorite. This recipe is my personal twist, inspired by those classic flavors but designed to give you a stunning layered presentation. It’s perfect for showcasing peak-season strawberries or making any day feel special.
Ingredients You’ll Need
Let’s talk about the heart and soul of this cake: the ingredients. Each one plays a crucial role in creating this masterpiece, so here’s everything you need to know.
- Fresh Strawberries: Choose ripe, vibrant strawberries for the best flavor. Look for ones with a bright red color and sweet aroma. If strawberries aren’t in season, frozen ones can work in a pinch.
- All-Purpose Flour: Stick with a good-quality flour for a tender cake texture. If you want a gluten-free option, use a 1:1 gluten-free baking mix.
- Granulated Sugar: Adds sweetness to the cake and helps bring out the natural flavor of the strawberries.
- Unsalted Butter: Always go with unsalted butter so you have full control over the saltiness. Room temperature butter ensures a smooth batter.
- Eggs: These bind the ingredients together and give the cake structure. Large eggs work perfectly.
- Whole Milk: Makes the cake moist and rich. You can substitute with almond milk or oat milk for a dairy-free version.
- Baking Powder: Helps the cake rise to fluffy perfection. Make sure it’s fresh for the best results.
- Vanilla Extract: Adds warmth and depth to the flavor. If you have vanilla bean paste, that’s an even better option!
- Heavy Cream: For the whipped cream frosting, heavy cream is the star. Look for one with at least 35% fat content for stable peaks.
- Powdered Sugar: Sweetens the frosting without making it grainy.
Optional additions include a pinch of salt to balance the sweetness and a splash of lemon juice to brighten the strawberries.
Equipment Needed
Before you dive in, make sure you have the right tools. Here’s what you’ll need:
- Two 9-inch round cake pans: These are essential for achieving even layers. Grease and line them with parchment paper for easy removal.
- Electric mixer: A stand mixer or hand mixer works beautifully for whipping the batter and frosting. You can do it by hand, but it’ll take some muscle!
- Mixing bowls: At least two—one for the cake and one for the frosting.
- Spatula: For spreading the frosting smoothly.
- Cooling rack: Allows your cakes to cool evenly and prevents soggy bottoms.
- Knife: A sharp knife for slicing strawberries and leveling the cake layers.
If you don’t have cake pans, you can try using a rectangular pan and cutting out circular layers, but the presentation might be trickier.
Preparation Method
- Preheat the oven: Set your oven to 350°F (175°C) and grease your cake pans. Line the bottom with parchment paper.
- Mix the dry ingredients: In a medium bowl, whisk together 2 1/2 cups (310g) of all-purpose flour, 2 tsp baking powder, and a pinch of salt.
- Cream the butter and sugar: In a large mixing bowl, beat 1 cup (226g) of unsalted butter and 2 cups (400g) of granulated sugar until light and fluffy, about 5 minutes.
- Add the eggs: One at a time, mix in 4 large eggs, ensuring each is fully incorporated before adding the next.
- Incorporate the milk and vanilla: Slowly add 1 cup (240ml) of whole milk and 2 tsp of vanilla extract to the batter, alternating with the dry ingredients. Mix until smooth.
- Divide and bake: Pour the batter evenly into the cake pans and bake for 30-35 minutes, or until a toothpick comes out clean.
- Cool the cakes: Allow the cakes to cool in the pans for 10 minutes before transferring to a wire rack.
- Prepare the strawberries: Slice 2 cups (300g) of fresh strawberries and toss with 1 tbsp of sugar. Let them macerate for 10 minutes.
- Make the whipped cream frosting: Beat 2 cups (480ml) of heavy cream and 1/2 cup (60g) powdered sugar until stiff peaks form. Chill until ready to use.
- Assemble the cake: Place the first cake layer on a plate, spread whipped cream frosting, and layer with strawberries. Add the second cake layer, frost the top and sides, and decorate with more strawberries.
Pro tip: Chill the assembled cake for 30 minutes before slicing to make it easier to cut.
Cooking Tips & Techniques
Here are some tips to make your strawberry shortcake cake flawless:
- Don’t overmix: Overmixing the batter can make the cake dense instead of fluffy.
- Room temperature ingredients: Make sure your butter, eggs, and milk are at room temperature for a smoother batter.
- Chill your bowl: When making whipped cream, chill your mixing bowl and beaters for the fluffiest results.
- Use fresh strawberries: Avoid underripe strawberries—they can be too tart and won’t release their juices properly.
- Level your cakes: Use a knife to level the cakes if they have domed tops. This ensures a stable, even assembly.
If you’ve ever struggled with frosting sliding off your cake, chill the layers first—it’s a game changer!
Variations & Adaptations
This recipe is wonderfully versatile. Here are some ideas to make it your own:
- Gluten-Free: Substitute the flour with a gluten-free baking mix.
- Dairy-Free: Use almond milk and coconut whipped cream for a dairy-free version.
- Chocolate Twist: Add 1/4 cup (30g) of cocoa powder to the batter for a chocolate-strawberry combo.
- Seasonal Fruit: Swap strawberries for peaches, blueberries, or raspberries depending on the season.
- Lemon Zest: Add lemon zest to the batter for a citrusy kick.
Personally, I’ve tried swapping the strawberries for blackberries, and the results were equally delicious!
Serving & Storage Suggestions
This cake is best served chilled, allowing the whipped cream frosting to stay firm. Slice into generous pieces and pair with a cup of tea or a glass of bubbly for a special treat.
Leftovers can be stored in the refrigerator for up to 3 days. Cover the cake tightly with plastic wrap or keep it in an airtight container. If you’d like to freeze it, wrap individual slices in cling film and store them for up to 2 months. To thaw, leave them in the fridge overnight.
Tip: The flavors deepen after a day in the fridge, so don’t be afraid to save this for later!
Nutritional Information & Benefits
Here’s an approximate breakdown per serving (based on 12 servings):
- Calories: 450
- Fat: 22g
- Carbohydrates: 58g
- Protein: 5g
The fresh strawberries offer a boost of vitamin C and antioxidants, making this dessert a little less guilty. However, with the whipped cream frosting, it’s definitely a treat for special occasions!
Conclusion
This Strawberry Shortcake Cake is everything you could want in a dessert: fresh, fruity, creamy, and absolutely irresistible. Whether you’re making it for a birthday party or just because, it’s sure to be a crowd-pleaser.
I love how customizable this recipe is, allowing you to play with flavors and ingredients to suit your tastes. Give it a try, and don’t forget to share your creations in the comments below—I’d love to hear about your personal twists!
Now, grab those strawberries and get baking. You’re about to create something truly special!
FAQs
Can I use frozen strawberries?
Yes! Thaw them first and drain excess liquid to avoid a soggy cake.
How long does whipped cream frosting last?
It’s best used immediately, but it can be stored in the fridge for up to 24 hours.
Can I make this cake ahead of time?
Absolutely! Bake the layers and store them in the fridge. Assemble the cake a few hours before serving.
What if I don’t have cake pans?
You can use a rectangular pan and cut the layers manually, though it might require extra effort.
How can I prevent the cake from drying out?
Don’t overbake, and store the cake tightly covered in the fridge.