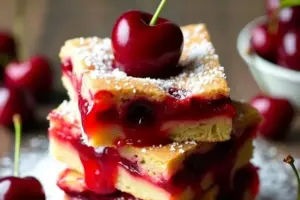
Imagine biting into a soft, buttery bar bursting with sweet cherry flavor—sounds heavenly, right? These Easy Cherry Pie Bars are the kind of dessert that feels nostalgic yet utterly irresistible. Perfect for family gatherings, casual weeknight treats, or even holiday baking, this recipe is one you’ll want to keep handy. Trust me, once you try these cherry pie bars, you’ll wonder why you didn’t make them sooner!
This recipe combines the simplicity of a cookie bar with the charm of cherry pie. It’s quick to whip up, versatile, and, honestly, a crowd-pleaser. Plus, it’s a great way to use canned cherry pie filling or even homemade if you’re feeling extra ambitious. Let’s dive right into the sweet magic!
The Story Behind Cherry Pie Bars
Cherry pie has long been an iconic dessert in American kitchens, and for a good reason—it’s comforting, sweet, and full of vibrant flavor. But sometimes, making a full pie can feel like a marathon when all you want is a quick treat. That’s where Cherry Pie Bars come in. They’re essentially a hybrid between pie and cookie bars, giving you the best of both worlds.
I first discovered cherry pie bars at a potluck years ago. A friend had brought them, and I remember being instantly captivated. The simplicity of the recipe paired with the bold cherry flavor was unforgettable. Since then, I’ve tweaked and perfected the recipe to suit my taste, and now it’s a staple in my home. They’re ideal for spring and summer when cherries are in season, but canned cherry pie filling makes them accessible year-round.
If you’re looking for a dessert that feels like a warm hug wrapped in buttery goodness, this recipe is it. Plus, they’re portable, making them great for picnics or packed lunches. It’s the kind of recipe that feels like a little slice of home, no matter where you are.
Let’s Talk Ingredients
Every ingredient in this recipe plays a specific role in creating the perfect cherry pie bars. Here’s a breakdown of what you’ll need and tips for choosing the best options:
- Butter: Unsalted butter is key here. It adds richness and helps create a tender crust and topping. Make sure your butter is at room temperature for easier mixing.
- Sugar: Granulated sugar sweetens the crust and topping. You could experiment with brown sugar for a deeper flavor, but stick with white sugar for the classic taste.
- Eggs: These provide structure and help bind everything together. If you’re out of eggs, try using a flaxseed egg substitute.
- Vanilla Extract: A touch of vanilla enhances the overall flavor. The better the quality, the better the result—pure vanilla extract is worth it!
- All-Purpose Flour: Regular flour is perfect for this recipe. If you’re gluten-free, you can use a 1:1 gluten-free flour blend.
- Cherry Pie Filling: The star of the show! Canned cherry pie filling is convenient, but if you have fresh cherries, consider making your own filling for an extra special touch.
- Salt: Just a pinch to balance the sweetness and bring out the flavors.
For seasonal variations, you can swap cherries for blueberries or apple pie filling. And if you’re feeling adventurous, sprinkle some almond extract into the crust for a subtle nutty flavor.
Equipment Needed
You don’t need fancy tools to make these cherry pie bars, which is part of the charm. Here’s what you’ll need:
- Mixing Bowls: One for wet ingredients and one for dry—simple and straightforward.
- Electric Mixer: A handheld or stand mixer works great for creaming the butter and sugar. You can mix by hand if you’re up for a workout!
- 9×13-inch Baking Pan: This size is ideal for this recipe. If you don’t have one, a slightly smaller pan will work, but the bars will be thicker.
- Spatula: For spreading the batter evenly into the pan.
- Cooling Rack: Optional but helpful for cooling the bars quickly and evenly.
Don’t forget to line your pan with parchment paper for easy removal and cleanup. Trust me, it’s a game-changer!
How to Make Cherry Pie Bars
- Preheat the oven: Set your oven to 350°F (175°C). Line a 9×13-inch baking pan with parchment paper or grease it lightly.
- Prepare the crust and topping: In a large mixing bowl, cream 1 cup (227g) of unsalted butter and 1 1/2 cups (300g) of granulated sugar until light and fluffy, about 2-3 minutes. Add 3 large eggs and 1 teaspoon of vanilla extract, mixing until combined.
- Combine the dry ingredients: Gradually add 3 cups (375g) of all-purpose flour and 1/2 teaspoon of salt into the wet mixture. Mix until a soft dough forms.
- Assemble the bars: Spread about 2/3 of the dough into the prepared baking pan, creating an even layer. Pour 1 can (21 ounces, or about 600g) of cherry pie filling over the dough, spreading it evenly.
- Top with remaining dough: Drop spoonfuls of the remaining dough over the cherry filling. Don’t worry if there are gaps—the dough will spread as it bakes.
- Bake: Place the pan in the oven and bake for 35-40 minutes, or until the top is golden brown and the filling is bubbling. Let the bars cool completely before cutting.
If the dough feels sticky, refrigerate it for 15 minutes before assembling. And remember, the bars need to cool completely for cleaner slices—patience is key!
Tips for Perfect Cherry Pie Bars
Here are my tried-and-true tips for making this recipe a success:
- Room temperature ingredients: Make sure your butter and eggs are at room temperature for easy mixing.
- Don’t overmix: When combining the wet and dry ingredients, mix just until combined to avoid tough bars.
- Parchment paper: Line your pan with parchment paper for hassle-free removal.
- Cool completely: Let the bars cool fully before cutting to avoid messy slices.
If you accidentally overbake them, don’t worry—they’ll still taste amazing, just a bit crispier!
Variations and Adaptations
Want to switch things up? Here are some fun variations:
- Blueberry Bliss: Swap the cherry pie filling for blueberry pie filling for a different fruity flavor.
- Gluten-Free Option: Use a gluten-free flour blend instead of all-purpose flour to make this recipe gluten-free.
- Nutty Twist: Add 1/2 teaspoon of almond extract to the dough for a subtle nutty flavor.
- Dairy-Free Option: Substitute vegan butter for regular butter if you’re avoiding dairy.
I’ve tried adding a drizzle of white chocolate on top once they’ve cooled—it’s decadent and delicious!
Serving and Storage Suggestions
Cherry pie bars are best served at room temperature, though they’re also delightful slightly warmed. Pair them with a scoop of vanilla ice cream or a dollop of whipped cream for an extra treat. For beverages, coffee or iced tea makes a perfect pairing.
To store, keep the bars in an airtight container at room temperature for up to 3 days. For longer storage, refrigerate them for up to a week or freeze for up to 3 months. To reheat, simply microwave individual bars for 10-15 seconds or let them thaw at room temperature.
Nutritional Information & Benefits
Here’s a rough estimate of the nutritional values per serving (based on 12 servings):
- Calories: 260
- Fat: 12g
- Carbohydrates: 36g
- Protein: 3g
Cherries are loaded with antioxidants, which can support heart health and reduce inflammation. While these bars are a treat, they do sneak in a bit of cherry goodness!
Conclusion
There’s something magical about the simplicity of these Easy Cherry Pie Bars. They’re sweet, buttery, and just the right amount of indulgent. Whether you’re making them for a special occasion or a casual dessert, they’re sure to impress.
Give this recipe a try and make it your own. I’d love to hear how you customized it—share your tweaks in the comments below! And if you loved this recipe, don’t forget to pin it for later or share it with your friends.
Happy baking, and remember, sometimes the simplest desserts bring the most joy!
FAQs
Can I use fresh cherries instead of canned cherry pie filling?
Absolutely! Just cook fresh cherries with sugar and a bit of cornstarch to make your own filling.
Do I have to line the baking pan with parchment paper?
No, but it makes removing the bars much easier and reduces cleanup time.
Can I freeze cherry pie bars?
Yes! Wrap individual bars in plastic wrap and store them in an airtight container for up to 3 months.
What’s the best way to cut clean slices?
Let the bars cool completely before cutting, and use a sharp knife wiped clean between slices.
Can I make this recipe dairy-free?
Yes, replace the butter with a plant-based alternative for a dairy-free version.
Print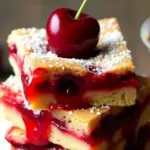
Easy Cherry Pie Bars
- Total Time: 55 minutes
- Yield: 12 servings 1x
Description
Soft, buttery bars bursting with sweet cherry flavor, perfect for family gatherings, casual treats, or holiday baking.
Ingredients
- 1 cup (227g) unsalted butter, at room temperature
- 1 1/2 cups (300g) granulated sugar
- 3 large eggs
- 1 teaspoon vanilla extract
- 3 cups (375g) all-purpose flour
- 1/2 teaspoon salt
- 1 can (21 ounces, or about 600g) cherry pie filling
Instructions
- Preheat the oven to 350°F (175°C). Line a 9×13-inch baking pan with parchment paper or grease it lightly.
- In a large mixing bowl, cream 1 cup of unsalted butter and 1 1/2 cups of granulated sugar until light and fluffy, about 2-3 minutes. Add 3 large eggs and 1 teaspoon of vanilla extract, mixing until combined.
- Gradually add 3 cups of all-purpose flour and 1/2 teaspoon of salt into the wet mixture. Mix until a soft dough forms.
- Spread about 2/3 of the dough into the prepared baking pan, creating an even layer. Pour 1 can of cherry pie filling over the dough, spreading it evenly.
- Drop spoonfuls of the remaining dough over the cherry filling. Don’t worry if there are gaps—the dough will spread as it bakes.
- Bake for 35-40 minutes, or until the top is golden brown and the filling is bubbling. Let the bars cool completely before cutting.
Notes
For cleaner slices, let the bars cool completely before cutting. Refrigerate the dough for 15 minutes if it feels sticky.
- Prep Time: 15 minutes
- Cook Time: 40 minutes
- Category: Dessert
- Cuisine: American
Nutrition
- Serving Size: 1 bar
- Calories: 260
- Fat: 12
- Carbohydrates: 36
- Protein: 3
Keywords: Cherry Pie Bars, Easy Dessert, Cherry Recipe, Cookie Bars, Homemade Cherry Pie