When the crisp autumn air rolls in and the leaves start to crunch underfoot, there’s nothing quite as comforting as a warm, homemade apple cobbler. This recipe for the Best Apple Cobbler is simple to make, packed with cozy fall flavors, and has just the right balance of gooey apple filling and buttery, golden topping. If you’re looking for the perfect dessert to celebrate fall, grab your apron because this one’s a keeper!
But first, let me tell you why this apple cobbler recipe holds a special place in my heart. Growing up, my family would go apple-picking every October, and we’d come home with baskets overflowing with fresh, crisp apples. This cobbler recipe was always the centerpiece of those days—it’s easy to make, uses pantry staples, and fills the house with the most delightful aroma. Trust me, you’re going to love it!
Recipe Story & Background
Apple cobbler has deep roots in American cuisine, often tracing back to early settlers who improvised with simple ingredients to create desserts that reminded them of home. Unlike pies, cobblers are known for their rustic simplicity—no need for rolling out dough or fussing with lattices. Instead, a biscuit-like topping creates a hearty, satisfying finish.
My version of apple cobbler leans into the flavors of fall with a touch of cinnamon, nutmeg, and brown sugar. It’s the dessert I turn to when I want something warm and nostalgic, especially after a long day of pumpkin carving or enjoying a hayride. You know those desserts that feel like a hug in a bowl? This is one of them.
Over the years, I’ve tweaked the recipe to strike the perfect balance of sweetness and tartness. Depending on the season, you can use freshly picked apples from a local orchard or ones from your grocery store—they all work beautifully in this recipe. And the best part? It’s forgiving. Whether you’re a seasoned baker or a newbie in the kitchen, this cobbler will have you coming back for seconds (and thirds!).
Ingredient Discussion
Let’s talk about the stars of this dish—the ingredients that make this cobbler shine. Here’s everything you’ll need and how to make the most of each:
- Apples: The foundation of this recipe! I recommend a mix of tart and sweet apples like Granny Smith and Honeycrisp. Granny Smiths offer that classic tangy bite, while Honeycrisp adds natural sweetness. If you don’t have these, Golden Delicious or Fuji work well, too. Peel and slice them thinly for even cooking.
- Brown Sugar: Adds depth and a caramel-like sweetness to the filling. You can substitute white sugar if needed, but the richness of brown sugar is hard to beat.
- Cinnamon & Nutmeg: These warm spices are what give the cobbler its fall flavor. Freshly ground nutmeg is worth the effort, but pre-ground works just fine.
- Lemon Juice: A splash of acidity balances the sweetness and keeps the apple slices from browning while you prep.
- Butter: Both in the filling and topping, butter adds richness and helps create that golden crust we all love.
- Flour: For the topping, I use all-purpose flour. If you’re gluten-free, a 1-to-1 gluten-free flour substitute works perfectly.
- Baking Powder: This ensures the topping gets nice and fluffy. Don’t skip it!
- Milk: Adds moisture to the topping. For a dairy-free option, almond or oat milk will work.
If you’re feeling adventurous, you can toss in a handful of raisins or cranberries for added texture and flavor. And for a nutty twist, sprinkle some chopped pecans or walnuts on top of the cobbler before baking!
Equipment Needed
One of the best things about this recipe is that it doesn’t require fancy equipment. Here’s what you’ll need:
- Mixing Bowls: One for the apple filling and one for the topping.
- Peeler: To peel your apples quickly. A paring knife works in a pinch!
- 8×8 Baking Dish: Perfect for a smaller cobbler, but you can double the recipe for a 9×13 dish.
- Whisk: For mixing the dry ingredients.
- Rubber Spatula: Handy for spreading the topping evenly.
Pro tip: If you’re short on baking dishes, an oven-safe skillet works wonders. Plus, it makes for a rustic presentation!
Preparation Method
- Preheat the oven: Set your oven to 375°F (190°C) and grease your baking dish lightly with butter.
- Prepare the apple filling: Peel and slice 6 medium-sized apples (about 4 cups sliced). Toss the apples with 1/3 cup (65g) brown sugar, 1 tsp cinnamon, 1/4 tsp nutmeg, and 1 tbsp lemon juice. Spread the mixture evenly in the baking dish.
- Make the topping: In a mixing bowl, whisk together 1 cup (125g) all-purpose flour, 1/3 cup (65g) granulated sugar, 1 tsp baking powder, and a pinch of salt. Stir in 1/2 cup (120ml) milk and 1/4 cup (60g) melted butter until smooth.
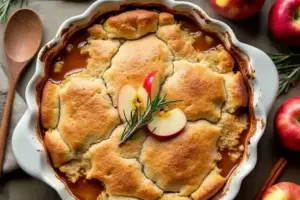
- Assemble the cobbler: Pour the topping mixture over the apples, spreading it out gently with a spatula. Don’t worry if it doesn’t cover every inch—the topping will spread as it bakes.
- Bake: Place the dish in the preheated oven and bake for 40-45 minutes, or until the topping is golden brown and the apple filling is bubbling.
- Cool slightly: Let the cobbler cool for about 10 minutes before serving. This helps the flavors meld together.
That’s it! Your kitchen will smell like heaven, and your taste buds are in for a treat.
Cooking Tips & Techniques
Here are a few tips to make sure your apple cobbler turns out perfectly:
- Don’t overmix the topping—it should be just combined for a tender texture.
- If the top browns too quickly, tent the dish with foil to prevent burning.
- Use a mix of apple varieties for a more complex flavor.
- For extra caramelization, sprinkle a bit of turbinado sugar over the topping before baking.
- If your cobbler feels too dry, you can drizzle a little melted butter over the top mid-bake.
And here’s a little secret: leftovers taste even better the next day, especially with a scoop of vanilla ice cream!
Variations & Adaptations
This recipe is wonderfully versatile. Here are a few ideas to switch things up:
- Gluten-Free: Use a 1-to-1 gluten-free flour blend for the topping.
- Dairy-Free: Substitute almond milk or coconut milk, and use vegan butter.
- Berry Cobbler: Swap out half the apples for fresh or frozen berries like blueberries or raspberries.
- Spiced Pear Cobbler: Replace apples with ripe pears for a fall-inspired twist.
- Nutty Topping: Add 1/4 cup chopped pecans or walnuts to the topping mixture for extra crunch.
One of my personal favorites? Adding a splash of bourbon to the apple filling for a grown-up version of this classic dessert.
Serving & Storage Suggestions
Apple cobbler is best served warm, straight from the oven. Pair it with:
- A scoop of vanilla ice cream (classic and irresistible).
- A dollop of whipped cream for a light, airy touch.
- A drizzle of caramel sauce for extra decadence.
For storage, let the cobbler cool completely and cover it tightly with plastic wrap or foil. It will keep in the refrigerator for up to 3 days. To reheat, simply pop it in a 350°F (175°C) oven for 10-15 minutes or microwave individual portions.
Want to freeze it? Wrap it securely and freeze for up to 3 months. Thaw overnight in the fridge and reheat before serving.
Nutritional Information & Benefits
Here’s the approximate nutritional breakdown per serving (based on 8 servings):
- Calories: 250
- Fat: 9g
- Carbohydrates: 40g
- Protein: 3g
- Fiber: 3g
Apples are rich in fiber and vitamin C, making this dessert a slightly healthier way to satisfy your sweet tooth. Plus, cinnamon has anti-inflammatory properties, so you can feel good about indulging!
Conclusion
There you have it—the Best Apple Cobbler Recipe, easy, homemade, and perfect for fall. Whether you’re making it for a family gathering, a cozy night in, or just because you’re craving something sweet, this recipe will deliver every time. I love how it fills my home with the smell of autumn and brings people together around the table.
If you try this recipe, let me know how it turns out! Leave a comment below, snap a photo, and share your own variations. I’d love to hear how you make it your own. Happy baking, and may your fall be filled with delicious moments!
FAQs
What are the best apples for cobbler?
Granny Smith and Honeycrisp are ideal because they balance tartness and sweetness. Golden Delicious and Fuji are great alternatives.
Can I make this recipe gluten-free?
Absolutely! Use a 1-to-1 gluten-free flour blend for the topping, and you’re good to go.
How do I prevent the topping from getting soggy?
Make sure your apples are evenly sliced, and don’t overmix the topping. Also, bake until the filling bubbles and the top is golden.
Can I prepare this cobbler ahead of time?
Yes! Assemble the dish, cover it, and refrigerate for up to 24 hours before baking. Just add a few extra minutes to the bake time.
What’s the best way to reheat leftovers?
Reheat in a 350°F (175°C) oven for 10-15 minutes or microwave individual portions for about 30 seconds.