The butter was sizzling in the pan before I even knew what I was making. It was one of those afternoons where the craving hit hard and fast, and I had exactly forty-seven minutes before I needed to leave for a last-minute dinner at my friend’s place. The fridge was embarrassing—half a stick of butter, some eggs that were definitely not at room temperature, and a bag of chocolate chips that had seen better days. But that butter. That butter was about to become something magical.
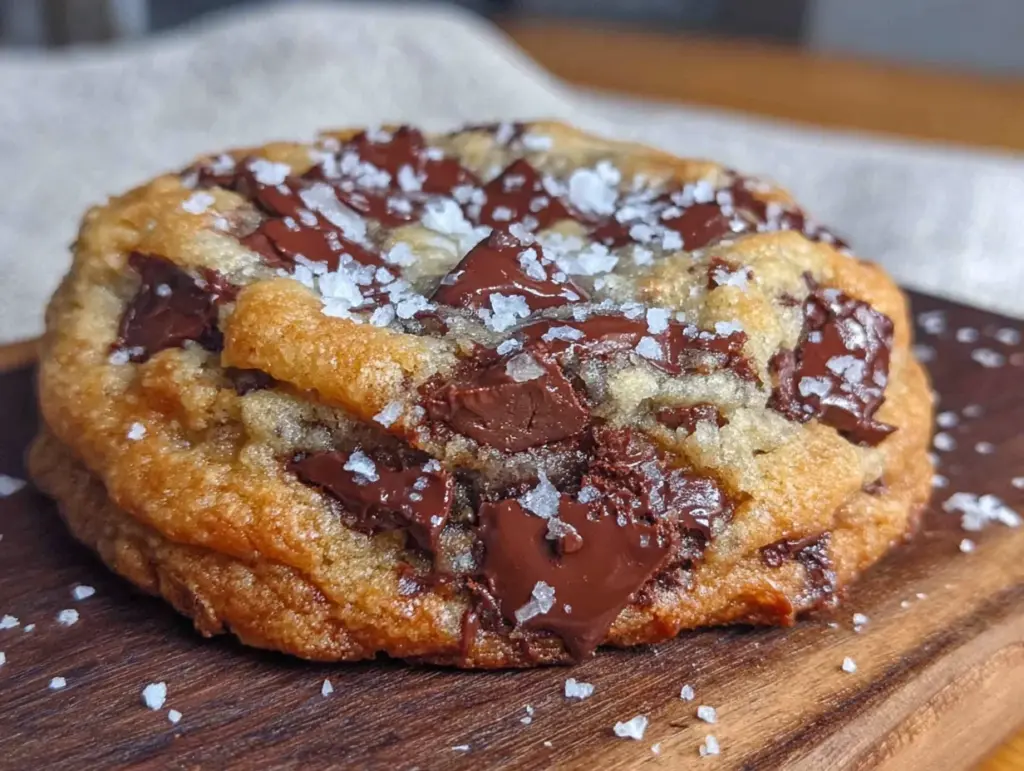
I’d been chasing the perfect bakery-style cookie for months. You know the ones—crackled on top, chewy in the middle, with those crispy, caramelized edges that shatter when you bite into them. The kind that make you close your eyes and forget whatever else was on your mind. I’d tried every trick in the book (chilling the dough overnight, using bread flour, banging the baking sheet halfway through), but something was always missing. Then I remembered a tip from a pastry chef I’d interviewed years ago—brown the butter first. Honestly, it felt too simple to be the answer.
I stood there watching the butter foam and turn amber, and the smell that filled my kitchen was like something between toasted hazelnuts and salted caramel. That’s when I knew this was different. The dough came together in a messy, flour-dusted rush, and by the time I was pulling the first tray out of the oven, I was already late. But I didn’t care. The cookies were perfect—crispy edges, gooey centers, and this deep, nutty richness that regular butter just can’t deliver. I grabbed a few for the road and walked in with a plate of warm cookies that stole the whole dinner. Sometimes the best recipes come from having nothing planned and everything to prove.
Why You’ll Love This Recipe
Let me tell you why these cookies are different from every other chocolate chip cookie recipe you’ve tried. I’ve tested this recipe at least a dozen times, adjusting butter temperatures, flour ratios, and resting times until I got it exactly right. These are the cookies I bring to every potluck, every holiday party, and every “I need to impress someone” situation.
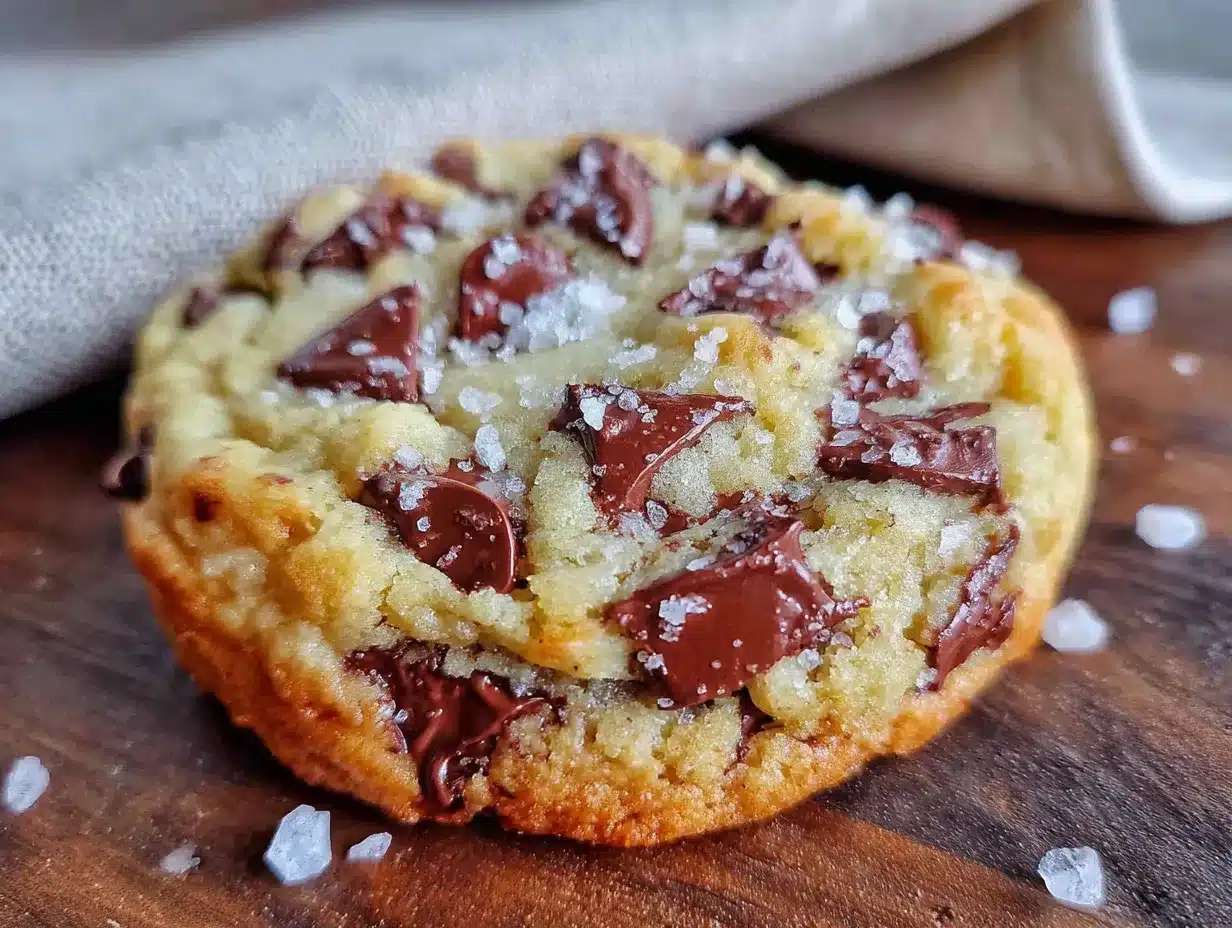
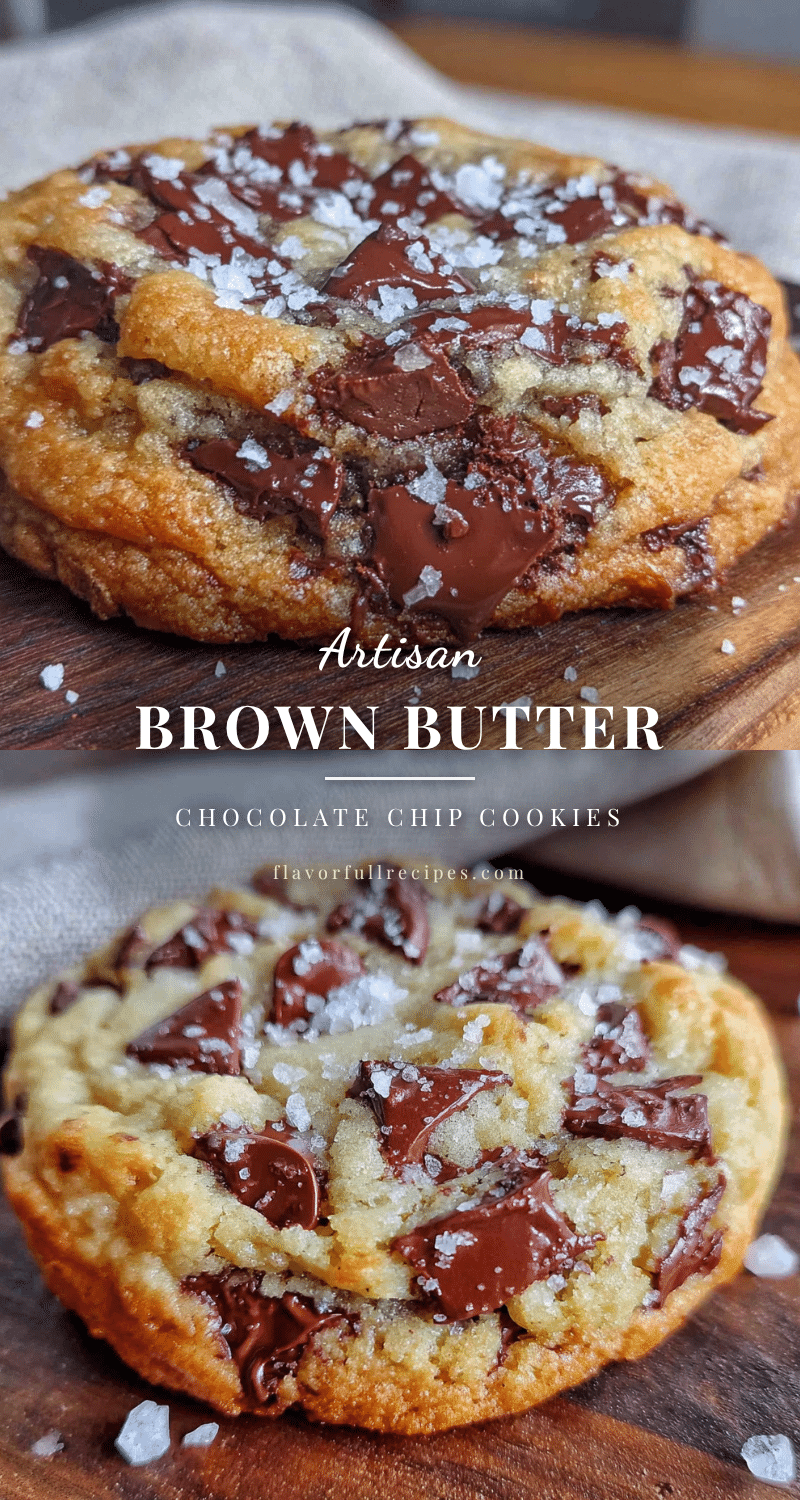
- Bakery-Style Perfection: These cookies have that signature crackled top, chewy center, and crispy edge that professional bakeries charge five dollars for.
- Brown Butter Magic: The nutty, caramelized flavor of browned butter transforms ordinary chocolate chip cookies into something unforgettable. You’ll never go back.
- Simple Ingredients: No weird add-ins or specialty flours—just butter, sugar, eggs, flour, and chocolate. You probably have everything already.
- Make-Ahead Friendly: The dough freezes beautifully, so you can bake fresh cookies whenever the craving strikes.
- Crowd-Pleaser: I’ve yet to meet someone who doesn’t ask for the recipe after trying one. Kids love them, adults love them, cookie snobs love them.
What makes these truly special is the combination of browned butter and the perfect ratio of brown to white sugar. Brown sugar gives you that chewy texture and molasses depth, while white sugar creates those crispy edges. The browned butter adds a layer of complexity that makes these taste like you spent hours in the kitchen, when really they come together in about thirty minutes of active work. This isn’t just another cookie recipe—it’s the one you’ll come back to again and again.
What Ingredients You Will Need
This recipe uses simple, everyday ingredients, but each one plays a specific role in creating that perfect bakery-style texture and flavor. Here’s what you’ll need and why each ingredient matters.
For the Brown Butter
- 1 cup (2 sticks) unsalted butter — I prefer using unsalted so I can control the salt level. Land O’Lakes or Kerrygold work beautifully here.
For the Cookie Dough
- 1 ½ cups packed light brown sugar — This gives the cookies their chewy texture and deep caramel flavor. Pack it firmly into the measuring cup.
- ½ cup granulated sugar — Adds sweetness and helps create those crispy, lacy edges.
- 2 large eggs, at room temperature — Room temperature eggs incorporate better into the brown butter. If you forgot to take them out, place them in warm water for 5 minutes.
- 2 teaspoons vanilla extract — Pure vanilla extract makes a difference here. I’m partial to Nielsen-Massey, but any good quality brand works.
- 2 ¼ cups all-purpose flour — Spoon and level your flour—don’t scoop directly from the bag or you’ll end up with dry cookies.
- 1 teaspoon baking soda — Helps the cookies spread and rise just enough.
- ½ teaspoon baking powder — Adds a little extra lift for that bakery-style puff.
- 1 teaspoon kosher salt — Don’t skip this. Salt balances the sweetness and enhances the brown butter flavor. I use Diamond Crystal.
- 2 cups semi-sweet chocolate chips or chunks — Use good quality chocolate here. Ghirardelli or Guittard are my go-to brands. You can also chop up a dark chocolate bar for those melty pools of chocolate (adds a rustic feel).
- Flaky sea salt for finishing (optional but highly recommended) — Maldon or any flaky salt adds that perfect salty-sweet contrast.
Ingredient Selection Tip: For the best flavor, use a combination of chocolate chips and roughly chopped chocolate bars. The chips hold their shape while the chopped chocolate creates irregular, melty pockets throughout the cookie. It’s a game-changer.
Substitution Guidance: If you’re out of brown sugar, you can make your own by mixing 1 ½ cups granulated sugar with 3 tablespoons molasses. For a dairy-free version, use vegan butter—just note that the browning process will be slightly different and may take longer.
Equipment Needed
- Medium saucepan — For browning the butter. A light-colored pan helps you see the color change.
- Large mixing bowl — For combining wet and dry ingredients.
- Whisk — For mixing the brown butter and sugars.
- Rubber spatula — For folding in the chocolate and scraping every last bit of dough.
- Cookie scoop (about 3 tablespoons) — For uniform cookies. I use a #20 scoop for that perfect bakery size.
- Baking sheets — Heavy-duty aluminum sheets work best for even baking.
- Parchment paper or silicone baking mats — Prevents sticking and promotes even browning.
- Wire cooling rack — Essential for cooling cookies properly so they don’t get soggy bottoms.
- Kitchen scale (optional but helpful) — For consistent cookie sizes. I weigh each dough ball to about 45-50 grams.
Budget-Friendly Tip: You don’t need fancy equipment. A good quality saucepan and baking sheet are worth investing in, but a regular spoon works fine for mixing, and you can use a measuring cup to scoop dough in a pinch.
Preparation Method
Follow these steps carefully, and you’ll have bakery-quality cookies every single time. Take your time with the brown butter—it’s the star of the show.
- Brown the butter: Place the butter in a medium saucepan over medium heat. Melt it completely, then continue cooking, swirling the pan occasionally. The butter will foam up, then start to crackle and pop. After about 5-7 minutes, the foam will subside, and you’ll see golden-brown specks forming at the bottom. The butter will smell nutty and toasty. Remove from heat immediately and pour into a large heatproof bowl. Let it cool for 10-15 minutes—it should be warm but not hot.
- Combine sugars and butter: Add the brown sugar and granulated sugar to the warm browned butter. Whisk vigorously until the mixture is smooth and glossy, about 1 minute. It should look like wet sand. The warmth of the butter helps dissolve the sugar, which creates that crackly top later.
- Add eggs and vanilla: Add the eggs one at a time, whisking well after each addition. Then add the vanilla and whisk until the mixture is pale, thick, and falls in ribbons from the whisk—about 2 minutes. This step is crucial for that bakery-style texture.
- Combine dry ingredients: In a separate bowl, whisk together the flour, baking soda, baking powder, and kosher salt. Make sure there are no lumps.
- Mix dry into wet: Add the dry ingredients to the wet mixture. Use a rubber spatula to fold gently until just combined. A few streaks of flour are okay—overmixing will make the cookies tough.
- Fold in the chocolate: Add the chocolate chips or chopped chocolate. Fold until evenly distributed. The dough will be thick, sticky, and utterly irresistible. Don’t eat it all now—trust me, the baked version is better.
- Chill the dough (this is non-negotiable): Cover the bowl with plastic wrap and refrigerate for at least 2 hours, or up to 48 hours. Chilling solidifies the brown butter, prevents excessive spreading, and allows the flavors to meld. I’ve tested it both ways, and chilled dough produces significantly better cookies.
- Preheat and prepare: When ready to bake, preheat your oven to 375°F (190°C). Line two baking sheets with parchment paper or silicone mats.
- Scoop and shape: Use your cookie scoop to portion the dough into balls about 3 tablespoons each (45-50 grams). Place them 3 inches apart on the prepared baking sheets. For that bakery-style look, gently tear each dough ball in half and press the rough sides together, leaving the craggy top exposed. This creates those beautiful, uneven edges.
- Bake: Bake one sheet at a time for 11-13 minutes, rotating halfway through. The edges should be golden brown and set, but the centers will look slightly underdone and puffy. They’ll continue baking on the hot sheet.
- Finish with salt: Immediately after removing from the oven, sprinkle with flaky sea salt. Let the cookies cool on the baking sheet for 5-7 minutes, then transfer to a wire rack to cool completely—or don’t. Warm cookies are a gift.
Cooking Tips & Techniques
I’ve made more batches of these cookies than I can count, and I’ve learned a few things the hard way. Here’s what I wish someone had told me.
Don’t rush the brown butter. This is where most people mess up. You want the butter to go from melted to foamy to golden amber with brown specks. If you pull it too early, you lose the nutty flavor. If you go too long, you get burnt butter (which tastes bitter, not nutty). Watch for the color change and that toasty smell—that’s your cue.
Temperature matters. The brown butter needs to cool before you add the eggs, or you’ll end up with scrambled eggs in your cookie dough. Let it sit for at least 10 minutes. Similarly, room temperature eggs incorporate more smoothly and create a better emulsion.
Chill the dough. I know it’s tempting to skip this step, but please don’t. The first time I made these, I was impatient and baked them straight away. They spread into flat, greasy pucks. Chilling for at least 2 hours (or overnight) solidifies the butter, which means the cookies hold their shape and develop those beautiful ridges and cracks.
Use a cookie scoop for consistency. Uniform cookie sizes mean even baking. If some cookies are bigger than others, you’ll end up with burnt edges and raw centers. Weighing each dough ball is the most precise method, but a good scoop works fine.
Bake one sheet at a time. I learned this after ruiding two batches in a row. Putting two sheets in the oven at once creates uneven heat distribution. Your bottom sheet will be pale while the top sheet burns. Bake in batches—it takes longer, but the results are worth it.
Embrace the underbake. Pull the cookies when the edges are golden but the centers still look soft and slightly puffy. They’ll set up as they cool on the hot baking sheet. Overbaked cookies are dry and crumbly, and that’s just sad.
Variations & Adaptations
One of the best things about this recipe is how versatile it is. Here are some of my favorite ways to switch it up.
Double Chocolate Chip: Replace ¼ cup of the flour with ¼ cup of unsweetened cocoa powder. Use white chocolate chips or milk chocolate chunks for a beautiful contrast. The brown butter adds a surprising depth to the chocolate flavor.
Brown Butter Pecan: Toast 1 cup of chopped pecans and fold them in along with the chocolate. The nutty pecans complement the brown butter beautifully. This is my go-to for holiday cookie exchanges.
Sea Salt Dark Chocolate: Use dark chocolate (70% cacao or higher) and double up on the flaky sea salt finish. The bitterness of the dark chocolate against the sweet, salty, nutty cookie is absolutely addictive.
Gluten-Free Version: Substitute the all-purpose flour with a 1:1 gluten-free baking flour blend (I like Bob’s Red Mill). Add an extra tablespoon of milk to help with moisture, and chill the dough for at least 3 hours. The texture will be slightly different but still delicious.
Vegan Adaptation: Use vegan butter (Miyoko’s or Country Crock Plant Butter work well for browning) and replace each egg with a flax egg (1 tablespoon ground flaxseed + 3 tablespoons water, let sit for 5 minutes). The browning process takes a bit longer with vegan butter, and the cookies will be slightly less chewy, but they’re still fantastic.
Spiced Brown Butter Cookies: Add 1 teaspoon of cinnamon, ½ teaspoon of nutmeg, and ¼ teaspoon of cardamom to the dry ingredients. These are incredible for fall baking and pair perfectly with a hot cup of coffee or chai.
Serving & Storage Suggestions
These cookies are best served warm, fresh from the oven, with a tall glass of cold milk or a strong cup of coffee. The contrast between the warm, melty chocolate and the crisp edges is pure heaven. If you’re serving them at a party, arrange them on a beautiful platter with a sprinkle of extra flaky salt on top—it makes them look (and taste) extra special.
For a fun dessert board, pair these cookies with some easy sheet pan nacho board with cowboy caviar for a sweet and savory spread that’ll impress any crowd.
Storage: Store baked cookies in an airtight container at room temperature for up to 5 days. Place a slice of bread in the container—it absorbs excess moisture and keeps the cookies soft. Replace the bread every couple of days if needed.
Freezing Baked Cookies: Freeze fully cooled cookies in a single layer on a baking sheet, then transfer to a freezer-safe bag or container. They’ll keep for up to 3 months. Thaw at room temperature, then warm in a 300°F oven for 5 minutes to revive that fresh-baked texture.
Freezing Cookie Dough: Scoop the dough into balls and freeze them on a baking sheet until solid. Transfer to a freezer bag. You can bake them straight from frozen—just add 2-3 minutes to the baking time. This is my favorite trick for having fresh cookies on demand.
Reheating: Microwave a single cookie for 10-15 seconds for that just-baked warmth. For a larger batch, pop them in a 325°F oven for 5-7 minutes. The edges will crisp up again beautifully.
Nutritional Information & Benefits
Let’s be real—these are cookies, not health food. But knowing what’s in them helps you enjoy them mindfully. Here’s the approximate nutritional breakdown per cookie (based on 24 cookies):
- Calories: 220-250
- Fat: 12-14g
- Carbohydrates: 28-32g
- Sugar: 18-22g
- Protein: 3-4g
- Fiber: 1-2g
- Sodium: 150-180mg
Health Highlights: Dark chocolate contains antioxidants and flavonoids that support heart health. Brown butter, while still butter, has a more intense flavor, meaning you can use less and still get maximum taste. The nuts in the pecan variation add healthy fats and protein. These cookies also pair beautifully with a cup of easy iced pumpkin chai latte for a cozy afternoon treat.
Dietary Considerations: This recipe contains dairy, gluten, and eggs. For gluten-free or vegan options, see the variations section above. The cookies are nut-free as written (unless you add the pecan variation).
Conclusion
These brown butter chocolate chip cookies have become my signature—the ones I’m asked to bring to every gathering, the ones that disappear first from the dessert table, the ones that make people close their eyes and sigh. And honestly, they deserve the hype. The nutty depth of the browned butter, the perfect chewy-meets-crispy texture, the melty chocolate in every bite—it’s everything a cookie should be.
I hope you make these and fall in love with them the way I did. Don’t be afraid to make them your own—add different chocolates, toss in some nuts, or double the batch because trust me, you’ll need them. And when you do make them, I’d love to hear about it. Drop a comment below, tag me in your photos, tell me how they turned out. Did you add anything fun? Burn the butter on your first try? (It happens. I’ve been there.) Let’s talk cookies.
Now go brown that butter. Your kitchen is about to smell incredible.
Frequently Asked Questions
Can I use salted butter instead of unsalted?
Yes, but reduce the added kosher salt to ½ teaspoon. Salted butter brands vary in salt content, so taste the dough (before adding eggs, if you’re worried) and adjust accordingly.
Why did my cookies spread too much?
This usually happens for one of three reasons: the dough wasn’t chilled long enough, the butter was too warm when you mixed it, or you used too much sugar. Make sure to chill the dough for at least 2 hours, and let the brown butter cool to room temperature before mixing.
Can I make these cookies without browning the butter?
You can, but you’ll lose that deep, nutty flavor that makes these cookies special. If you’re short on time, use melted butter instead of browned, and add an extra teaspoon of vanilla extract to compensate for the lost flavor.
How do I get that bakery-style crackled top?
The crackled top comes from the combination of brown butter, the right sugar ratio, and proper chilling. The warm butter dissolves the sugar, creating a shiny crust as the cookies bake. Chilling the dough solidifies the butter, which helps the cookies rise and crack on top instead of spreading flat.
Can I freeze the baked cookies?
Absolutely. Freeze them in a single layer on a baking sheet, then transfer to a freezer bag. They’ll keep for up to 3 months. To enjoy, thaw at room temperature or warm in a 300°F oven for 5 minutes. They’re almost as good as fresh-baked.
Pin This Recipe!
Best Bakery Style Brown Butter Chocolate Chip Cookies
- Total Time: 2 hours 42 minutes (includes 2 hours chilling)
- Yield: 24 cookies 1x
Description
These brown butter chocolate chip cookies have that signature crackled top, chewy center, and crispy edge that professional bakeries charge five dollars for. The nutty, caramelized flavor of browned butter transforms ordinary chocolate chip cookies into something unforgettable.
Ingredients
- 1 cup (2 sticks) unsalted butter
- 1 ½ cups packed light brown sugar
- ½ cup granulated sugar
- 2 large eggs, at room temperature
- 2 teaspoons vanilla extract
- 2 ¼ cups all-purpose flour
- 1 teaspoon baking soda
- ½ teaspoon baking powder
- 1 teaspoon kosher salt
- 2 cups semi-sweet chocolate chips or chunks
- Flaky sea salt for finishing (optional but highly recommended)
Instructions
- Brown the butter: Place the butter in a medium saucepan over medium heat. Melt it completely, then continue cooking, swirling the pan occasionally. The butter will foam up, then start to crackle and pop. After about 5-7 minutes, the foam will subside, and you’ll see golden-brown specks forming at the bottom. The butter will smell nutty and toasty. Remove from heat immediately and pour into a large heatproof bowl. Let it cool for 10-15 minutes—it should be warm but not hot.
- Combine sugars and butter: Add the brown sugar and granulated sugar to the warm browned butter. Whisk vigorously until the mixture is smooth and glossy, about 1 minute. It should look like wet sand.
- Add eggs and vanilla: Add the eggs one at a time, whisking well after each addition. Then add the vanilla and whisk until the mixture is pale, thick, and falls in ribbons from the whisk—about 2 minutes.
- Combine dry ingredients: In a separate bowl, whisk together the flour, baking soda, baking powder, and kosher salt. Make sure there are no lumps.
- Mix dry into wet: Add the dry ingredients to the wet mixture. Use a rubber spatula to fold gently until just combined. A few streaks of flour are okay—overmixing will make the cookies tough.
- Fold in the chocolate: Add the chocolate chips or chopped chocolate. Fold until evenly distributed. The dough will be thick and sticky.
- Chill the dough: Cover the bowl with plastic wrap and refrigerate for at least 2 hours, or up to 48 hours.
- Preheat and prepare: When ready to bake, preheat your oven to 375°F (190°C). Line two baking sheets with parchment paper or silicone mats.
- Scoop and shape: Use your cookie scoop to portion the dough into balls about 3 tablespoons each (45-50 grams). Place them 3 inches apart on the prepared baking sheets. For that bakery-style look, gently tear each dough ball in half and press the rough sides together, leaving the craggy top exposed.
- Bake: Bake one sheet at a time for 11-13 minutes, rotating halfway through. The edges should be golden brown and set, but the centers will look slightly underdone and puffy.
- Finish with salt: Immediately after removing from the oven, sprinkle with flaky sea salt. Let the cookies cool on the baking sheet for 5-7 minutes, then transfer to a wire rack to cool completely.
Notes
Don’t rush the brown butter. Watch for the color change and that toasty smell. The brown butter needs to cool before you add the eggs. Chilling the dough is non-negotiable for best results. Use a cookie scoop for consistency. Bake one sheet at a time. Pull the cookies when the edges are golden but the centers still look soft.
- Prep Time: 30 minutes
- Cook Time: 12 minutes
- Category: Dessert
- Cuisine: American
Nutrition
- Serving Size: 1 cookie
- Calories: 235
- Sugar: 20
- Sodium: 165
- Fat: 13
- Saturated Fat: 8
- Carbohydrates: 30
- Fiber: 1.5
- Protein: 3.5
Keywords: brown butter chocolate chip cookies, bakery style cookies, chewy chocolate chip cookies, homemade cookies, easy cookie recipe